I love hearts all year long (why confine them to February!?). I also love experimenting with my Evolution Die Cutter and combining it with cuttable metal sheets and embossing folders was a fun way to add a twist to a simple, rustic pallet. I adore the contrast of the shiny metal against the rough dark stained wood, and that touch of embossing makes it even extra special!
Monday, June 30, 2014
The last few months of my life have been insane,
and to add to that insanity I threw my daughter a birthday party right before we moved.
Last month I posted about the A-D-O-R-A-B-L-E
mini sugar cookie favor boxes I crafted...and finally (better late than never, right?)
I am showing you a simple but oh so pretty paper pinwheel centerpiece I made for the party as well. I used the same Chalkboard Paper Pack as I did for the favors...because it has to coordinate, right!?
Friday, May 30, 2014
I have been trapped under, beside, and on top of boxes...
but that aside, this month has been full of celebrations.
Most recently we threw my daughter a small birthday party
before we took off from California to Texas.
In general I like to keep my party favors useful or edible,
"everyones" favorite butterfly sugar cookies from the local bakery.
These sweet favors were so simple and made such a great presentation.
Here is how to make them.
Supplies
- Evolution Die Cutter
- Mini Pizza Box Die
- Paper of choice. I used Chalkboard Paper Pack (it is double sided so the inside and outside both look great.
- NOTE: (each box requires one half of a 12 x 12 sheet)
- Wax paper (to line bottom of the box)
- Sticky Thumb Adhesive
Embellishment
- Rosette Die
- Chalkboard Paper Pack
- button
- hot glue
Make it!
- Cut the paper in half. I used the Chalkboard Paper Pack because I LOVE the look and style but it is also 2-sided so you get a decorative inside and outside.
- Place the mini pizza box die on the Genius platform.
- Place the paper on top; top with the cutting mat.
- Run the pizza box die through the Evolution.
- When cut, bend at perforated lines.
- I used the Sticky Thumb Adhesive to keep the box secure. Just add it to the back and front of the box bottom, and the front of the lid.
You can be done here...but let's embellish!
- Cut one Rosette on the Evolution out of a coordinating paper. (you should be able to cut 2 rosettes from each piece of 6 x 12 paper)
- Bend the rosette at the perforations; use Sticky Thumb Adhesive to adhere the ends together
- Glue (with hot glue) the rosette to the top of the pizza box.
- Add a button or embellishment to the center.
NOW...
- I also cut small squares, that fit right in side the boxes, in wax paper to set the cookies on.
- Fill the sweet boxes with some sweets and you have an adorable and oh so yummy party favors!
I LOVE my Evolution (and the dies work with many other manual die cutters).
Use the code 504MAIN to grab a discount on your order!
What is your favorite favor from a party?
Wednesday, April 30, 2014
There are so many celebration happening in my life right NOW.
Milestone birthdays, births, bat mitzvahs, promotions, new jobs, new homes.
And, well I love celebrating these joys with my friends,
and I love to decorate and create sweet little details for them too.
Monday, April 28, 2014
We L-O-V-E dessert in this house.
Because of that I am always trying to come up with new ideas for simple
and somewhat-healthy options to satisfy our sweet tooth in a "good way."
Two big favorites in this house is my berry "cobbler" and the apple crisp (in a mug)
and today I share with you the latest fruit creations...
Honeyed Peach Crisp!
(and there are only 4 ingredients!)
Friday, April 25, 2014
I may have mentioned 1 or 100 times that I am moving to Texas.
I am busy packing my house...but I am also busy planning road trip and diving into all things Texas. When I received the Heat Transfer Material from Silhouette I knew I wanted to make something that paid homage to my home state of California but also celebrate my new adventure in Texas. After perusing the Silhouette Store, I found these graphics for Texas and California (for only 99cents!) and I knew what I was doing...
Travel Tote Bags that celebrate Route 66 and The Great American Road Trip!
Tuesday, April 15, 2014
I love fashion. And so does my daughter.
I used to sew all the time, and have been enjoying it again recently.
My daughter wants to sew too (we are slowly working on it).
She has recently started to ask me to make her clothes.
I look forward to getting settled in our new home so I can get a jump start on this.
For now we are both enjoying the Happy Homemade book by Yoshiko Tsukiori,
and my little girlie is quite busy selecting which pieces I "must" make her.
I received three books, 2 of which focus on children...but of course, the ladies (mainly me) cannot be left out! Sew Chic: 20 Simple Everyday Designs by Yoshiko Tsukiori is a collection of 20 patterns for easy to make fashionable pieces. There is an easy relaxed elegance to all of these pieces. I can see the tops, pants, and dresses working into any stylish ladies wardrobe.
In the back of the book is an envelope with the patterns. Although I have not used the patterns yet, I do have a background in patternmaking and the patterns in the book seem simple to use and straightforward.
These books are so easy to follow along, and are comprehensive in their information. But, I love the eye candy too - each book begins with a series of beautifully style photographs showcasing the garments. So chic!
The book focuses on some Basic Techniques, including basic tools, sewing tips, and how to make a paper pattern and place it.
Each garment has a very detailed and comprehensive diagram for sewing the garment together.
With the tools and tips provided in this book, making a few of these garments should be a snap...even for a beginner!
As I mentioned I also received a couple of other books.
I love that this book includes not only girls clothing but boys styles too.
How darn cute is this pullover Parka? Or the Boy's shirt?
My daughter was smitten with Girls Style Book.
Dresses, blouses, pants - all of them are so cute. I bet we make them all!
We are also getting ready to move from a fairly cool coastal climate to Texas and I think many of these items will be perfect for those warm (HOT!) summer days as well as transition into the other seasons!
Do you sew?
Thursday, April 10, 2014
I have loved every minute of Tickled Pink...
loved every minute of looking at links and reading amazing stories
and being inspired by amazing projects and recipes.
Then my life started flip flopping around and motivation left me.
I felt like I had received a huge gift when Meegan Makes
joined the Tickled Pink Team and I felt renewed again.
However, in the next couple of months, my life will change completely
as I move from California to Austin Texas.
I know that blogging is going to take a bit of a back seat as I adjust and help my children adjust, find new activities and start a new school. I cannot lie...I am excited and scared to death, but I owe it to the kiddos and husband to be totally present during this process. I also cannot expect you all to continue to link up while I cannot possibly visit links and create a worthy Tickled Pink post.
So for those reasons and many, many more...this is the LAST Tickled Pink
I want to take a minute to TRULY SAY "THANK YOU" to everyone who has linked up here week after week. I know some of you have been around since the beginning of Tickled Pink.
YOU ARE APPRECIATED!
This was so much fun for so long.
I looked forward to creating new projects and recipes and decorating my new home...and I look forward to visiting all of your blogs but just not as a part of Tickled Pink.
This was so much fun for so long.
I looked forward to creating new projects and recipes and decorating my new home...and I look forward to visiting all of your blogs but just not as a part of Tickled Pink.
|
Before I go...I must say a HUGE THANK YOU to Meegan. She was the best partner EVER. Full of enthusiasm, light, and energy. I am so happy to have shared Tickled Pink Times Two with her. |
I will really, truly miss Tickled Pink.
Thank you all!
Thank you all!
Monday, April 7, 2014
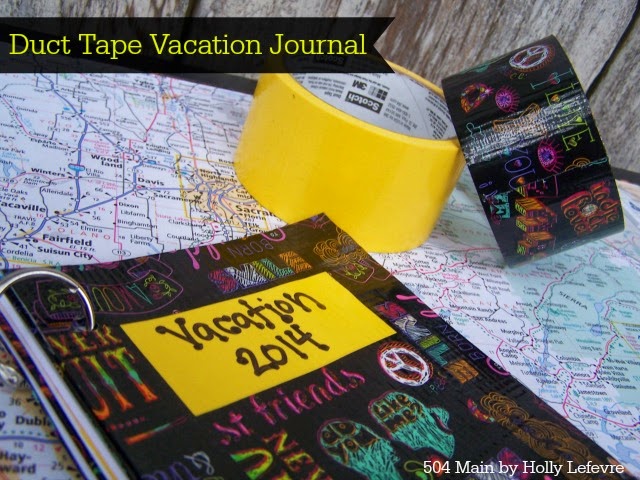
I am proud to be a 3M- sponsored blogger, and, as part of my
responsibilities, I get the opportunity to evaluate new products from
Scotch Duct Tape. I love creating new projects and I hope you love this one.
My family will be doing a lot of travel over the next few months.We are getting ready to move to Texas and making a lot of last minute sightseeing trips and visits to friends before we hit the road. And, I don't know about you, but my kids like to collect stuff when we travel. They save ticket stubs, magnets, brochures...and they LOVE maps. When we get home, what do I have left but a pile of stuff...but not anymore. I designed these super kid friendly and durable "Vacation Journals" for each kiddo to keep their "souvenirs" and information organized and in one place. And, oh yeah they work well for adults too!
Subscribe to:
Posts (Atom)