After school time - no any time - at our house is crazy busy. There are always new papers to fill out, new notices to read, homework to do, schedules to organize, activities to attend. Even with the craziness, I do have (thankfully) at least three givens everyday: The kids want a snack, they want it to be a "treat," and they want a little down time before starting homework. Well, they are getting their wish, and I am getting mine too - a quick go-to and sometimes on-the-go snack! Now, add in some fun activity time and the rest of our day is complete.
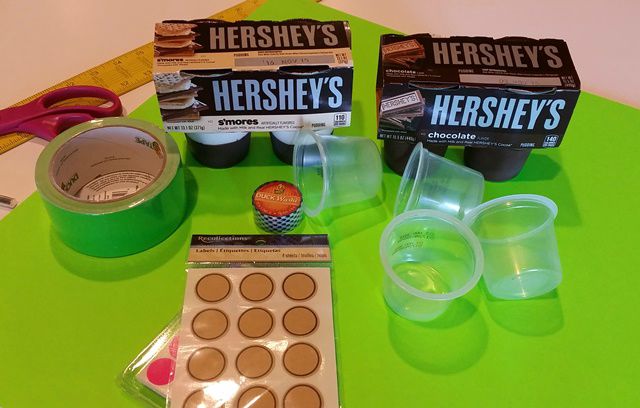
It's Hershey's, so of course there is rich and creamy chocolate made with real Hershey's cocoa...but they also have my favorite flavor in the whole wide world...S'mores! It is the perfect amount of sweetness and the perfect portion size! (and the sweet pudding cups are perfect for a craft!...just wait until you see what we created!)
If you want to try the delicious Hershey's Ready to Eat Pudding for yourself, head to Walmart and pick them up in the refrigerated section - you cannot miss that classic Hershey's look! Be sure to pick up the September/October issue of All You magazine for a 55 cent off coupon too! And, before you head to Walmart...check out the fun DIY Basketball Game we created using the pudding cups...and of course you can pick up all of the supplies to make it at Walmart too!
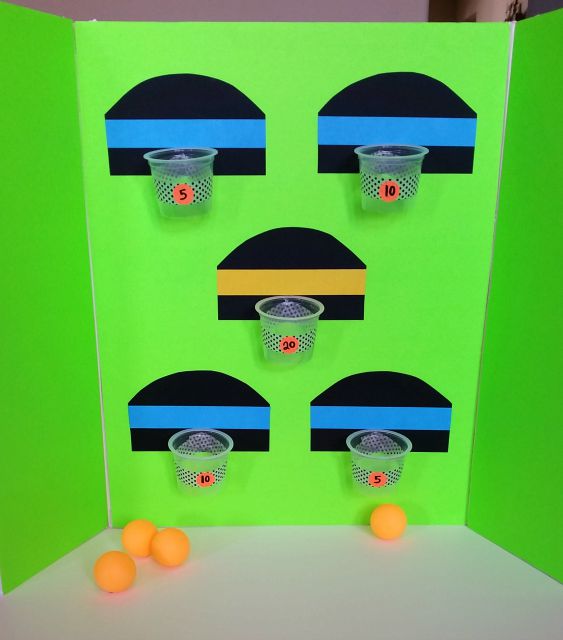
Now Let's PLAY! My kids are very different ages, so finding an after school activity that can keep them both occupied and not running in two different directions is a hard task. Like many kids, my kids love their electronic devices, but I want them to take a break from those screens...they need to take a break! My purpose of the after school "break" is just to give them a little release and get their energy back up. I was inspired by my kids love of arcade games to create this DIY Ping Pong Basketball Game.
Supplies
NOTE: There are so many ways to make this project your own. I happen to love little details and have a ton of craft supplies and tools... This project can be made much more simply (and less decorated) using items you already If all else fails, just glue those pudding cups onto mini backboards and let them have fun!
- 5 Hershey's Ready to Eat Pudding (cups), cleaned and dried.
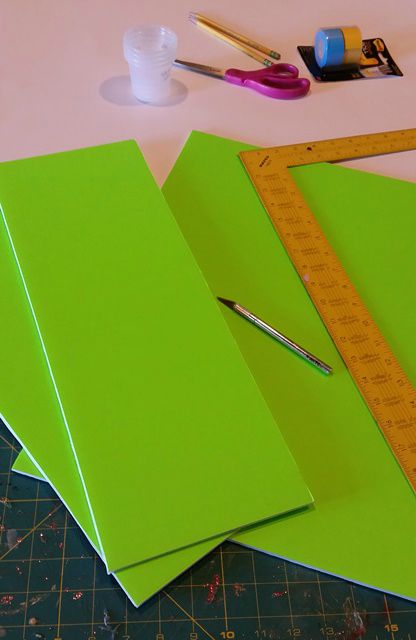
- 1 piece Foam board (20" x 30" in Neon Green). I used the Elmer's neon green board, but you can also use white or any color.
- Backboard Template, printed out
- X-Acto Knife and cutting mat or scissors - A craft knife (like an X-ACTO) works best.
- Metal ruler (preferably an L-square)
- Scissors
- Glue stick
- Hot Glue and glue sticks
- Cardstock in color of your choice (I used black) or scrapbook paper
- Tape:
- Washi-style Tape for decorating the baskets.
- Post It Adhesive Tape for decorating the backboard.
- Duct Tape in white for adhere the sides to the base
- Ping Pong Balls (sporting goods aisle)
- Mutli-color dots (office supply aisle)
- Sharpie
 Make It!
 Foam Board:
- Lay the foam board with the width horizontal (30" wide). Cut one piece 14" long and cut the remaining section into 2 equal parts, they should be about 8" wide, each. This is easiest cut with a sharp craft knife and the aid of a metal ruler or L-Square. Be sure to cut on a cutting mat or protected surface.
- (If you are not using pre-colored board, now is the time to decorate it.)
Backboards:
- Print out the Backboard template and cut 5 in the color/pattern paper of your choice.
- Add strips of colored paper, or decorative tape to decorate. I used Post It Note Adhesive Tape. It was placed 1" up from the bottom of the backboard.
- Use a glue stick and glue the finished backboard to the main board of the game.
Assemble the Board:
- Lay the main (larger) board face up; place each side board face down on top of the main board, matched up to opposing sides.
- I used small pieces of duct tape to hold my sides in place.
- Then, I used larger (the length of the board) pieces of tape to cover the entire seam (half the tape on the sides pieces, half on the main piece.). Trim the tape and the top and bottom.
- Prepare your pudding cups. First eat the pudding (over the course of a few days). Clean and dry the cups.
- Use an X-ACTO knife to cut the bottom out of the cup. I laid the cup upside down and gently pushed the blade into the fold where the cups turns up. Then, just gently follow that line around. If you find you have any edges that need trimming, use the X-ACTO or a pair of scissors. These edges were NOT sharp at all - the plastic is nice and pliable!
- Hershey's Ready to eat Pudding Cup to Basketball Hoop!
- Decorate the pudding cup: I wrapped black and white washi tape around the cup (the cup is angled, so it does not wrap in a straight line, but that's ok.) I also tried to use a sharpie and draw criss-cross lines on the cups...which is cute too.
- On the round labels, apply points to 5 different labels. Adhere them to the center of the pudding cups.
- NOTE: to make this educational, add (and change up) amounts/numbers based on the age of the child and ask them to try and score a certain number or combination of points.
- Add the pudding cups to the board. I used hot glue. You could use mounting squares. A glue stick really does not give it a strong enough hold.
- At the back of the pudding cup (where the washi tape came together) place a dime size dollop of hot glue. Immediately place it on the backboard. I lined up the top of the pudding cup to the bottom of the decorative stripe, centered. Push down on the sides of the cup (It will be warm.). Repeat 4 more times.
That's the last step! Now get out the ping pong balls (you could use bouncy balls...but those things tend to get a little crazy!) and start playing!
Check out the video too! I see many, many hours of friendly competition with this game!
A little video to show you the action!
Be sure to follow the Kraft Foods Facebook Page and the Kraft Foods Twitter feed for more great ideas!
How do you #ReadySetSnack?
What would you make with a pudding cup?
Grab a pack of Hershey's Ready to Eat Pudding and show us!
(And don't forget the coupon in All You Magazine!)
Grab a pack of Hershey's Ready to Eat Pudding and show us!
(And don't forget the coupon in All You Magazine!)


That's so cute Holly! I wanna' play too!
ReplyDelete