504 Main by Holly Lefevre
twitter facebook instagram bloglovin google plus pinterest youtube

Thursday, August 16, 2012

We are wrapping up our second week of school already.
I grew up not starting school until after Labor Day,
so I can barely wrap my head around this concept of school in early August.

Last years organizer

Every year I make a
Back to School Organizer
(I shared it last year on Meremade)

I do not make my binder pretty and cute -
for me this project is about function,
but I can imagine them all dressed up.
In fact, I may just make a fancy one with Duct Tape this year

I am perpetually disorganized, so I am just getting around to putting together our School Organizers. These very EASY organizers are actually more than just for school they are for life.

Joe's original Preschool binder (2005)


When I had one kiddo, I could keep it all straight in my head...but with 2 in school...not a chance! So, while I have been doing this since my son started preschool, back then it was for memory keeping...now it is necessity.

Again, let me reiterate that you can jazz these guys up as much as you want. I chose to keep mine simple. It is all personal preference!

It does not seem like it was that long ago Joe started preschool!

Here is how I keep my kids school/activity/sports schedules on track
(and more importantly me on track) !
 
Supplies (per binder):
  • 3 ring binder. I like a minimum of 2" 1-2 packages (I can always find these at Goodwill for like $2.00)
  • Clear sheet protectors
  • Tabbed dividers

DIY
1.  I like the clear view binders, so that on the cover, I can insert the school year schedule (info at a glance!)

2.  I also include a sheet in the front with a copy of the emergency info and all necessary school numbers/email...just in case my hubby needs to be updated or I am out of town, etc.

3.  Label each binder with the kiddos name - I just simply used stickers to put their names on the spine.
4.  Determine your categories.

My son's categories:

  • School Year Calendar
  • School Policy/Rules/Info
  • Class Information/Rules/Info (we need a section for EACH class in Middle School), Activities
  • Sports (also subdivided as different sports begin)
  • Mementos/Memories
  • Boy Scouts


My daughter's needs are simpler, it is Kindergarten after all!


  • School Year Calendar
  • School Policy/Rules/Info
  • Class Information/Rules/Info
  • Activities
  • Sports (also subdivided as different sports begin)
  • Art/Mementos/Memories (I save anything with hand or feet prints!)


5.  Slide the pertinent information into sheet protectors and insert in the correct section.

I like to keep about 5 extra empty sheet protectors in each section to make it easy to slip new info in. 

And that is it! Easy Peasy.

You want to know my favorite part of this...
apart from not forgetting anything or losing important paperwork...

I discover cute things like this:
my son and daughter's self-portraits
(same age, same school, 6 years apart!

 How do you stay organized during the school year...
I am open to any and all help!
Signature
Follow Me on Pinterest
Craft DIY IdeasA Crafty Soiree
 photo arrow.pngCONTINUE READING


Tuesday, August 14, 2012

I have always loved pickles, in ever way shape and form.
Grilled cheese must always be served with a big juicy pickle,
and I even created a pickles and cheese sandwich was I was a little girl. 
And a fabulous dill pickle alone was a huge treat!


One of my favorite things to do was buy one of those really ginormous dill pickles right out of the pickle jar at the neighborhood market. Last year I introduced my little one to the joy of a fresh, homemade dill pickle from a local restaurant. Jules loved them and went pickle and cucumber crazy. That's my girl!

I had always wanted to make my own pickles but I thought it would be too time consuming or too difficult for a mediocre final outcome. Well, the other day, while visiting and pinning away, I pinned a recipe for pickles. I clicked over to discover this recipe on Common Sense Homesteading for "no canning required dill pickles." Her post is full of other more technical information (about the salt, etc.), so I highly suggest checking it out if you are interested in trying this.

I did a little searching around and found some more information on this method. You can check out those articles on Pillsbury, Pick Your Own, Taste of Home, and Cooks.com.

So, after reading a bit, I bit the bullet and did it! I have my big beautiful half gallon Ball jars, I had the pickling salt (Morton's), and garlic. I picked up some small cucumbers and fresh dill at the grocery store. My cucumbers were not organic, but I will deal with that later.

So, here is what I did...and seriously, TRUST ME - this was so simple and these are the best pickles EVER! They flew out of my frig and I have another batch brewing...I made need another refrigerator to store my pickles (ha!).


INGREDIENTS
FYI: I do specify brand in some of the ingredient because that is what I used.

  • Small cucumbers (I did not specifically use pickling cucumbers)
  • Fresh dill (I used about 6-8 stalks of fresh dill)
  • 3-5 cloves of garlic
  • 1 1/2 cups white vinegar
  • 1/2 cup sugar
  • 1/3 cup pickling salt (I had Morton Canning and Pickling Salt on hand and that is what I used)
  • 9 cups water
  • Large stock pot
  • Large (half gallon Ball jars)
  • Cheesecloth and rubber band (for covering)
  • I also found a wide mouth funnel to be quite useful


MAKE IT!

  • Prepare the jars. I will be honest, I did not sterilize my jar for this batch. I washed it thoroughly with super hot water, but when I make a lot of pickles I will follow the correct canning guidelines.
  • Prepare the cucumber by wash them thoroughly and slicing a small amount off of each end of the cucumber.
  • Peel the garlic cloves (I slightly smashed my cloves)
  • Wash dill and pat dry.
  • Place about half of your dill stalk and garlic cloves in the bottom of the clean jar.
  • Place prepared cucumbers in the jar.


  • Combine water, vinegar, sugar, and salt in a large stock pot and boil for one minute.


  • Let it cool slightly.
  • Pour brine into the jar over the cucumbers.


  • I then added my remaining dill stalks to the top of the jar - it kind of kept the cucumbers down in the jar.
  • Cut a square of cheesecloth and place it over the top of the jar and secure it with a rubber band.
  • EDIT #1: I did not put a lid on the jar before placing the cheesecloth on it. Mine went into the frig after one day
  • EDIT #2:  THANK YOU to Laurie from Common Sense Homesteading for adding this in the comments: "While the pickles sit for a few days at room temp (before they go in the fridge), they need to breath because they will give off some carbon dioxide as they ferment in the brine. That's why you skip the lid until they go in the fridge. The cold temperatures slow down the ferment, so they might "burp" a bit when you open them, but otherwise a lid is preferred once they are in cold storage."


  • Let cool some more.
  • I placed mine in the back of my refrigerator for one week before testing them out. The recipes says they should be ready in a few days though.


I am not joking...
these pickles are the BEST!
I will have a hard time ever buying pickles again!


What do you think...do you love pickles? If so, you should try this!
Signature
Follow Me on Pinterest
Today's Creative BlogCraft DIY IdeasA Crafty Soiree
Full Circle Creations
 photo arrow.pngCONTINUE READING


Monday, August 13, 2012

I have been entertaining a lot in the last few weeks...
that mean trying out new recipes!
Most of the recipes had fairly simple ingredients,
which made it even more important have really quality ingredients
because the flavor were going to shine through.
A main component of many of my creations required an amazing olive oil.


I had recently been given some
It's bold and robust flavor was just what I need to push those
hors d'oeuvres and entrees to another level.

 photo arrow.pngCONTINUE READING


Friday, August 10, 2012

So very behind...so very behind...(and a lot tired!)...
and I may never catch up...but I tried.
But first....

If you are looking for
click away and head over.

Tickled Pink at 504 Main

Now...a warning...this post is LONG and photo heavy
(either are necessarily a bad thing)

This is a round up of the top viewed items in each category for the past few weeks! I could get lost in all the amazing links forever. You all are awesome! So that is why I decided to show you  want has been clicked a lot  - what you all are interested in!

Click on READ MORE to see the rest of the features!
I am using the read more...because this post is long.....
 photo arrow.pngCONTINUE READING


Thursday, August 9, 2012


Welcome to Tickled Pink!

What is going on with you?
My kiddos started school this week.
I can hardly believe it!
I am emotionally zapped.

GUESS WHAT?????
By Friday night I will have a
Compilation of FEATURES
from the last few weeks of Tickled Pink posted!
There are some AWESOME posts!

THANK YOU for continuing to visit and hang in there with me!

Click on READ MORE in the bottom left corner to get to the links
I am going to try and use this for Tickled Pink because this post gets really, really long!
Please let me know if you have any problems!

 photo arrow.pngCONTINUE READING


Tuesday, August 7, 2012

Hey all...this is a repost from about one year ago.
I have had a lot of emails and inquiries lately about this post...so I am sharing it again!
Enjoy!
*************************************
Last year I made a Family Chalkboard Command Center and Calendar with chalkboard paint (yeah!) and some simple ideas and supplies.

Truly,the eye-catcher of this project was the French-Inspired enameled tags
I made to use for the dates and to make the calendar customizable.

I so wish I could tell you I was the creator of this project...but I was not.
I first saw the enameled tags on In My Own Style,
where she was using a tutorial from Can't Stop Making Things
(the original tutorial is here)


Tags Supplies
  • Brass Key Tags, 1.5"
    • NOTE: I purchased mine at Ace Hardware in the key section (it is a key tag). Then I purchased some in bulk
  • Krylon Indoor/Outdoor Spray Paint, Dover White, Gloss
  • Rockler, Norton Sanding Bug
  • Newspaper or covering to protect surface
  • Clear number stamps and mounting block
  • StazOn Solvent Ink Pad, black
  • P.K. Glitz Ultra Thick Emboss Powder, clear ( you can use the embossing powder found at craft stores too...I happen to like PK Glitz products)
  • Electric Griddle( I suppose you could try this on a flat pan on the stove over low hear..BUT I have not tried it)
  • Old spatula or knife
  • Sheet of plain paper
DIY IT!
  • Scuff one side of the brass key tag with the Norton Sanding Bug (or sand paper) - Prepare more tags than you will need just in case of messes.
I had a very good helper!

Scuff 'em up!
  • Wipe clean
  • Protect your surface and prepare to spray paint
  • Layout the tags so that they are not touching
  • Using long smooth strokes, use the Krylon Dover White to paint the tags. I did multiple coats of paint.


  • Let dry completely.
  • Using the clear stamps, clear mounting block and StazOn Solvent Ink in black, begin stamping the number on your tags.


  • I centered the single numbers and eyeballed  where the numbers should go for the 2-digit numbers. For the 2-digit numbers, I would stamp the first number, and let it dry before stamping the second.
  • Let the ink dry.
  • Prepare your electric griddle by placing parchment paper on the surface to protect it. 
  • Preheat to 350 F.
  • I did 3 tags at a time - that seemed to be what I could manage without getting behind.
  • Place 3 tags on griddle and let them heat up for about 20 seconds.
  • Remove from griddle and sprinkle embossing powder all over the tag  - do this liberally. Let the powder just start to melt. 
  • Use the knife of spatula to CAREFULLY lift tag up. Shake off excess powder and replace on the griddle (on top of the parchment).
  • The powder begins to melt almost immediately. Once melted removed from the griddle and place on parchment paper to let dry. Continue until finished.


You may notice a nick here and there or smudge on some of the tags -
this happened when tried to go too fast.
This craft is not hard, you just need to be patient.
The imperfections don't actually bother me so much -
makes the tags look older and possibly more authentic.

NOTE: I actually have one of these tags on my key chain that I carry with me every day and it is still perfect!

    So, yeah...I LOVE my chalkboard command center.
    Check out that tutorial!

    Signature
    Follow Me on Pinterest
     photo arrow.pngCONTINUE READING


    Saturday, August 4, 2012

    You know it is not good when the weather forecast on your (smart) phone just says "FOG" in big black letters...It has pretty much said that all summer long.
    So sometimes you just have to make your own sunshine! And that is just what I did with my Sunshine (chalkboard) Pallet Art.


     photo arrow.pngCONTINUE READING


    Friday, August 3, 2012

    It is back to school time here.
    To me that means new socks and underwear for everyone along
    with the backpacks, school supplies, and clothing.
    My son has a very difficult time understanding
    or caring why new socks and underwear are a part of this "package"...
    but I am the mom...so I win!
    And I decided to surprise him and get him to step out of his comfort zone.


    Mario Lopez has a new line of underwear at Target  - MaLo Underwear - and I was given the opportunity to shop this line and let you know what I think....
    or more importantly what one of the men in my life thinks.

    Before I go on...I just have to tell you I have met Mario Lopez before.
    Anyone remember that show he was on back in the early 2000 with Dick Clark and Danny Bonaduce? Yep, I was on that show...and they were all very nice.
     photo arrow.pngCONTINUE READING


    Thursday, August 2, 2012


    A new writing gig!
    House hunting!
    Back to school shopping!
    Braces on the big kid!
    Daily life!
    Who else is crazy busy?

    Welcome to Tickled Pink 
    (the lamer edition where the host never
    does features because she cannot manage her time)

    So, Here's the plan...
    I am working on a major post with the top 5 viewed links form the last few weeks.
    Oh yeah, I will get it done...eventually!
    Happy Weekend!

    THANK YOU for continuing to visit and hang in there with me!

    P.S. Anyone know how to get that jump break thing to work? 
    EDIT - Looks like I got it to work!
    Click on READ MORE in the bottom left corner to get to the links
    I am going to try and use this for Tickled Pink because this post gets really, really long!
    Please let me know if you have any problems!

     photo arrow.pngCONTINUE READING


    Wednesday, August 1, 2012

    I have a very special guest today!
    And when you read her intro below…just know,
    I did not pay her for those sweet comments!
    Bethany from The Glamorous Housewife is here to cook for us! The last time I saw Bethany in person she was wearing a wedding dress (a GORGEOUS one) and more recently I was flipping through Country Living and saw her smiling at me.
    Yep, her charming and unique home was features in Country Living in June! 


    Now, here is Bethany….

    Hi everyone, my name is Bethany Herwegh and I am The Glamorous Housewife. I met Holly 13 years ago when I hired her to be my wedding planner. I can’t believe it has been so long! Holly was amazing at her job and I had the time of my life. My mother has gone on to have two more of her children married off and she says Holly was by far the best wedding planner she ever had the pleasure of working with. And if you knew my mom you would know that is a gold plated recommendation.

    Recently Holly and I reconnected through our blogs, and I am loving everything 504 Main! From cooking to crafting, Holly does it all with such style and aplomb. I am definitely inspired by her. 

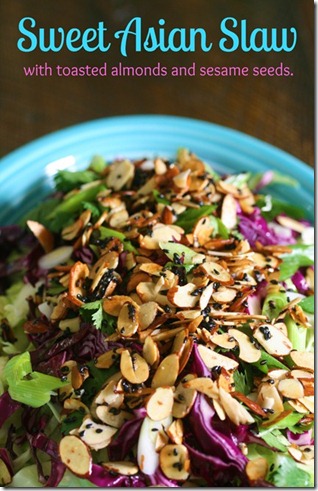
    sweet asian slaw_cover photo

    As an avid cook I wanted to share with the readers of 504 Main a favorite salad of mine:
    Sweet Asian Slaw.
    I have made this multiple times and whenever I serve it the bowl is licked clean. No seriously - I have had people actually use their bread to scrape out the last of the dressing! And the best part is how simple it is to prepare.

    I always start by mixing my dressing first. I have found the longer a dressing sits, the better it tastes. I often make my dressings a day ahead of time, or I make a big batch and just leave it in the refrigerator. This dressing should last at least a month in the fridge. But if you are short on time just make sure all the sugar has dissolved before you serve it.

    dressing 1.1

    In a jar I mix together:
     ½ cup oil - usually canola
    ½ cup rice vinegar
    1/3 cup sugar
    1-2 tsp of salt.
    • I give it a good shake and then leave it for the flavors to mingle together.
    • Next I melt 2-3 Tbsp of butter in a skillet on a medium to medium low heat.
    • Once the butter is melted I add ½ cup sliced almonds and 1 Tbsp sesame seeds and a few pinches of salt. NOTE: In the pictures I used black sesame seeds, but white works just as well.
    • I let those toast up to a nice light caramel color making sure not to let them burn. Then I place the mixture on a plate so they don’t continue to cook in the skillet. This is the easiest way to keep them from burning.

    slaw ingredients 1.1
    • After I toasted the almonds and sesame seeds, I open a bag of slaw.
    • In the photos I sliced my own cabbage, but this seriously is just as good with the bags of coleslaw you can get in the market. Or you can also slice your own cabbage- either way tastes fantastic.
    • To the cabbage I add 2-3 sliced scallions and a handful of chopped cilantro.
    • About 10 minutes before I serve I add the dressing to the slaw, sprinkle on the nuts and seeds, and toss.

    That’s it!

    Though the ingredients are simple the taste is an ideal arrangement of sweet, sour, and salt. You get a soft crunch with the cabbage, a green fresh pop from the cilantro and scallions, and then a hard salty crunch when you bite into the toasted nuts and sesame seeds. Together these simple items create a perfectly balanced salad that you and your family will love.
    sweet asian slaw served

    Doesn't this sound and look A-M-A-Z-I-N-G!
    I am so making this ASAP!

    glamorous housewife logo


    So ladies (and gentlemen) you must checkout Bethany’s blog.
    I love her about me page.
    I think I need to go to Bethany Bootcamp right about now!

    Signature
    Follow Me on Pinterest
     photo arrow.pngCONTINUE READING


    blogger template