Showing posts with label vintage. Show all posts
Showing posts with label vintage. Show all posts
Wednesday, January 27, 2016
Monday, February 25, 2013
This weekend was one crazy busy hoo-ha!
My kids had last week off and it was relaxing...
but we ended it with a bang.
I participated in our city's artwalk on Friday.
This weekend was also the fourth Friday of the month...
and to me, that means it is my favorite weekend -
time for our vintage wholesale market Pickings!
 |
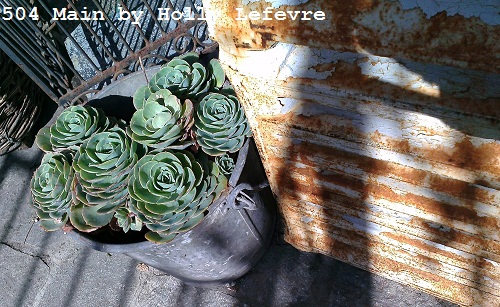
| Succulents and and iron grate |
Last month I sold my banners there,
but this month I shopped and my kiddos hosted a lemonade stand
(see more about that a bit later in the post).
 |
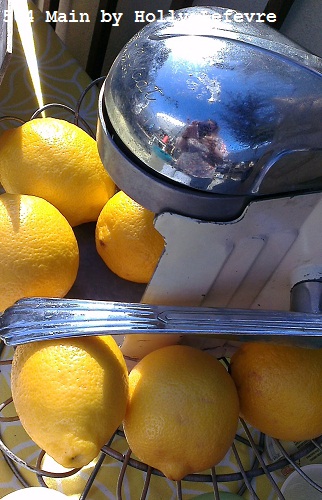
| Vintage Juicer |
I just wanted to share some of my eye candy from this weekend,
as captured on my HTC OneX phone.
This phone takes the most amazing photos - I am blown away.
These photos may have been cropped but not retouched/altered at all...
aren't they gorgeous!? ENJOY!
 |
| Miniature gardens in all sorts of magical vintage vessels. This is a creation of THE SILVER PLANTATION |
Wednesday, January 16, 2013
I am a teeny weeny obsessed with old bakeware.
I paint it...I use it for flowers, clocks, storage...
whatever I can think of!
I have had this vinyl for awhile...
and finally found the perfect home for it.
I really cannot apply vinyl to my walls
- way too bumpy and lumpy,
and the space I originally had this in mind for it...not so good.
BUT how can you get lost when you are accessorized with Cherry Red?
It's a showstopper now!
This is a super easy DIY
SUPPLIES
- Old rectangular metal pan - from thrift store...I paid $2.25
- Spray paint: color of choice. I used Krylon Dual Cherry Red Gloss
- Vinyl #1414, Design Divas (Only $10.00)
- Sand paper (optional)
- 1 DISChanger
- a plastic squeegee or credit card for smoothing vinyl
MAKE IT!
- Clean the pan. I also wiped it with rubbing alcohol (who knows where it has been and or for how long)
- Prepare and protect you surface with cardboard/newspaper/etc.
- Place the pan right (open) side down and spray in smooth even strokes, covering the entire pan. Repeat a second coat when the first is dry. Let dry completely.
- Flip pan over and spray wit at least 2 coats of paint, as per package instruction.
- Let dry.
Adhere Vinyl:
NOTE: The vinyl come in one length - it is meant to be placed on your wall in one length.
I cut out each word, carefully, trying to keep equal space (1/2" on the bottom and top) on the words.
- Now when you place the word on the pan you can measure to find the center, but for me, as some words were in a script, center did not look quite right...so use you eye to (dry) place the words.
- Once you are happy with the placement. I found it easiest to place the top word and then the bottom word, and then centering the two middle words.(use scotch blue tape to mark the place if necessary) Remove the backing from the vinyl, and place the word on the pan. Press firmly and rub over it with the credit card in all directions. Repeat with each word.
- Peel the covering off the vinyl carefully, swipe with the card again if necessary to adhere any places you missed.
- Take a DISChanger and moisten the back with a little warm water. Let it sit for 5 minutes. Take the prepared DISChanger and place it on the back of the pan. Let dry.
At this point, you can decide to distress the pan a bit or not. If so (and of course I am) I am just lightly running a piece of scrap sandpaper around the edges.
Hang up and enjoy your new piece of kitchen art!
This post is written and created at 504 Main by Holly Lefevre
disclosure: some products were provided to my from The DIY Club

Wednesday, September 19, 2012
One day while cruising around Facebook,
I noticed my friend posted about Goat Hill Fair.
I was so intrigued - antiques, vintage, artisan, fair...
close to my house. I was so there!
Better yet, I heard that Cathe from Just Something I Made was speaking.
I adore Cathe - she is super sweet and amazingly talented.
So I made plans, and lucky for me at the last minute
a friend decided to join me (FUN!). What a fun day
(it was steaming hot...of course I think hot is 60 degrees).
We got a wee bit lost, but made it there just in time for Cathe's talk.
So, that is where we will start...
Cathe brought sample of some of her creations, talked about how she made some of them, shared some tips and tricks, and we got a teeny tiny sneak peek of her book (coming out in Spring 2013!!)
Since we arrived a bit late...we had to move our tails to see everyone.
We spent most of our time at a few booths including:
purveyor of salvaged curiosities
LOVED her creations - old watches, sea glass, water spigots, old bakeware.
LOVE!
We LOVED Bombshell Betty Shop too!
Check out this bracelet!
The Junk Girls were lovely and creative and inspiring
Hand stamped jewelery,
tons of cool vintage finds
and bags of Findings (my fave!)
And to complete the eye candy,
my favorite sign (it did not go home with me)
And a shot of the fair!
So there is some eye candy.
I loved Goat Hill Fair and l plan on heading back for the next one, May 2013!
Stop by their facebook page to see tons more photos!
This post is written and created by 504 Main by Holly Lefevre
Tuesday, August 7, 2012
Hey all...this is a repost from about one year ago.
I have had a lot of emails and inquiries lately about this post...so I am sharing it again!
Enjoy!
*************************************
Last year I made a Family Chalkboard Command Center and Calendar with chalkboard paint (yeah!) and some simple ideas and supplies.
Truly,the eye-catcher of this project was the French-Inspired enameled tags
I made to use for the dates and to make the calendar customizable.
I so wish I could tell you I was the creator of this project...but I was not.
I first saw the enameled tags on In My Own Style,
where she was using a tutorial from Can't Stop Making Things
(the original tutorial is here)
Tags Supplies
- Brass Key Tags, 1.5"
- NOTE: I purchased mine at Ace Hardware in the key section (it is a key tag). Then I purchased some in bulk
- Krylon Indoor/Outdoor Spray Paint, Dover White, Gloss
- Rockler, Norton Sanding Bug
- Newspaper or covering to protect surface
- Clear number stamps and mounting block
- StazOn Solvent Ink Pad, black
- P.K. Glitz Ultra Thick Emboss Powder, clear ( you can use the embossing powder found at craft stores too...I happen to like PK Glitz products)
- Electric Griddle( I suppose you could try this on a flat pan on the stove over low hear..BUT I have not tried it)
- Old spatula or knife
- Sheet of plain paper
DIY IT!
- Scuff one side of the brass key tag with the Norton Sanding Bug (or sand paper) - Prepare more tags than you will need just in case of messes.
I had a very good helper!
Scuff 'em up!
- Wipe clean
- Protect your surface and prepare to spray paint
- Layout the tags so that they are not touching
- Using long smooth strokes, use the Krylon Dover White to paint the tags. I did multiple coats of paint.
- Let dry completely.
- Using the clear stamps, clear mounting block and StazOn Solvent Ink in black, begin stamping the number on your tags.
- I centered the single numbers and eyeballed where the numbers should go for the 2-digit numbers. For the 2-digit numbers, I would stamp the first number, and let it dry before stamping the second.
- Let the ink dry.
- Prepare your electric griddle by placing parchment paper on the surface to protect it.
- Preheat to 350 F.
- I did 3 tags at a time - that seemed to be what I could manage without getting behind.
- Place 3 tags on griddle and let them heat up for about 20 seconds.
- Remove from griddle and sprinkle embossing powder all over the tag - do this liberally. Let the powder just start to melt.
- Use the knife of spatula to CAREFULLY lift tag up. Shake off excess powder and replace on the griddle (on top of the parchment).
- The powder begins to melt almost immediately. Once melted removed from the griddle and place on parchment paper to let dry. Continue until finished.
You may notice a nick here and there or smudge on some of the tags -
this happened when tried to go too fast.
This craft is not hard, you just need to be patient.
The imperfections don't actually bother me so much -
makes the tags look older and possibly more authentic.
NOTE: I actually have one of these tags on my key chain that I carry with me every day and it is still perfect!
Subscribe to:
Posts (Atom)


