


You know it is not good when the weather forecast on your (smart) phone just says "FOG" in big black letters...It has pretty much said that all summer long.
So sometimes you just have to make your own sunshine! And that is just what I did with my Sunshine (chalkboard) Pallet Art.

There is a lot of back story on this project:
There is a lot of back story on this project:
- I LOVE sunshine.
- I was already working on one sunshine inspired pieces.
- I made this Faux Pallet Stenciled Piece about 2 years ago and I really like it...but when I made it I got a little carried away with the size...and there was no place to put it in my kitchen. I hung it in the family room, but as much as I liked it, it was never quite right.
- I make lots of stuff and am running out of room, so I need to revamp and update pieces.

This is a simple project that can be done on many surfaces - I used or reused my faux pallet, but canvas, plywood, even foam board or straight on a wall will work too. This sun is graphic and screams summer...and the colors remind me of a vintage surf palette (think OP in the 70's)...and it is a chalkboard too!
SUPPLIES
- Board/canvas/wall to paint on. NOTE: If you are painting on a wall determine your size and use a level and scotch blue tape to frame your art for painting on the wall.
- Paint. I mixed some colors to get exactly what I wanted (and to finish off some almost gone bottles of paint). You can easily just buy one color for each ray without mixing. I used DecoArt American Acrylic in: Orange Canyon and Cadmium Yellow, Winter Blue and Baby Blue; Cherry Red; Ebony.
- 1" foam brush.
- Sand paper
- Scotch Blue tape, 1"
- DecoArt Clear Chalkboard Coating
- Paint brush
- Optional: large bowl, pencil, ruler
MAKE IT!
- I started with this faux pallet stenciled piece. If you want to build your own faux pallet, there are directions on this post. There is also a great article linked from Poetic Home on why I will not use a real pallet in my home...hence, my faux pallet!

- OPTIONAL: I originally was going in a different direction than the final project. I first painted over the entire pallet with another color...this may not be necessary for you...what it does do is give a background color showing through once you distress the piece.
- Prep your surface by lightly sanding and/or cleaning. I was fine with my sun still having a distressed/rough feel so I just barely sanded the wood. If you want a smoother feel, sand more. Of course a wall or canvas will not require sanding.
- Use a large bowl and place it in the corner of the wood, with about 1/4 of the bowl on the wood and trace off with a pencil. I put my sun in the corner so that I could hang the piece horizontal or vertical (see photos below)
- Take the Scotch Blue tape and beginning at the sun outline, extend the tape out to the opposite side of the wood. I eyeballed it, but you could measure where you want your "rays" to end.

- Paint the rays of the sun and let dry. I made zero effort to make the painting perfect. The point was to make it look distressed and effortless

- Paint the sun, let dry.
 |
- Remove the Scotch Blue Tape

- Use the 1" foam brush and fill in the spaces between the ray colors with the black/ebony acrylic paint. Again, not perfectly filled in lines - distressed and effortless are key words!
- Outline the sun with the black as well.
- Let dry completely.
- Sand the piece a bit for additional distressing. Wipe clean

- Once dry, come back with the Clear Acrylic Chalkboard sealer and paint the entire piece in on direction. Let dry for at least one hour and then paint in the opposite direction. I repeated this process 2x. Let dry for 24 hours.

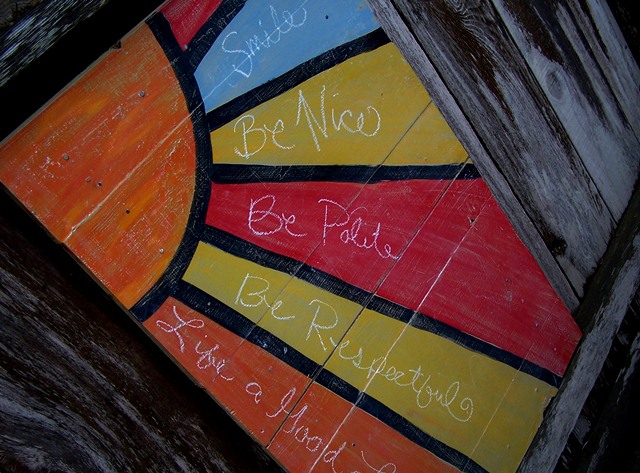
After 24 hours, rub all over with chalk and now you have a fun art piece that you can also write messages on!

This can be hung vertically or horizontally (since I am moving soon, I want it to be versatile!)

I wrote some of my favorite lyrics and poems and some sassy sayings
...best part is...totally changeable! Love that kind of art!


disclosure: some products may have been provided to me.


LOVE this Holly!! The colors are amazing! Gotta try that chalkboard coating!!
ReplyDeleteSo cute! And I love that clear chalk board coating!
ReplyDeleteThis is so lovely!! I never new a clear chalkboard product was even available - what a neat idea!
ReplyDeleteLOVE this Holly!! So bright and happy :) I love the chalkboard coating...how cool is that?!
ReplyDeleteKara
Love that! And I love that clear chalkboard coating ... it's so brilliant. Can't wait to try it.
ReplyDeleteAnd I'm with you on the pallets ... I love the look but my husband banned them after reading the same information.
LOVE this!
ReplyDeleteThis is really great Holly!! I love the colors you chose and I think it's just fabulous that it's a chalkboard too!
ReplyDeleteSuper cute, Holly, and I am LOVING the bright colors!
ReplyDeletelove it - didn't even know there was clear chalkboard coating...thanks so much for sharing!
ReplyDeleteLove it Holly! I've gotta try that clear chalkboard coating - too cool!
ReplyDeleteOh...I just love this...so HAPPY! hugs, mb
ReplyDeletep.s. I use the same painter's pallet....zoo pals....the ears are great for mixing colors : )
So cute! I love how bright and cheerful it is!
ReplyDeleteI am diggin this Holly! So happy!!! Malia
ReplyDeleteVery cute, Holly! I'm considering painting an entire graphite wall with the clear chalkboard coating. I bought a foam roller and will test out the sheen this weekend. I don't like my walls semi-glossy. Is the sheen fairly matte? Have a great weekend!
ReplyDeleteThis is so super cute Holly - you know I love it!! I featured you today! http://www.flamingotoes.com/2012/08/crush-of-the-week-think-pink-features-60/
ReplyDelete