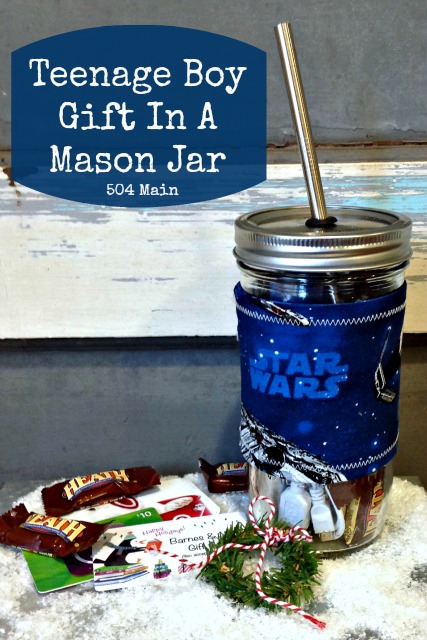
Buying Christmas gifts for my teenage boy is hard work! He has aged out of toys...well sort of, now he wants those very expensive electronic toys! LOL! It takes some thought to find smaller, affordable gifts that make him happy and make me happy. Of course, if I was going for "mom happy" there would be a vegetable-of-the-day club membership, a book, deodorant, and new socks, but you can imagine how well that would go over! Well, I think this year, I have collected a few affordable and necessary, "teenager-approved" items all nicely packaged in a Mason Jar!
Showing posts with label mason jar. Show all posts
Sunday, November 15, 2015
Labels:
#masonjarchristmasgiftideas,
ball jars,
candy,
Christmas,
christmas gifts,
DIY holiday gift,
easy gift,
electronics,
gift card,
gift in a jar,
holidays,
mason jar,
projects,
teen,
teenage boy,
teenager
Monday, December 9, 2013
I have had my eye on this fabulous Mason Jar Graphic
from The Graphics Fairy for quite awhile.
I made myself a flour sack towel with this graphic and
was thinking that as we enter the holiday season,
these towels would make a great gift -
who doesn't love mason jar (no one I know!)!
I decided to make them for our annual Favorite Things party
and I made a few more for simple gifts and hostess gifts.
from The Graphics Fairy for quite awhile.
I made myself a flour sack towel with this graphic and
was thinking that as we enter the holiday season,
these towels would make a great gift -
who doesn't love mason jar (no one I know!)!
I decided to make them for our annual Favorite Things party
and I made a few more for simple gifts and hostess gifts.
These towels are really easy to make...and do not cost too much...
but look like they do (the best kind of present!)!
or tie them with some bakers twine...
or come up with your own presentation.
However you package them...
they are sure to bring a smile to the recipients face!
SUPPLIES
- You will need: computer, color printer, and an iron/ironing board
- Mason Jar Graphic from the Graphics Fairy
- Flour Sack Towels. I usually purchase mine at Smart and Final but you can pick them up at stores like Target too. (on average they are about 1.50-2.00 each)
- Printworks White T-Shirt Transfer Paper (this is my favorite brand), I have purchased mine at Target in the past or you can get T-shirt transfer paper at office supply store and Amazon. (about 60-70 cents per graphic is you use 5 x7 printouts you can fit 2 images on each sheet)
Make It!
- I always wash and dry my towels first. They usually need to be pressed as well.
- Download the mason jar graphic.
- Using your preferred computer program, open the image and position it for printing. (I open with Windows Picture Gallery)
- I am able to get 2 - 5 x 7 images on one sheet of transfer paper.
- Under "Print Options," MAKE YOUR IMAGE "MIRROR" - YOU WANT THE WORDS TO BE BACKWARDS WHEN YOU PRINT IT...BECAUSE WHEN YOU IRON, YOU PLACE THE IMAGE FACE DOWN. THIS IS IMPORTANT!!!!!
- Print the image when you are satisfied. (refer to the directions on the package and your printer for specifics)
- Heat up your iron.
- Press the towel.
- Fold the towel in half, and if desired press a crease in the center.
- Cut around the jar, as close to the image as possible. I do not like to leave a lot of "blank" transfer paper around the edges...trimming makes for a cleaner look.
- Place the trimmed image face down in the center of the towel (use the crease you ironed in to help) and about 4-5" up from the hem. (see photo collage below)
- You should refer to the package directions...but here is how I do it.
- Some of these papers recommend you place a thin fabric or towel over the back of the image (essentially sandwiching the image between 2 towels). But I find the results are just fine pressing it directly on the towel (You should test it with your own iron and paper). Iron the image, pressing down firmly and keeping a constant motion cover all areas of the image (be sure to get those edges!). You may need to go over the areas multiple times (but really it only takes about 30+ seconds to transfer the image.)
- While the image/paper is still warm, being in the bottom corner and peel the paper backing off the image.
- I make these towels all the time, and while, over time, the image may fade a bit (it takes a long time), I have not ever had an issue with the image withstanding washings and regular use.
Simple as that all done.
Now to package them in a cute mason jar:
fold the towel so that the image is visible,
but there is little white left on the sides (about 3-4" wide),
and beginning at the opposite end from the image
(with the image face down) roll the towel, kind of tightly.
fold the towel so that the image is visible,
but there is little white left on the sides (about 3-4" wide),
and beginning at the opposite end from the image
(with the image face down) roll the towel, kind of tightly.
Simply place it in the jar, and put on the lid!
(I used a cupcake liner to decorate the lid)
These cute little towels make a great gift and are so easy to make, and cost about $6 when packaged in the mason jar!
Do you have any go-to gifting ideas?
Monday, June 24, 2013
Growing up the 4th of July was my favorite holiday. I loved the flags...the red, white and blue...the fireworks...the patriotism. I remember lighting fireworks in my grandparents driveway. It was so much good old fashioned fun!
We cannot set off our own fireworks where we live. Most of the big firework display have been cancelled...or the fog covers them up anyway. So I have to create a little 4th of July magic myself.
![]() |
| USA Banner Tutorial
So...here is the inspiration...My daughter LOVES snowglobes. I buy them anytime I see them at thrift stores. My daughter loves glitter (so do I)...so I have a feeling this project will be out year round. And believe it or not...in my overly-complicated world...this craft is pretty darn easy and quick!
|
SUPPLIES
- Baby Oil
- Small (or large jars). I used GLASS jars but you can also use PLASTIC jars for safety sake. I used small 4 oz. jars (from World Market) and a small half pint jelly jar. You can also just use any recycled jars from around the house.
- Gorilla Glue single use tubes
- Glitter (I like the big, inexpensive chunkier glitter for this)
- Sequins in various shapes
- OR use a punch and cut stars (or whatever shape you wish) out of aluminum cans...I succumbed to my love of Diet Coke and purchased a 6 pack just for this project. You can also buy thin sheets of aluminum at craft and hardware stores.
- Scissors
SAFETY FIRST: Gloves and heavy duty scissors or tin snips for the aluminum cans...if you choose do use that option.
CAUTION: If you use the aluminum cans...the edges can be very sharp. wear gloves or be very careful when cutting your can apart. I did this (NOT THE KIDS) and I punched the shapes from the aluminum (NOT THE KIDS).
MAKE IT
OPTIONAL: If you are making your "fireworks" with a punch, do this now. Wash out your aluminum cans (and let dry). Use heavy duty scissors (I did use an old knife to puncture the can near the top) and cut around the top until it is off (remember sharp edges). Cut straight down toward the bottom and then cut the bottom off. Now you have a piece of aluminum.
AGAIN CAUTION: If you use the aluminum cans...the edges can be very sharp. wear gloves or be very careful when cutting your can apart. I did this (NOT THE KIDS) and I punched the shapes from the aluminum (NOT THE KIDS).
- Place you stars, sequins, glitter into the empty glass jar.
- Fill the jar almost completely to the top with baby oil.
- Apply Gorilla Glue to the inside of the lid.
- Screw on the lid tight and let dry!
Shake away!
Enjoy the show!
Tuesday, February 5, 2013
You may not believe your eyes...I have another Valentines Project!
I am tickled pink with how this turned out!
And there is quite a story behind it!
Way back last year I started this project...
I loved it beyond belief.
Then I made a big mistake...
It was cold and wet outside, really cold and really wet.
I was not being careful - I was being impatient.
I thought it just need one more coat and it will be perfect...
well that perfect crackled and crinkled and ruined my sweet vase.
I may have shed a tear...or screamed.
And there was not time to start over...so I scrapped the idea.
But I had to try again...I will not be defeated
(but it may take a year...or two).
Tuesday, November 10, 2009
About 15 or so years ago when I was a single gal...who didn't cook - I mean, I occasionally baked chocolate chip cookies, stirred up some Rice Krispie treats, and threw together 7-layer cookies (the easiest, yummiest thing on the planet) - my mom bought me this book called Cake in a Jar. Great! Yipppeee!...What am I supposed to do with this? I kept it anyway.
Subscribe to:
Posts (Atom)