I have had my eye on this fabulous Mason Jar Graphic
from The Graphics Fairy for quite awhile.
I made myself a flour sack towel with this graphic and
was thinking that as we enter the holiday season,
these towels would make a great gift -
who doesn't love mason jar (no one I know!)!
I decided to make them for our annual Favorite Things party
and I made a few more for simple gifts and hostess gifts.
These towels are really easy to make...and do not cost too much...
but look like they do (the best kind of present!)!
or tie them with some bakers twine...
or come up with your own presentation.
However you package them...
they are sure to bring a smile to the recipients face!
SUPPLIES
- You will need: computer, color printer, and an iron/ironing board
- Mason Jar Graphic from the Graphics Fairy
- Flour Sack Towels. I usually purchase mine at Smart and Final but you can pick them up at stores like Target too. (on average they are about 1.50-2.00 each)
- Printworks White T-Shirt Transfer Paper (this is my favorite brand), I have purchased mine at Target in the past or you can get T-shirt transfer paper at office supply store and Amazon. (about 60-70 cents per graphic is you use 5 x7 printouts you can fit 2 images on each sheet)
Make It!
- I always wash and dry my towels first. They usually need to be pressed as well.
- Download the mason jar graphic.
- Using your preferred computer program, open the image and position it for printing. (I open with Windows Picture Gallery)
- I am able to get 2 - 5 x 7 images on one sheet of transfer paper.
- Under "Print Options," MAKE YOUR IMAGE "MIRROR" - YOU WANT THE WORDS TO BE BACKWARDS WHEN YOU PRINT IT...BECAUSE WHEN YOU IRON, YOU PLACE THE IMAGE FACE DOWN. THIS IS IMPORTANT!!!!!
- Print the image when you are satisfied. (refer to the directions on the package and your printer for specifics)
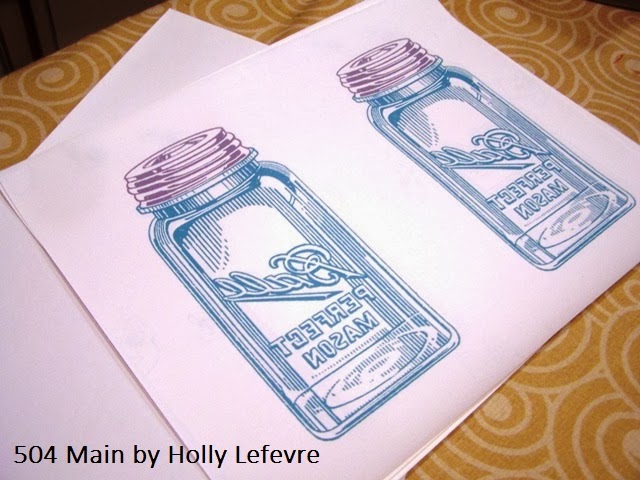
- Heat up your iron.
- Press the towel.
- Fold the towel in half, and if desired press a crease in the center.
- Cut around the jar, as close to the image as possible. I do not like to leave a lot of "blank" transfer paper around the edges...trimming makes for a cleaner look.
- Place the trimmed image face down in the center of the towel (use the crease you ironed in to help) and about 4-5" up from the hem. (see photo collage below)
- You should refer to the package directions...but here is how I do it.
- Some of these papers recommend you place a thin fabric or towel over the back of the image (essentially sandwiching the image between 2 towels). But I find the results are just fine pressing it directly on the towel (You should test it with your own iron and paper). Iron the image, pressing down firmly and keeping a constant motion cover all areas of the image (be sure to get those edges!). You may need to go over the areas multiple times (but really it only takes about 30+ seconds to transfer the image.)
- While the image/paper is still warm, being in the bottom corner and peel the paper backing off the image.
I
make these towels all the time, and while, over time, the image may
fade a bit (it takes a long time), I have not ever had an issue with the
image withstanding washings and regular use.
Simple as that all done.
Now to package them in a cute mason jar:
fold the towel so that the image is visible,
but there is little white left on the sides (about 3-4" wide),
and beginning at the opposite end from the image
(with the image face down) roll the towel, kind of tightly.
Simply place it in the jar, and put on the lid!
(I used a cupcake liner to decorate the lid)
These cute little towels make a great gift and are so easy to make, and cost about $6 when packaged in the mason jar!
Do you have any go-to gifting ideas?


 This post is written and created at 504 Main by Holly Lefevre


 CONTINUE READING