


about 5 days before Christmas...
A little late for starting an advent calendar, eh?
So, this year, I am so "on it"...here is is again!
Right before Thanksgiving!
Maybe a little project to play with this weekend?
I have made a few little updates/tweaks.

First off, I must tell you that I am not a
crazy-freaky-everything-has-its-place tree person...
if you are, I still love you...but I am not.
Generally, after the kids attack the tree, I add my touches, the garland, crystals, gems, and snowflakes. My fondest memories are of decorating our tree and my mom let us do pretty much whatever we want.
I have adopted that attitude...for now.
One day these kids will have their own tree and then it is my turn!
I have adopted that attitude...for now.
One day these kids will have their own tree and then it is my turn!

So, our family has one advent calendar - for a long while that was enough...
Problem #1...
the little one wants her own calendar.
the little one wants her own calendar.
Problem #2...
the kids are infatuated with decorating the tree.
The little one take ornaments off just so she can put them back on.
the kids are infatuated with decorating the tree.
The little one take ornaments off just so she can put them back on.
Solution...
A new advent calendar that involves hanging things on the tree for 25 days!

A new advent calendar that involves hanging things on the tree for 25 days!

SUPPLIES


- Basswood boards, 3" x 24"
- DecoArt American Acrylic in Ebony...OR...UPDATE: If I was making these again, I would now use DecoArt Chalkboard Paint.
- DecoArt Glamour Dust in Ice Crystal
- DecoArt, DecouPage, matte
- Rockler, Norton Sanding Bug
- Rockler foam brush
- Dremel Multi-Max with cutting blade or Saw - hand, electric - whatever you prefer
- Drill (I need a new one my rechargeable one is on its last leg- Santa are you listening? Santa did not hear me last year...so I make one more plea...)
- Paint pen, white or white paint and small brush
- Pencil
- Print out of the numbers in font of your choosing
- Ribbon, twine, cord, wire for hanging
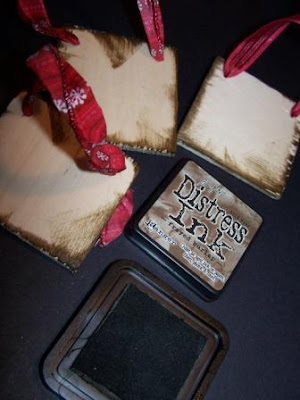
- Distress Ink, Frayed Burlap
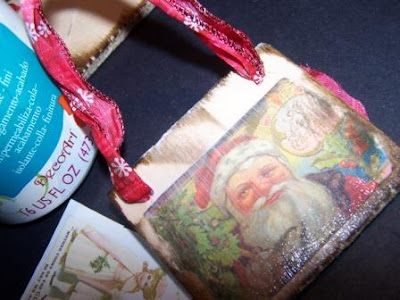
- Vintage Christmas Images from The Graphics Fairy (the first time I made these I did not use images on the reverse - this is how I am updating them for 2011!)

There are so many ways to personalize this and adapt this project to your liking. Use different images, different colors - you name it!
DIY IT!
1. Paint each basswood Board with the ebony/chalkboard paint.UPDATE: If using chalkboard paint, paint; Let dry and cure according to the directions; rub chalk all over; wipe off; prep for numbers.

(My original tutorial used black stencil paint)
3. Sand all edges with the Sanding Bug to remove sharp edges and rough patches. This also gives the edges a distressed look, which I ended up loving. (NOTE: You can cute the boards first and then paint for a less distressed look).
4. Drill 2 holes in each pieces about 3/4" in and 3/4" down on the top. This also splits the boards a little (NOTE: If you choose to cut your board prior to painting, drill holes then as well)

6. For the numbers, now, we go old school...
A. Cut out the numbers/dates.
B. Take a pencil and on the back side of the print out, rub pencil lead using the side of the pencil on the lines of the font.
C. Then flip over position on the square, correct side up.
D. Using the pencil trace the lines of the numbers/date. You get a faint outline of the date in the font you desire.
E. Then use the paint pen or you paint and a paintbrush and go over the numbers. Let dry.

7. Once this is all dry, glam it up a little with some DecoArt
Glamour Dust. I am so in love with this paint...it creates a subtle
sparkling finish...beautiful. I just paint all over the front

8. Once dry, distress the edges of the numbers by running them through the ink.
9. Once the number side is dry, add the image to the back. Cut/trim/tear image to size; apply a thin layer of decoupage to the back using a foam brush; apply image; apply another layer of Decoupage over the image and let dry.
8. Once dry cut ribbon into lengths of about 10" (it can be longer or shorter). Thread through, from the back side, into each hole. Knot on the front side and you have your hanger.

8. Once dry, distress the edges of the numbers by running them through the ink.

(my ribbon is already on the numbers, because in this tutorial I am adding to last years project...if you are starting fresh add the ribbon at the end)

8. Once dry cut ribbon into lengths of about 10" (it can be longer or shorter). Thread through, from the back side, into each hole. Knot on the front side and you have your hanger.

So, you can leave these little guys "plain" -
meaning just the numbers on one side or you can add a touch of vintage magic.
I know Jules will love this new "flip-flop" addition!
meaning just the numbers on one side or you can add a touch of vintage magic.
I know Jules will love this new "flip-flop" addition!

Do you use an advent calendar?
Any special traditions that go with it?
Happy Thanksgiving!
I am taking a few days off!
I'll be back for Tickled pink on Friday!

Happy Thanksgiving!
I am taking a few days off!
I'll be back for Tickled pink on Friday!


I love this idea- what a great job!
ReplyDeletehttp://www.thechattymommy.com
Cute idea, Thanks for sharing!
ReplyDelete~Mrs. Delightful
ourdelightfulhome.blogspot.com
You always come up with such great ideas ~ I love this one! I have a free day over Thanksgiving break and now I know what I'll be doing :)
ReplyDeleteJo
I love this! I'm glad you showed it this year in plenty of time for slow pokes who can't just whip something out in ten minutes. (Like me)
ReplyDeleteHi, Holly
ReplyDeleteI just love this project. It turned out lovely! Thank you for stopping by Home Sweet Butterfly. I really appreciate it. Happy Thanksgiving.
Vanessa
This is such a lovely idea for an Advent. Have a great few days off, Happy Thanksgiving.
ReplyDeleteI loved this when you shared it last year, Holly. I'm hoping to get my advent calendar made before Christmas gets here this year! :)
ReplyDeleteThis is amazing Holly. I'm um..well not so ready?!
ReplyDeleteThis is so cute! We don't have an advent calendar, but I have such fond memories of our when we were little. I really should make this! Thanks for sharing, Holly!
ReplyDeleteAdorable!!! And I have that ink! =) Ooooh
ReplyDeleteHi! I haven't "seen" you in a while. I love the advent calendar. I quit putting one out when the kids left home, I should do that again. I am a fussy, everything has its place tree person. But, when my kids were home (or even if they came here for Christmas) I had two trees. A family tree and a fussy tree!
ReplyDeleteHello, this is the first time you step on your blog and I really like.
ReplyDeleteYou have a new follower!
Skip to visit me, I'd appreciate your views on my page .. about a project that is close to myheart. Starting with beautiful and unique pieces "Vintage", becomes all the mostunconventional and different from what's out there .. a way to go a bit counter, but definitely something that guarantees originality and style .. the style that everyone has within himself.
A hug ♥
Valentina
Staff PIUSC!
I absolutely love this idea Holly!
ReplyDeleteSuch a cute idea Holly! My boys look forward to the advent calendar every year. Hope you had a blessed Thanksgiving holiday!
ReplyDeleteHi Holly, thanks for sharing such a great tutorial for making the advent calendar. This is a very nice one. I have recently found your blog and am now following you, and will visit often. Please stop by my blog and perhaps you would like to follow me also. Have a wonderful day. Hugs, Chris
ReplyDeletehttp://chelencarter-retiredandlovingit.blogspot.com/
Sweet idea!
ReplyDeleteLove this idea!
ReplyDelete