504 Main by Holly Lefevre
twitter facebook instagram bloglovin google plus pinterest youtube

Monday, December 19, 2011

I am also a little obsessed with trees this year. I had plans to get crazy with little vignettes of trees everywhere...well, it did not happen...yet (Every year I am crafting and creating until the last minute...well, I still have 6 days left...so technically not the last minute, right? I still have time.)

Anyway, I still LOVE my trio of trees from last year, but had to make more trees!! Now these trees are very different than last years trees...
THESE ARE SO EASY TO MAKE.
It took me about 30 minutes to make them all!


SUPPLIES

  • 3 - Styrofoam Crafts 5 7/8" Cones
  • 1 Sheet Canvas Corp Chalk Stock
  • Gorilla Glue Super Glue
  • 1 box floral pins with pearl head (you may or may not use the entire box - I used about 20 per tree)
  • Cotton fabric - I used scraps around the house. You only need about 1/4 yard
  • 6 - Skewers (or 3 - skewers and 3 -  Toothpicks)
  • 3 - Pearls or beads Glue stick


If you can rip and pin/stick things in Styrofoam...
you can do this craft

1. Lay fabric flat and make 1/2″  cuts about every 1/2″ along the selvage of the fabric


2. Rip fabric using the small cuts as the starting points
(There will be lots of strings and frayed edges – and that is good!)

3. At the base of a cone use a floral pin to secure a strip of fabric. Begin wrapping that strip of fabric all around the cone, overlapping edges slightly.


4. When you reach the end of a strip, grab another strip and secure the first strip to the second strip with a fabric pin – just stick in the Styrofoam, being sure to secure the end and beginning of the strips.

5. Continue to wrap until you are finished (I used about 2 strips per cone for wrapping..if you use a larger cons, you will need more strips.) when you reach the top wrap around the top to cover the Styrofoam (you will be placing a toothpick in here so, try to keep a little space open in the center to poke this in). Secure the strip to the top with a pin.


6. You can be done if you want..or I used one more strip – secure to the top with a floral pin (you can secure it using the pin you just inserted to finish off the wrapping). Twist this strip of fabric and then wrap around the tree, like a garland – you are not wrapping to cover just to accent. Finish off the end with a floral pin.

7. Decorate the tree with floral pins – by using the pearl headed pins to secure the fabric, you are also decorating, so just keep doing it.


8. Place a skewer in the bottom center of the cone. You can then place the trees in anything you want. I kept my skewers long and used my milkglass vases to display them. You can grab some floral foam and tuck them into many different types of containers.


Add some FUN with Sweet Little Pennants of JOY!!
I made some pennant ornaments using Canvas Corp paper the other day and these tree  topper pennants were inspired by those.


Now, I made 3 trees and wrote JOY on the pennant,
but these are easily adaptable to any wording and so EASY to finish.

You need:
skewer or toothpick
chalkstock or heavier paper
pearl (with hole) or other embellishment
Gorilla Glue Super Glue
Glue Stick

Place small drops of Gorilla Glue Super Glue on the tip of the skewer and then place pearl/bead on the point (insert the point into the pole).
 

Cut 3 pennant triangles on the fold in chalkstock (I used my decorative edge scissors to cut the edges). My triangles are 2″ wide at the top/fold and 3″ long.

7

Place glue allover the inside of the pennant, place skewer in the fold; press both sides of chalkstock together.


Cut (or I just broke them) the skewers to the desired size, at least a few inches long.


When dry, insert into the top of the cone…I mean tree!


What are you lovin' this holiday season?
Signature
disclosure: some products were received via my affiliation with The DIY Club. See me full disclosure by clicking on disclosure in the top navigation bar
This post is written and created at 504 Main by Holly Lefevre
 photo arrow.pngCONTINUE READING


Saturday, December 17, 2011

I love sweets! I love making them and serving them. I am always looking for new ways to display and serve them. I received a Cupcake Tree from Canvas Corp. This is a fun and cute 3 tiered tower for serving cupcakes...but it is good for so many things...

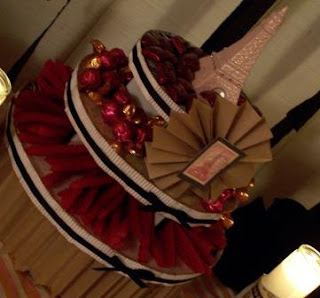
I used it at my Bridesmaids party for candies and treats...
I also made another for the mini cupcakes at the SoCal Social...
And now I am using if for Christmas!


I think it is adorable for serving just about anything...but can you imagine how cute this would be for a cookie exchange...and guess what I have New years Eve Plans for it too! 


Supplies:
  • Cupcake Tree from Canvas Corp.
  • Decorative paper (without flocking or glitter - plain is best). I used scrap book paper (and I used Canvas Corp paper for the Cookies Tower)
  • Scissors and or X-ACTO knife
  • Adhesive: I used hot glue and a glue stick
  • Trim for all: I used - Canvas Corp corrugated paper - white - 12x12,  a distress ink pad, black grossgrain ribbon, lightweight craft paper.
A. For  the Bridesmaid party: a rosette of the craft paper and a vintage graphic.
Chocolates and candies at the Parisian Themed Bridesmaids party


 B. For the SoCal Social - canvas paper printed with the hibiscus "logo."
Mini Cupcakes at the SoCal Social
 
 C. For the Holiday Treat Tower - Canvas Corp paper, rosettes cut with my Lifestyle Crafts Epic 6, buttons.  
Cookies and boxes of surprise treats for the holidays!


DIY IT!


The Tree comes already cut and ready to be put together - you get to decorate it to match your event. As much as I wanted to add glitter and sparkle, I did not. I used only accessories that would not interfere with the food or taint the food (no glitter or fuzzy trim). Here is how to make it!


Go read all about how to create a fun and fabulous Cupcake Tree (or Tower of Treats!) at The DIY Club!

DIY Club

What is Your Favorite cookie???
Signature
Disclosure: Some products have been provided to me through The DIY Club. See my disclosure policy by clicking "disclosure" in the top navigation bar
 photo arrow.pngCONTINUE READING


THANK YOU to all that entered the recent giveaways!
I use random.org to pick my winners
**************
 The winner of the Purdy Paintbrush Set is Mary Ellen from Mary's Meanderings
**************
The winner of the Walmart Gift Card provided by Elmer's is Debby from Cozy Blanket


Please send me an email with your shipping information.


THANKS AGAIN to these great companies and to all of you!

  Signature
 photo arrow.pngCONTINUE READING


Thursday, December 15, 2011

Happy Friday!
(sorry this is late)
Who is ready for the holidays?
I am almost there, but more importantly, I am not stressing about about them. I truly want to enjoy the season and if that means all of my decor is not out and my tree still is not finished, this year I am "OK" with that.

It also means that I have not finished responding to comments from last week either - sorry!

Thanks to everyone who entered the Hodgson Mill giveaway.
Junk Loving Girl was the winner!

The Elmer's $50 Walmart Gift Card is still happening for a few hours...click on the Elmer's logo on the right of the blog. You have until midnight 12/15/11 PST
_______________________________________________________________
NOW
I just have to share my FAVE project (that I did) this week.
It is just FUN and EASY-PEASY!
Pennant Ornament
_______________________________________________________________
 You can still link up your GOLD PROJECTS!
I am Day 10 of the 12 Days of Holiday DIY
and my color is GOLD!
You have a chance to win some Dutch Boy and Krylon!
Here is the linky!
You can also check out my Pinterest Gold Board and I am pinning the link ups!
_______________________________________________________________
Have you checked out LinkyHere
A new linky party directory!
It is awesome!
_______________________________________________________________
FEATURES
A poignant message from I am a Mother Seeking...

*****
Perfect for all of that cooking decorating!
How to make your own colored sugar from Mom on Time Out

*****
How cute are the Gingerbread sidecars from Fudge Ripple!?
*****
I just love denim and these stockings from Babblings and More are CUTE!

*****
A Winterlicious Mantel from Anythingology


*****
Adorable Snowman from My World Made by Hand


I just want to say a BIG THANK YOU to everyone
who links up, reads, and visits. I truly appreciate it.

So, go on over and LIKE 504 Main on Facebook!
I am also inviting you to share your
link on my FaceBook wall.

Please no giveaways or etsy shops or "please follow" messages,
but whatever you link up here, feel free to share the link on my Facebook Wall.
(be sensible peeps...I reserve the right to DELETE!)
If I feature you on Facebook or twitter, be sure to grab a button HERE!

Have a GREAT weekend!
Signature

NOW FOR TICKLED PINK!
A craft...a recipe...a tip...a party...a short story...a  poem...
a  fashion find...a  favorite product...your favorite  post...
whatever makes  your blog  fabulous!
That is what Tickled Pink is all about!
{and it does NOT have to be PINK}

Grab a button HERE!
or here!
504 Main
PRACTICE PINK KINDNESS
1. Link  up...whatever makes  your blog  fabulous. Family Friendly please. Guess what? Your post does not have to be PINK!! 
2. PLEASE LINK TO A POST URL, ****NOT YOUR MAIN URL****
3. Pretty please...add the Tickled Pink button to the post* {people need  to know what the heck they are doing!}. 
4.  I reserve the right to remove posts that are offensive or do not  adhere  to the rules, without any discussion, at my discretion.
5. Please visit at least 2 other links!
TICKLED PINK Now Has Categories
I won't banish you if you mess up, but try to link appropriately, pretty please!
Craft, DIY, Decorate
crafting, diy, decor type links


Cook, Bake, Eat
stuff to eat, cook, drink, and bake


Read, Write, Share

posts you love, stories, favorite things, ideas to share


Signature
 photo arrow.pngCONTINUE READING


Wednesday, December 14, 2011

I have been hosting crafty gatherings at my house for a few weeks now.
They are so much fun and we are all learning new things
and getting to play with each others "toys".

I had finished making up my treat tower (tutorial coming in a day or two) and started doing something really simple...and in the end loved how it came out!

These cute pennant ornaments were actually inspired by the pom pom ribbon (my mind works in mysterious ways!) - I ell in love with the pom poms
and had to figure out a way to use it.

These are SUPER EASY to do, can be done with THINGS YOU ALREADY HAVE, and take ONLY MINUTES - YEAH! This are CUTE on the tree or on a present!


Supplies
  • Scrapbook/Decorative Paper - any kinds..I used Canvas Corp holiday paper
  • Glue stick, I used Elmer's Extra Strength Glue Stick
  • Decorative edge scissors, from X-ACTO
  • Ribbon or pom pom yarn
  • Pencil
  • Ruler
  • Alphabet stickers, cutouts, or personalized with an electronic craft cutter


DIY IT!
  • Fold paper - you only need about 3" on each side of the fold (that might even be more than you need - just being safe).
  • I folded the paper with the wrong side out so I could just draw on it directly.
  • Mark every 2" along the fold. This is the top width of your pennant.
  • At the 1" (mid point between the 2" marks, measure down 3" and make a point.
  • Connect the 2 marks at the 2" marks to the one point of the 3" mark. You have a triangle.


  • Use your decorative scissors and cut out the sides. LEAVE THE FOLD.


  • Fold over to show the right side of the paper.
  • Use the glue stick and go all over the inside of the pennant.
  • Place your ribbon or pom pom yarn in the crease/fold and them press the two sides together firmly.


  • Apply the typography stickers.


  • I left about 3-4" on each side of my word and then attached a pretty hanger. I have JOY and CHEERS on my tree...and more to come!


Cute, eh?
They look adorable on the tree...in fact no garland this year,
just little pennants everywhere!
(These are really on my tree but I cannot get a good photo)

Signature
Check out this awesome giveaway - win a wall of Elmer's Products!


A Crafty Soiree
Visit thecsiproject.com
 photo arrow.pngCONTINUE READING


blogger template