


I grew up surrounded by family photos.
I always found it reassuring to see the faces of family gracing our walls.
About 9 months ago, I "de-personalized" our house in preparation for a move.
Although I did not have a lot of
family photos out to begin with,
those that were, got packed away.
Well, things changed (for now) and I decided,
"as long as I live
here...it is going to look like I do."
So back out the photos came!

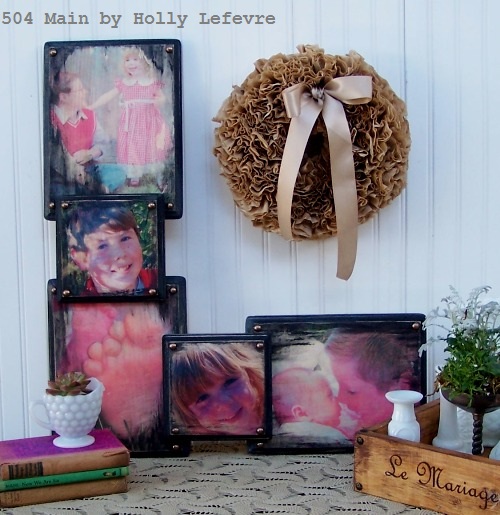
I guess I never realized how much I missed having the photos on display, and more importantly how much my kiddos missed them. I have a Family Heirloom Wreath that I adore, and as I began to think about what I liked about it, I realized I like my photos to be displayed in unusual ways...and so I began this project.

At Christmas I experimented with transferring images to wood with gel medium. It was a present for my Dad and they ended up leaving early and before I could grab an "after photo"...but let me tell you I LOVED the effect. I knew that my new photo display would be made using this method.
SUPPLIES
(This project was originally shared on Capturing Joy with Kristen Duke)
For Image Transfer to Wood
- Wood plaques in various sizes. You can cut them yourself but I purchased mine at Michael's. I think the big one (approx 8 x 11) was $3.00 and the smaller ones $2.00 (approx 6 x 6). I used three larger ones and two smaller ones.
- Matte Photo Paper (and photos)
- Printer (Ink Jet)
- Gel Medium. I used Golden Regular Gel (Matte)
- Paint brush
- Spray bottle and water

For Painting/Embellishing
- Accents - this all depends on your preference and the final look you want
- Paint or stain (I used DecoArt American Acrylic in Ebony and Varathane Wood Stain in Weathered Gray)
- Upholstery nails
- Sandpaper

For Assembling
- Nails or wood screws. I used 1 1/4" screws - just be sure they will go through both layers but not entirely through the top layer.
- Screwdriver/hammer/drill

MAKE IT!
- Dust/Brush off the plaques
- Print the photos out on Matte Photo Paper (I used the store brand from Staples and it worked great). It took tie for me to find the right combination of photos. Only 1 of these is professional. I used my favorite photo for the kids.
- NOTE 1: I wanted to do this project all in Black and White or Sepia, but tried one and was not in love with the result. I had done color before and so I decided to stay with color. I saturated the color a bit for a stronger effect.
- NOTE 2: BE SURE TO FLIP THE PHOTO WHEN YOU SAVE IT OR FLIP IT AS YOU DO THE PRINTING. YOU APPLY THE GEL TO THE FACE OF THE PHOTO.

- Trim off any excess of the photo if necessary to fit the size of the wood you have.
- Protect your work area
- ON THE FACE (PRINTED SIDE) of the photo, apply a liberal coat of Gel Medium all over. The better the coat of gel medium, the easier it will be to transfer the image and remove the paper.
- Match up the edges and lay the photo FACE DOWN onto the wood (you will be looking at the plain white backing of the paper).
- Let dry for at least 8 hours.

- Using a spray bottle, saturate the back with water - you will be getting the paper wet and then rubbing it off with your fingers (or a towel). You will need to re-apply water through the process. It will take 2-4 "stages" to get the paper backing all removed.
- After the first spray, I am usually able to peel off "sheets" of the paper. After that more rubbing is necessary.

- As you rub/roll your fingers the paper comes off, revealing the image on the wood. It took my about 4 runs at the paper.

From there, you can decide how to finish your plaques.
You can sand the edges or all over for a more distressed look...
You can use Distress Ink to finish it off...
You can simply paint the edges a solid color...
You can simply paint the edges a solid color...
it is totally up to you and dependent on your style!
- I will tell ya, that my final product does not necessarily look like I though it would. I decided to stain the edges, letting my brush just slightly hit the top edge of the wood/photo...
- BUT I was impatient and my wood was not dry enough (after removing the paper)...and the stain bled onto the photo a lot more than I anticipated...and it looked too much like it just bled...
- SO I pulled out the black acrylic paint and with a drier brush, "hit the sides" (here and there) and swept the paint onto the edges and corners of the photo.
- I went heavier on the corners to cover the bleeding.
- While this was not exactly the effect I had in mind, in the end it sort of looked like an old film negative and it grew on me.
- Once it was dry, I used a piece of sandpaper to slightly distress the edges and parts of the photo.

To Assemble (once dry)
Of course each photo can stand on its own as well...I just wanted something a little different.
- Layout the photos to get the look you want.

- Flip the wood over (back side showing up - and yes - I am messy - you could paint the back as well if you want.).
- I marked up equal amounts (1 1/2") on my smaller wood plaques to determine the placement of the larger wood plaques and to keep things lined up.
- Screw in screws (or hammer nails) from the back. My screws went in 5/8" from the edge and 1 1/2" in from the sides.

Once dry and assembled,
You can add other embellishments - like upholstery tacks or metal findings

When it is time to hang these beauties, the options are limitless...stack them on a shelf, create a grouping on a wall...or as I did I created an asymmetrical design - that just night resemble an "L"- my monogram.


If you like to display your photos in unusual way,


How do you display your family photos?


What a unique way to display photos! I really like how you shaped them into a monogram too.
ReplyDeleteThis is a great idea, thanks so much for sharing with us. :-) I can not wait to try it. Just another project to add to my LONG list of things I want to do...LOL
ReplyDeleteThanks again, have a blessed day! :-)
Your pictures are gorgeous, Holly! I have used this transfer method on many projects and I love doing it. I use Golden Gel Medium, as well, but have mainly used images made with a copier that uses toner. I also like to use Citra-Solv cleaner and reversing the image when I make my copies.It is always fun to visit your blog and see what you have been working on and for inspiration to try new things. Thanks for sharing your pictures and the transfer technique with us fellow bloggers!
ReplyDeleteHi Holly! nice project with a personal touch. I've never heard of doing this on wood, but your results look awesome. And I love the black on the edges. Everything goes with black.
ReplyDeleteJoAnn