


I am the queen of Christmas wrapping...
procrastination!
Every year I manage to squeak out a few tags and cards before the deadline...and every year I say I am going to wrap beautiful packages...
and every year I fail...until NOW!

Thanks to Elmer's and #gluenglitter and a quick trip to Walmart,
I got a jump start on my wrapping...
and it is looking G-O-R-G-E-O-U-S!

I had so many ideas running through my head (as usual).
I was going for a plaid/ruffle/dot sort of theme -
ya know, some boyish looks and some girlish looks (gotta keep the kiddos happy)...
but then I started creating and this little ensemble is what fell into place.
The best part, my little one created right along side me
decorating the present she picked out for her brother.

The one thing that did remain constant is a basic "background" for my look. I have used Kraft Paper to wrap presents since the 80's! So I figured this was the perfect starting point. I also picked up some really inexpensive red and white dot paper while I was at Walmart - just to add a little color!
Of course I picked up some of my favorite Elmer's and X-ACTO supplies while I was there...plus a few more things (of course!). Have you checked out the selection of Elmer's and X-ACTO products at your local Walmart? Walmart has an amazing and complete selection of these products...I seem to discover a new product each time I shop! And lots of people must be shopping - this wall was well shopped!
You can read all about my shopping trip on google+
You can read all about my shopping trip on google+

Did you know Elmer's is having a "Win the Wall" contest too?
Click on their button down on the bottom of my post to enter to win the wall of Elmer's! Take a look at that wall...wouldn't that be awesome!

Now let's wrap!

(Not everything I used is in this photo)
SUPPLIES- Elmer's CraftBond Dual Tip Flexible Pen
- Elmer's CraftBond Foam Mounting Tape
- Elmer's Scrapbooking Tape Permanent (Double Sided Tape)
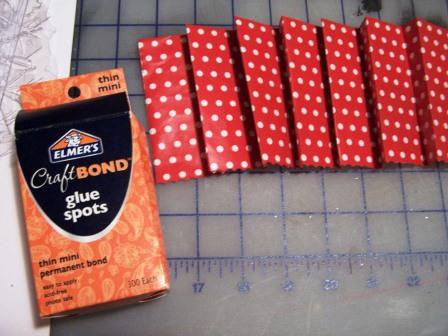
- Elmer's Glue Spots, Thin Mini
- X-ACTO Designer Series Precision Tip Scissors
- X-ACTO Designer Series Circle Cutter
- X-ACTO Decorative Shapes Template
- Elmer's Extra Strength Glue Stick
- X-ACTO Designer Series Craft Swivel Knife
- X-ACTO Decorative Edge Scissors
- X-ACTO Designer Series 8" Scissors (optional)
- Wrapping paper (your choice)
- Kraft Paper, plain brown paper (butcher paper works too!)
- Cardstock (or heavyweight paper): red, green, and white. Use the Kraft paper for the 3rd color.
- 1/1/2" red dot ribbon (or your color choice)
- Textured cardstock (I happen to like the texture, regular card stock will do)
- Ink Pad in desired color (I used distress ink in medium brown)
- Craft rhinestones/gems
DIY IT!
Wrap it: I used a combination of the Kraft Paper and the dot wrapping paper to wrap the gifts. They all look pretty now because I also used Elmer's Permanent Scrapbooking Tape - it is double-sided, so it is perfect for wrapping pretty presents! See no ugly tape lines!


DIY Flowers

5 - 3" circles in red
5 - 2" circles in Kraft Paper
5 - 1" circles in white

2. Ink the edges of each circle - it is not supposed to be perfect and if you prefer a "cleaner" look, you can skip this step. (you could also brush on glitter now if you want sparkle)


4. Give the flower some dimension by wrapping the fringe around a pencil to curl it up.


7. (Optional) Finish flowers by apply glue with a CraftBond Glue Stick to the back side of the flower; affix on leaf; apply more glue; affix other leaf.
DIY LEAVES
1L. Cut leaves from green cardstock using the Decorative Shapes Template and a Craft Swivel Knife. I have never used the swivel knife before- it took a minute to get used to the feel/flow, but after that it was great!
2L. Ink the edges of the leaves.

DIY BANDS/PAPER RIBBON
1B. For the larger Kraft Paper band, measure off a 4" wide strip on the Kraft paper.
2B. Align the desired edge of the Decorative Shapes Template to the line and using the Craft Swivel Knife, cut and edge.

4B. Repeat on the opposite side.
5B. For the smaller band, measure off a 1 1/4" strip of paper. Using the Decorative Edge Scissors (in your choice of edging), cut each side of the strip to create a smaller band.

DIY PLEAT
1P. Measure a length of wrapping paper 6" wide

3P. Cut the other side with Decorative Edge Scissors
4P. Beginning at one side, make 1/2" pleats all across the length of the paper.

DIY STARS

2S. Use the X-ACTO Circle Cutter and cut:
3 - 2" circles in red
3 - 1 1/2" circles in Kraft Paper
3 - 1" circles in white

3S. Ink edges
4S. Fringe edges of the circle using the Precision Tip Scissors, See Step 4.

5S. Construct stars using the Foam Mounting Tape and the same method as Step 5.

6S. Apply rhinestone, see Step 6.
TO ADORN PACKAGES

B. RIBBON: Cut a length of decorative ribbon long enough to wrap around the package. Use a glue stick or Glue Spots to place the ribbon about 1/3 way down the package and hold in place; Apply approximately 1" of Foam Mounting Tape to the back of the flower and then place on the ribbon. (back, center)


C. WIDE BAND AND FLOWER: After cutting wide band of Kraft paper, wrap around the package and secure on the back side using a CraftBond Glue Stick or Glue Spots; place flower/leaf combination on top of the band using 1" of Foam Mounting Tape. (shown, left)

D. PLEATS: Apply Glue Stick to the top back edge of the pleated paper; place in the desired position on the package - begin on the front and then wrap around the sides. Secure with CraftBond Glue Stick. Apply the smaller band of green cardstock with glue stick; cover band with glue, and line up top edge of pleat and band; press down; wrap around package and affix with glue stick. Place flower using the Foam Mounting Tape in desired position. (shown, right)


STARS: Place a length of ribbon vertically on the package and affix with Glue Spots or Glue Stick. Use the Elmer's CraftBond Dual Tip Flexible Pen and apply glue to three positions on the ribbon. Set the stars on the glue and let dry.


There ya have it...some pretty packages...
all ready to go under the Christmas tree.
No one will believe my wrapping is done...
until they read this post!


Are you wrapped and ready to go?????

Don't miss out, be sure to follow along:


Your packages made me smile. I love all the layers and colors and polkadots...but my favorite was the ruffle of polkadots!!! You did awesome!!!
ReplyDeleteLove these, they look great and all with paper!! Merry Christmas!
ReplyDeleteYour packaging looks great, Holly! I tell myself I'll dress up my packages every year, too, but I never do since I'm usually wrapping everything at the last minute. I really love the pleating!
ReplyDeleteOh my gosh, if I got one of those presents, I wouldn't want to open it up! So pretty!
ReplyDeleteLove all of these. I wouldn't want to open them though they're so gorgeous!
ReplyDeleteGorgeous idea, Holly!
ReplyDeleteYour presents are beautiful...I wouldn't want to open them...LOL
ReplyDeletewww.mydailyphotojourney.blogspot.com/
www.facebook.com/MyCrazyBeautifulLife.13
www.pinterest.com/denyse13/
Those are adorable. I would love to get that package but wouldn't want to open it!
ReplyDeleteVery fun! It would be hard to open these on Christmas day!
ReplyDeleteWay too pretty to unwrap. I would love to get a gift that looked like these.
ReplyDeleteYour gifts look so great...you've inspired me to get more creative with my gift wrapping.
ReplyDeleteamazing!!!
ReplyDeleteSuch cute wrapping I wouldn't want to tear this package open!!
ReplyDeleteMerry Christmas!
mary