504 Main by Holly Lefevre
twitter facebook instagram bloglovin google plus pinterest youtube

Thursday, July 21, 2011

My living room must be confused...
every time I settle on one thing I change my mind.
Which tells me I have not quite found the right combination.

I was loving my living room.
I revamped it a little with some paint,
but something was still not-quite-me.
I loved the funky vintage vibe that was happening,
but I also have a slightly modern bold side to me.
(I have never really shown you those art pieces and murals)

Then, Country Living published their "What's Country Now?" Issue and it feature this living room on the cover...and I fell in love. I already had the wall color happening. I love red, and this was a great inspiration for meshing country and modern as least to me.
You can read more about this room here

I was inspired by the look of this room - I felt the need to make changes to get closer to this look, but wanted to make it mine, not simply copy this room. I have started the process, but still have details to finish up - bit-by-bit - but I feel it - this is it!

I began to make plans, and about that time, an Australian Company called Comfort Works contacted me through The DIY Club, offering me the opportunity to review one of their products. Comfort Works has "over 100 different fabrics designs and blends." They specialize in customizing IKEA Sofa Covers, Curtains, Pillows, Coverlets and Cushion Slipcovers. Currently their slipcovers only are for IKEA sofas,
BUT not their other products and I was SOLD on their curtains.

I was sent some swatches to look over and was really impressed with their quality.
I selected Pinch Pleat Curtains
in Antoinette Desert Rose
When my curtains arrived, I did a happy dance!
The fabric is a great quality,
the lining excellent and the way they hang makes me smile!
I even received two pillow cushion covers - just what I needed!
I am seriosuly impressed and quite happy with the colors,
and quality from Comfort Works.
I just wished they made slipcovers for non-IKEA couches - boy do I need those!

I am so happy with the difference these curtains
from Comfort Works made in my living room.
I hope to paint my (very large) brick fireplace in a shade of white,
and I have some new pillows and art I am working on -
all with pops of red!
And, there is a great ottoman in the works too!

I wish I was a better photographer...or had a better camera...
it looks awesome in person,
but I have had some trouble capturing the right color/exposure in the image.


Do you redecorate or revamp as much as me? UGH!
If so, why? Or care to share your tricks?

Signature
DIY Club
Disclosure: I received two panels of pinch pleat curtains and two cushion covers from Comfort Works. No other compensation was provided. The opinions are my own. Disclosure Policy
 photo arrow.pngCONTINUE READING


Tuesday, July 19, 2011

My little doll had a birthday party recently (OK, 2 birthday parties) and it was inspired by the Lalaloopsy Dolls. If you are not familiar, Lalaloopsy Dolls are fun, funky, and whimsical dolls (although I wish they were not so plastic - their heads are huge and could be a weapon). I love the crazy colors of their outfits and the two dolls my daughter has just really inspired me to go forth with this theme (I talked her out of a Tangled theme. I do love that movie though).

When I do a party or event I like the details to be more subtle, with maybe one or two literal translations, that is why I always say "inspired-by."
I used the colors and fun spirit of the dolls to create the party.

Now, Jules LOVES rod pretzels,
and I have made pretzel wands for years,
but I wanted something different...
then I remembered Jenn had purchased the Fry Box Die
from Lifestyle Crafts (and I have the Epic 6),
and so it was a match made in heaven -
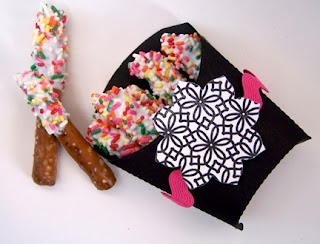
PRETZEL FRIES!

This is so fun...and better yet...super easy!

SUPPLIES
(Disclaimer - I am not technical or fancy...I like to work with what I have, so this is what I did and used).
  • Pretzel Rods or Thick Pretzel Sticks (I had purchased the long rods already, so I used those and broke them in pieces)
  • Melting chocolate - your choice of color. I used white (available at craft and most party supply stores)
  • Sprinkles


 TOOLS
  • Glass measuring cup
  • Microwave
  • Spoon
  • Wax Paper
  • Aluminum foil
  • Cookie sheet
OPTIONAL - for presentation
Lifestyle Crafts
(use the code 504MAIN to get 20% off at Lifestyle Crafts)

DIY IT!
  1. Prepare your pretzels. There is not much prep required other than opening the bag if you buy the shorter pretzels. In my case I had to break the pretzels in two.
  2. Line the counter with wax paper/cutting boards/something to protect the counters. I had a piece of wax paper for dipping the pretzels; a cookie sheet lined with aluminum foil for rolling the pretzels in sprinkles; and more wax paper (laid out on the counter) for laying the pretzels on to harden/dry.
  3. Place melting chocolate wafers in microwave safe glass measuring cup and heat according to package directions (typically, microwave on low for 30 seconds to one minute, stir, and repeat and short time intervals, stirring until smooth and melted.).
  4. When melted, remove from microwave.
  5. Dip end of each pretzel into the chocolate (I only covered 1/2 to 2/3 of the pretzel and in the case where I broke the pretzels in half, I covered the broken end).
  6. Give the pretzel a slight tap on the edge of the measuring cup to shake off excess chocolate.
  7. Dip or roll in sprinkles.
  8. Place on wax paper to dry.

PRESENTATION
As mentioned I used my Epic 6 and the Fry Box Die Cut to "fancy-up" my presentation the fries. The majority of the fry boxes were not decorated at the party, just a few. (I simply ran out of time). Read more about the Lifestyle Crafts NEW Dies.
I am sure you could find paper fry bags at a restaurant supply store or a store like Smart and Final (but I LOVE my die cutter, just sayin'). Then decorate them using purchased die cuts or embellishments from the craft store.
  1. Cut die out of black cardstock and assemble fry box using perforations and directions.
  2. Cut a medium size nesting bloom out of a corresponding cardstock (I used a piece of letterpress paper I had made previously).
  3. Wrap ric-rac or ribbon around fry box and secure in back with glue dot or double stick tape.
  4. Attach bloom die cut on front of box using glue dot or tape.
  5. I do think I should have added a sweet button to the middle of that die (buttons were a reoccurring element in the party details too).

You have any special party tricks up your sleeve?
More party details coming soon!

Signature

The Girl CreativeTodays Creative BlogPhotobucket
Strictly Homemade TuesdayA Crafty SoireeJoin  us Saturdays at tatertotsandjello.com for the weekend wrap 
 up party!
Disclosure: I am in an affiliate program with Lifestyle Crafts</a>
 photo arrow.pngCONTINUE READING


Monday, July 18, 2011

Some of you may remember a few months ago
I had the privilege of receiving a Lifestyle Crafts 
Epic 6 Letterpress Combo Kit for review.
I absolutely LOVE this fabulous product.
Lifestyle Crafts
Recently I was asked to become an affiliate,
which means I can offer a fabulous discount for you -
20% off using the code 504MAIN at checkout
(use it at anytime on anything!)
and I get to tryout products and create fabulous paper crafts.
What could be better?!!!!

Lifestyle Crafts is launching their newest set of dies -
POSSIBILITIES!
This product line contains up to 22 dies and sizes ranging from .25" to 5.75.
And these dies are fun and elegant and gorgeous and
basically whatever you want them to be!

I had not used dies a whole lot in the past, but I am SOLD -
I never knew what I was missing!
As I ran them through the machine just playing
all of these ideas came popping into my head.
I am so excited!

I have been creating with them already and just want to show you a sneak peek
of a few of my ideas and projects...
and oh there is more...but for now...here are a few ideas!

Nesting Bloom
I used this die, cut out from a Blossoms letterpressed sheet,
combined with the Fry Box Die and some simple ric-rac for
a sweet presentation for my pretzel fries
(DIY tutorial coming on that tomorrow!)
*************************************
The  Nesting Lace Ovals
I recently planned my sweet girls birthday party and
used this die to create some special details.
 Labels for the food and drink!
I love to let people easily know what they are eating at a party!

A simple little banner using multiple types of coordinating papers

*************************************
The Nesting Frame 5
 These seemed fluttery and made me think of fairies and butterflies,
so I created magical wands!
*************************************
There is still a TON of ideas floating around in my head.
Here are a few more of the fabulous new dies!

Scallop Squares
 Nesting Frame 8
Nesting Star
*************************************
So, don't forget, the new line from Lifestyle Crafts, 
POSSIBILITIES, debuts today!
Use the Code 504MAIN
at checkout to get 20% your purchase.
This code is good for any product at anytime
(and it is always on my sidebar!)
Lifestyle Crafts
*************************************
So, what do you want to make?????
Signature

Disclosure: I was not paid for this post. Previously I had received an Epic Letterpress for review and I have received the current set of Possibilities dies for review as well. I am participating in an affiliate program with Lifestyle Crafts. Read my disclosure policy HERE
 photo arrow.pngCONTINUE READING


So, did you watch it? Did you Catch Design Star last week?
I watched it twice. I LOVE that show.

I will have to say I usually pick my "winner" during the first show, but this season i cannot quite put my finger on it...I want to see more. In fact, I am always a little sad when the first designer gets voted off...sometimes nerves and circumstance get the best of them and they never get their chance to shine.

BUT...Tonight,
Monday 7/18/11 at 9/8c on HGTV,
I get my second chance to check out Design Star
and try to make my prediction.
I will say that for the premiere episode, I wholeheartedly agreed with the judges on the room they selected to win. The bonus room designed by Karl and Kellie is fabulous - such a great use of space. I can imagine myself cozied up in that bonus room nook reading my favorite magazines!

I LOVED that mural painted by Karl (I kind of love Karl so far too).

In the Living Room designed by Leslie and Cathy, I liked a good portion of what they did, but Leslie's find of that table made of old rubber tires was AMAZING! What a cool piece that is contemporary and modern but looks fabulous in this room and is such a great focal point.

I also liked Meg and Tyler's bedroom...
of course I did it was a shade of purple
(and we know how I feel about purple)!

Be sure to check out Design Star tonight at 9/8c on HGTV!

So, did you watch?
What was your favorite piece?
Who's your favorite designer?
I must add that David Bromstad is super charming as this seasons mentor! 
Signature
Disclosure: This post is part of a sponsored campaign by Crafterminds and HGTV Design Star. My opinions are my own.
 photo arrow.pngCONTINUE READING


Thursday, July 14, 2011

Happy Weekend!
504 Main
ALL D-O-N-E!
Birthday parties are over for 2011!
Yeah for me!
******************
I am beyond Tickled Pink that I am headed to L.A.
(home sweet home)
to hang with some very special ladies in  my life,
and see one friend I have not seen in 4 years (give or take).
I did manage to schedule this trip when the major L.A. freeway (405) will be shut down,
um so yeah, that should be awesome.
Of course I hope to sneak in visits with all of my other
dear friends too and let the kids play with Grandma and Grandpa.
Hubby and Ranger Danger will be holding down the fort!
*******************
I know I am not the only busy lady or man out there..
I know I have been awful at returning emails and comments.
...so THANK YOU all for coming by! I appreciate it!

I LOVE the ease of sharing links on Facebook, so this is how I will make my way through Tickled Pink links. I will now get more active with that!

So, go on over and LIKE 504 Main on Facebook!
Don't miss a thing. If you have a Blog Page, just let me know
by leaving a comment on the 504 Main Wall!

I am also inviting you to share your
link on my FaceBook wall this week.
Please no giveaways or etsy shops,
but whatever you link up here, feel free to share the link on my Facebook Wall.
Hope I have not made a mess with that invitation!
(be sensible peeps...I reserve the right to DELETE!)

If I feature you on Facebook or twitter, be sure to grab a button HERE!

NOW FOR TICKLED PINK!

A craft...a recipe...a tip...a party...a short story...a  poem...
a  fashion find...a  favorite product...your favorite  post...
whatever makes  your blog  fabulous!
That is what Tickled Pink is all about!
{and it does NOT have to be PINK}
Click right HERE to Grab a button!

Signature
504 Main
PRACTICE PINK KINDNESS
1. Link  up...whatever makes  your blog  fabulous. Family Friendly please. Guess what? Your post does not have to be PINK!! 
2. PLEASE LINK TO A POST URL, ****NOT YOUR MAIN URL****
3. Pretty please...add the Tickled Pink button to the post* {people need  to know what the heck they are doing!}. 
4.  I reserve the right to remove posts that are offensive or do not  adhere  to the rules, without any discussion, at my discretion.
5. Please visit at least the 3 links in front of you!


TICKLED PINK Now Has Categories
I won't banish you if you mess up, but try to link appropriately, pretty please!

Craft, DIY, Decorate
crafting, diy, decor type links


Cook, Bake, Eat
stuff to eat, cook, drink, and bake


Read, Write, Share

posts you love, stories, favorite things, ideas to share

 photo arrow.pngCONTINUE READING


Wednesday, July 13, 2011

When I first moved out of my parents house and into my very own apartment, I had so much fun designing and decorating my living space. You could even say I went a little crazy...with it. I had more ideas than I can even remember stuffed into 400 square feet. Just imagine (if you dare) a shabby chic theme that somehow got sidetracked to countrified angel. Not something I am completely proud of...notice no photos! But at that time I loved it.

When my husband and I bought a house, my design sensibilities had changed...now imagine lots of gold, sparkly, cherubs, and well, semi-ornate items. And, we had just gotten married so there were plenty of new gifts - vases, frames, platters, etc. - to decorate with. I liked that everything was new. I wanted my house to look like a catalog (you know which one, I am sure). It didn't...it never felt right...and hubby is cheap!

Once again we moved...to a new house - an older home on the Central California Coast. It had low ceilings, not a lot of natural light, and was in need of major updating. I got preoccupied and overwhelmed with fixing what was "broken" with trying to make the new house the same as the old house. Other than blowing a hole in the wall to create a hallway...I didn't do much to this house for a long while...I complained but never acted...seriously, it took 3 years for the cardboard in the hallway to make way for new hardwood floors.

Painting, decorating, and making a home had always been one of my favorite things to do and I had left is by the wayside, while continuing to lament about the "tragedy" of my new fixer-upper. I just was not feeling it with the new house...everything I did seemed forced...until one day, I finally got it...I had to let the house be what it was. There was no way hubby was going to let me blow the roof off so I could have higher ceilings, and with the price we paid (yes, we bought at the height of the market!) the old orange-ish kitchen and UGLY master bath complete with saloon doors were staying for awhile.

Now, however, I can say I am glad, I am happy...I do love this house. It has personality. It has a story to tell. I was patient...and I let its story unfold. By living here, adjusting to a new lifestyle and embracing the (little) charm that was there, we have created a warm and welcoming home. It has taken time...it has tested my patience...but the changes we have made are right for this house and for our family.

In the process of letting our home and our decorating style evolve I have discovered a few things:
1. Don't fight what you cannot change (kind of like marriage). Um yeah, converting the garage to an indoor pool and adding a rooftop deck and out of the question..even the contractor looked at me and told me to "just move."

2. Learn to love if for what it is. My family room is funky...I used to call it the pine coffin (pine paneling, pine ceiling...ugh!). It had a mini makeover - just some white paint on the walls, but it is getting ready for a serious makeover...first up the walls will be painted with a warm honey color. I did not love the saloon doors...they are gone...but the bathroom is still ugly.
3. Spend your money wisely. At first I wanted to gut the kitchen, move things around completely and create a state of the art cooking area. First that would have looked DUMB in this house...kinds of like "So...you spent all the money on the kitchen? Do you like cardboard taped to your floor?" Instead we kept the cabinet boxes, left the floor plan the same, had new doors put on, new appliances, fresh hardware, new paint, and a few little extras. For a very small fraction of the cost of a complete overhaul. And guess what? The kitchen fits the house perfectly...it does not overwhelm it.

4. Surround yourself with what you love and it will feel like home. My style is crazy (I am not an interior designer) I know what I like and I make it work. Case in point I have a very large print of a champagne ad...it was going to hang in the living room no matter what. After many attempts at paint we finally got it...purple! Yes, even purple works in a living room (and hubby agreed to it) because it felt right and complemented the artwork we already loved (also, think color wheel). The (darker) purple has been upgraded to more periwinkle and it looks stunning.

I have a long list of projects still...but I enjoy and relish each and everyone of them. It makes this house unique...it makes DIYing fun. I cannot wait to bring a little happy to the outside of the home with a new paint job...just trying to decide if I can DIY that one myself!? I am sure the neighbors would enjoy watching the crazy lady go at it.

So what's my point...yes...I have a point? Become your home's BFF. Make it happy! It will speak to you it will tell you what it needs...what it wants, and ultimately surround yourself with things that make you happy...that is what will make a house your home.

What's your style or decorating challenge?

Signature


 photo arrow.pngCONTINUE READING


Monday, July 11, 2011

I have been watching HGTV since Matt and Sheri
ruled the airwaves with Room by Room.
I still love HGTV for so many reasons...
with the most major - reason being Design Star.
I seriously dig this show and eagerly await its premiere each season.
And, did you hear?
TONIGHT's the NIGHT!
Monday, 7/11/11 at 9/8c.
Woo-Whooo!

I have notes on many of the projects I have seen on
the show in my own special little DIY to-do journal!

I have been watching since Season 1.
I even knew someone on Season 2.
BUT, by far Season 4 Hollywood has been my fave.
Antonio won me over with those pink geese 
(which I am still looking for for my own home!)
Oh Antonio!- 
a tattooed breath of fresh air, cool design aesthetic, and pure awesomeness!
I never miss an episode of The Antonio Treatment.
(way to go Design Star judges!)

I don't stop my busy-i-ness for much,
but I enjoy the diverse talent, ideas, and
pure entertainment value Design Star provides...
so the busy-i-ness stops for an one or so.

I also happen to adore the judges -
Genevieve, Vern and Candace -
how could you go wrong?

I look forward to each season....
And, now the wait is OVER...
Season 6 Design Star premieres tonight,
7/11/11 at 9/8C.
You know what that means?
Baths are early, kids are to bed, grab a mocha and I am so there!
(in front of my TV there!)
I cannot wait to see these Design Stars shine.
I always make my pick the first show...
and guess what I have been right every time!

So, are you a fan of Design Star?
If so, which who is your favorite past winner?
Will you be watching tonight?
Signature

Disclosure: This post is part of a sponsored campaign by Crafterminds and HGTV Design Star. My opinions are my own.
 photo arrow.pngCONTINUE READING


blogger template