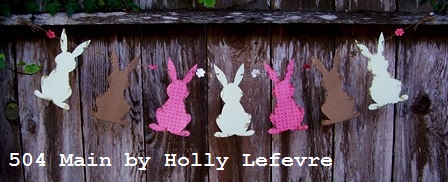
Here is a fun and eclectic collection of bunny and egg project. There are projects for all styles and tastes as well as all crafting and baking abilities. I have posted this collection before...but its so darn cute I just needed to share it again! These projects were compiled from Tickled Pink (way back when I hosted that linky party!) and the responses to my Facebook Page request! To see all the awesome ideas...keep on reading! Thanks Everyone!
Showing posts with label Easter decor. Show all posts
Showing posts with label Easter decor. Show all posts
Tuesday, April 3, 2012
When it comes time for holidays at our house,
I strive to make each holiday special for my kids.
We do not live near our families and I want to create memories
and traditions for my kids that will last forever.
Of course, that does not always mean I get super elaborate
or go over the top, but it does mean incorporating items they love,
letting them help decorate or cook, and creating a special table for our meal...
even if it is just the four of us.
Monday, April 2, 2012
Tuesday, March 16, 2010
The list of my obsessions continues to grow.
Now I am adding eggs and vintage labels to the list
Someone stop me!
I do not have time to obsess about anything else.
{I have to sleep sometime!}
But I have always wanted to blow out eggs and now I did..
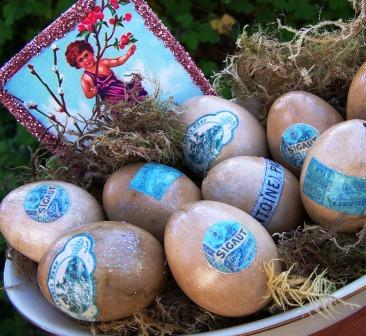
and then I dyed them in coffee, and then I added vintage labels.
Pretty!
But I have always wanted to blow out eggs and now I did..
and then I dyed them in coffee, and then I added vintage labels.
Pretty!
{pretend that one egg is right side up}
I have always wanted to blow out an egg {...is there a better term?} and decorate the shells...but I was a chicken {Ha, Ha!}. I figured I would break them...it would be messy...too much work. Well, a few weeks ago for my tablescape I tried it...and boy oh boy I was so very wrong. This was easy-peasy {and I am even a messy crafter}.
Part I...Blow Them Out
I am sure you can find more intricate details and instructions out there on the Internet...somewhere, but I am all about easy. Here are my steps...and since I am all about using what I got...I used a very clean nail {sterilized it} and blew my eggs out over a bowl...and made quiche for dinner.
Directions
-Poked a whole with a (clean) nail in each end of the egg.I am sure you can find more intricate details and instructions out there on the Internet...somewhere, but I am all about easy. Here are my steps...and since I am all about using what I got...I used a very clean nail {sterilized it} and blew my eggs out over a bowl...and made quiche for dinner.
Directions
-One side had a larger hole, the other a smaller
-Put a skewer in one end and sort of mashed up the yolk...then blow from the side with the smaller hole {over the sink or a bowl}.
-It was not hard to blow them at all...just make sure their are holes in each side and the holes are big enough - start small and make them bigger if necessary.
-I have also heard you can use those suctioners you get for little kiddos to suck their noses out. Or you can actually buy a egg blowing tool.
{see the holes on top...the bottom ones are slightly bigger}
Part II...To Dye ForI put two scoops of instant coffee in a large bowl and boiled about 4 cups of water. I made my coffee dye and then put my eggs in...since their is nothing in them, they float so you have to turn them...I tried putting a medium size bowl on top to weigh them down...it sort of worked. I kept mine in for a few hours.

{The plain coffee-dyed eggs}
Part III...Since I am Not a Chicken Anymore...Labeled Eggs
Well, I loved my pretty little caffeine infused beauties, but it was time for a makeover. Off to visit The Graphics Fairy for some tres {pretend there is an accent over the "e"} chic vintage labels. And the craft store because I just had to try Sparkle Mod Podge!
Supplies
-Blown and dyed {and dry!} eggs
-Mod Podge Matte Finish {or your preference}
-Mod Podge Sparkle
-Paint brush
-Scissors or Exacto knife
-Mod Podge Sparkle
-Paint brush
-Scissors or Exacto knife
-Labels from The Graphics Fairy {or clip art, letter, etc.}
-I also used skewers and a round Styrofoam form to hold them while I was painting them and they were drying
-Patience {I always have to remind myself of this}
-Ribbons, buttons, bead - optional for adornment {I didn't do this...but I want to!}
Directions
-Ribbons, buttons, bead - optional for adornment {I didn't do this...but I want to!}
Directions
-Cut out labels
-Apply a layer of Mod Podge all over the egg {This makes the eggs more durable too}
-Let dry slightly
-Apply Mod Podge to back of label
-Affix label to egg, while smoothing paper down onto egg
-Coat with a lyer of Mod Podge, let dry for 20 minutes or so.
{I applied another layer of Mod Podge, specifically over the label area - don't tell, I use my finger so I could really smooth out the paper...did I mention I am a messy crafter?}
-Let dry
-I wanted a little sparkle...but not too much...so I used Mod Podge Sparkle
 {I am in L-O-V-E}...just a hint of glimmer and sparkle..perfection!
Now, hop on over and see how I used these eggs for my Spring Table Decor
Labels:
blown eggs,
coffee,
craft,
create,
DIY,
easter,
Easter decor,
eggs,
holidays,
projects
Subscribe to:
Posts (Atom)


