


The process I use to make my signs is pretty similar for all the different varieties I make, but I always add a little something new to make them unique. This sign came together perfectly. An with just a little time, you can have one too!

- 8", 10" or 12" pine board cut to 24" (my sample is actually a 10" board, but the others I have made for sale are 8")
- Wood stain, I used Minwax in Classic Gray (You can use any color you want) and brush or rag for application
- White paint. I chose chalk paint, specifically I used DecoArt Americana Chalky Finish in Everlasting
- Creme Wax (If you use Chalk Paint) and rag for application
- Sand Paper or sander. I used my Black and Decker Mouse
- Paint brush
- Letters: You have options
- Stencils from the Craft Store
- Stencils made on a craft Cutter (I used my Silhouette)
- Print out Font you desire to the size you desire and trace it.
- I used Book Antiqua in all capitals (HOME), 460 point
- Here is a pdf file of the letters
- Ruler and/or Blue Painters Tape can be helpful: I almost always use blue painters tape for these projects to hold stencils or position my words.
- Scissors (heavy duty)
- Hot glue gun and glue sticks
- E6000 glue (optional)
- 1 Miniature Greenery and Grapevine Wreath (grab the full tutorial and supply list).
- You need greenery, medium grapevine wreath, floral wire or hot glue.

Wreath - Make it!
- Refer to my tutorial on How to Make A Miniature Greenery and Grapevine Wreath

Sign - Make It!
- Cut a 10" board to 24" long (or have them do it at the hardware store)
- Stain the board in Classic Grey. I just swipe on my stain, let it sit for a few minutes and wipe off the excess. Let dry thoroughly. Refer to your wreath (for width) so that I could place my letters according to the width of the wreath.
- Determine where you want the bottom of your letters to be and if necessary place a piece of blue tape to keep you on target. Here are some measurements - keep in mind wood boards are not always the same size, so keep that in mind when placing the letters - these measurements are to help guide you.
- On an 8" board. my letters are about 1 1/2" from the bottom edge of the board. (1 1/8" to 1 1/4" from the top)
- On a 10" board, my letters are 2 5/8" from the bottom of the board. (2 1/8" from the top)
- On EACH side of the board the letters (the edge of the decorative "tails") are 1 1/4" in.
- Determine what method you will use to add your lettering.
- For store bought stencils, position, using your "O" wreath as a marker and them trace the letters into their position (Unless you want to leave the board showing the stain and have painted letters)
- For making a STENCIL on a craft cutter, cut out the word on your craft cutter on adhesive vinyl. Removing the excess/surrounding vinyl, leaving the letters on the backing. Apply transfer tape over all the letters. Remove backing when you are ready.

- HINT/NOTE: I cut my H apart from my ME to position them around the wreath. There are 7-8" between the edge of the H and the edge of the M. The letters were all positioned on the same line on the transfer paper or blue tape (or ruler) so it was easy to line them up again.
- Place the letters on your board (using that blue tape line) and firmly apply the vinyl letters to the wood, remove transfer tape.
LETTERING TRANSFER METHOD #3
- You can print out the letters (see the printable letters HERE)
- Rub chalk or the side of a #2 pencil all over the back of the letter. I used chalk for this because the wood was grey and it showed up better.
- Flip you letter over, position it and trace it with a sharp pencil or pen.
- Remove the letter and it will have transfer lines on the wood.
- Now, paint around the letters.NOTE: I used a horrible brush when I did this so mine looks messy (which is also OK because we are going to sand a lot). Just try to get all your strokes going one way (horizontally) by the time you are done.

- Paint the entire front of the sign. Let dry thoroughly. I did two coats.

- Remove the vinyl letters.
- Sand the edges of the sign and all over to distress it.
- Apply a coat of creme wax to finish the sign off.
- Affix the wreath to the board using hot glue or, my preference E6000 (It will NOT come off!). If you feel like you might want to switch out your wreath for the seasons, use a small nail instead!
This sign is really on of my favorite ever! It is stylish, elegant and rustic all at the same time. I have tons of friends asking me to make them one! Now, that's a good "sign."

Don't forget how cute the wreaths are!

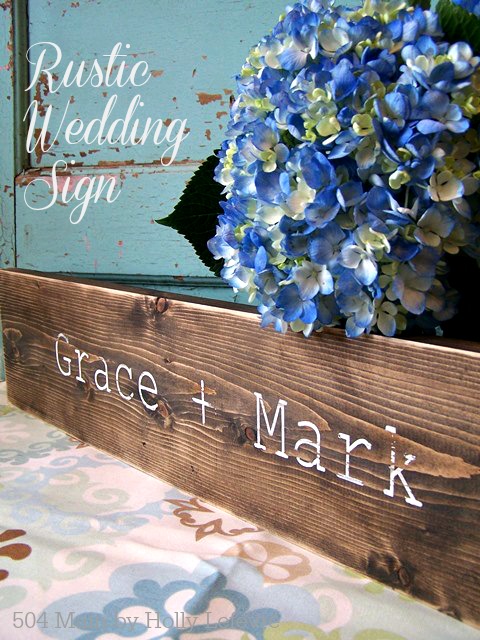
Here is one of my Rustic Wood Wedding Signs
Or my Make Jesus Famous Pallet Sign

Do you paint signs? Do you love signs like me? What's your favorite sign? (I have lots of questions!)


Those signs and wreaths are beautiful, Holly. Thanks for sharing the different methods you used to make your words!
ReplyDelete