I made these DIY Magical Floating Ghosts for my son's first grade Halloween party. He's 14 now...so yeah, sometimes it take me awhile to get around to sharing my ideas (I did not even know what a blog was back then!). They kids loved these little ghosts. I still have the ghost my son made in first grade and my daughter was playing with it...so it was time to revamp it and share!
So, you may wonder, "what the heck do the kids do with these things?" My answer: "They run around the playground chasing each other, pretending to be ghosts and just have fun being kids! It is adorable to watch!
This is a simple project and so cute! I have included some ideas below under "IMPROVISE" so that you can try your hand at these without having to rush to the craft store to buy all new supplies (because I never do that!). I promise 1st graders made these with just a wee bit of help!
SUPPLIES
- 1" (or larger) Styrofoam ball (Improvise - ball up some paper - it wont be as smooth, but it works)
- 1 yard Clear mono-filament
- Cheese cloth (17" long)
- 1/4" dowel (24" long. You can cut it or use cake dowel for a shorter stick)
- Washi Tape, Masking Tape or Paint
- 12" white ribbon, yard or thread
IMPROVISE!
Here are some options to help you DIY these ghosts for less money or with items you have on hand! Some of the effect or design may look different...but guess what the kids will still like it!
- Don't have mono-filament...use ribbon or yarn.
- Don't have a Styrofoam ball, crumple up paper or use a ping pong ball.
- Don't have cheesecloth. use any lightweight fabric.
- Don't have washi tape...use paint and vice versa.
- Don't have a dowel, find a stick.
MAKE IT!
- Cut a rectangle of cheesecloth 17" long. When you take the cheesecloth out of the package, only unfold it one time. That should leave you three layers of cheesecloth.
- Cut a length of yarn about 12".
- Cut a length of mono-filament 36".
- Place the Styrofoam ball in the center of the cheesecloth.
- Bring all four corners up to the center, hold them in one hand above the Styrofoam ball. Grab it around the "neck" and smooth it down.
- Lay the ball/cloth creation flat on a surface.
- Place the length of yarn under the "head" with ends extending to the sides (not tied yet)
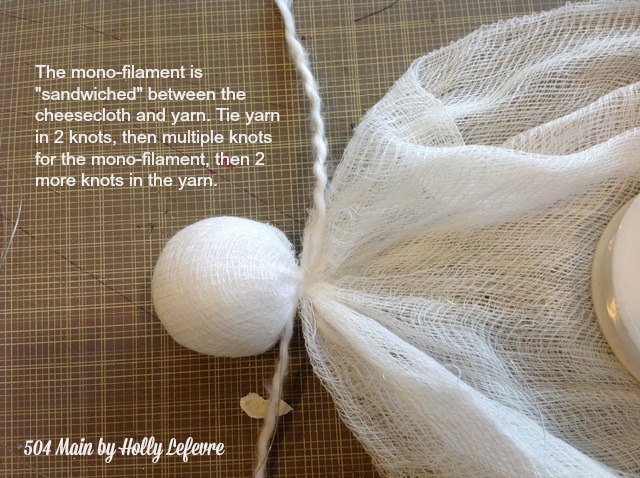
- Lay the mono-filament down the center of the back of the ghost, with about 6" on the body and the longer length extended up.
- Tie the yarn in the back of the ghost, in 2 knots.
- Tie the mono-filament in about 4 knots and then tie 2 more knots in the yarn. Trim the ends of the strings.
- (If you are painting the stick, paint it now).
- About 1" back from one end of the dowel, wrap the mono-filament around the dowel. I wrapped it a couple times, then I alternated sides as I wrapped the mono-filament around about 10 more times. Tie in (multiple) knots.
- Wrap the dowel in washi tape (covering the mono-filament) all the way to the opposite end.
Have a magically fun time playing with your ghosts!


No comments:
Post a Comment
Thanks for stopping by and joining the conversation! I sure hope you come back for more!