


Hi all....
I am still off somewhere...
perhaps celebrating the
Los Angeles Kings first EVER Stanley Cup!
You can take the girl out of L.A. but not the L.A. out of the girl!
*****
Today I have another of my FAVORIT-EST bloggers
for you with a super-awesome tutorial
Michele from The Scrap Shoppe never disappoints
when it comes to creativity and over all sweetness.
Here she is sharing a DIY Letterpress tamp tutorial!

Hello, 504 Main-ers!!
I'm Michele, and I create at The Scrap Shoppe.

I am excited to be visiting Holly today and confessing a secret.
Okay, if you have ever visited my blog it may not be that much of a secret...
I am slightly obsessed with monograms!
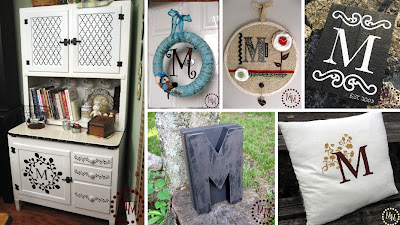 Vinyl Hutch Makeover, Yarn Wreath, Embroidery Hoop Wall Art, Monogram Sign, DIY Letterpress Stamp, Pottery Barn Knock Off Pillow

source
I thought these letterpress stamps would be fun in a jumbo size and today I'm going to show you how to make one for yourself!
![]()
![]()
![]()
![]()
![]()
![]()
![]()
![]()
![]()
![]()
![]()
![]()
Okay, if you have ever visited my blog it may not be that much of a secret...
I am slightly obsessed with monograms!

I'm always trying to think up new creative ways to add them to my decor!
This is my latest inspiration:
source
I thought these letterpress stamps would be fun in a jumbo size and today I'm going to show you how to make one for yourself!

The materials needed to make your own oversized letterpress stamp are pretty basic.
I used a large paper mache monogram letter and a couple of pieces of wood cut about a 1/4" larger than the letter.

Just stacking everything up you can see what I'm going for with these three pieces.
Now to start putting everything together!

The two pieces of wood were glued together then wood putty was used to seal the cracks between the two pieces. It was then sanded and primed. You can see that you can not even tell that this block is more than one piece of wood!

I mixed some brown, black, and dark green acrylic paint to make a grayish brown color and painted the wood block. With the primer, it only took 2 coats of paint for good coverage.

I painted the M the same color as the block. Then I mixed some brown, black, and gold acrylic paint and brushed it lightly over the top of the M, making sure not to give it good coverage. Then I quickly wiped much of the paint back off.

I think that extra lighter coat of paint on top gives the letter a "used" feel like it really was used as a stamp! And it helps add that metallic touch of an old letterpress stamp.

Once everything was painted and dry it was time to glue my monogram to my wood block.
I used my trusty Beacon's 3-in-1 adhesive.
This stuff is like a hot glue gun in a bottle.
All the adhesive power, none of the burns!

I made sure I had my 1/4" edge all the way around my new "stamp" as I glued the letter down.

Although the letter was made of paper mache, it still made the front of the stamp a little forward heavy when it was standing upright. And with that 1/4" gap on the bottom of the stamp, it had a tendency to tilt slightly forward. To remedy that I added a small bit of that material you put under your rugs so they don't move around. Then I painted it black so as not to be noticed.


Its amazing the transformation paint can have!

Another happy monogram project to check off the list!
Thank you so much for letting me visit, Holly!
I would love for you all to visit me at my place sometime!
![]()
Thank you so much for letting me visit, Holly!
I would love for you all to visit me at my place sometime!

****************
THANK YOU MICHELE!
Now head over and see some more
awesome projects at The Scrap Shoppe


Michelle, I love this project. I like all your "M"s. I'm going to have see what I can do with "C"s!
ReplyDeleteOkay, so that is just too clever. When I first saw the one by the tree, I thought, where did she get such a big one of those? Ha! Very nicely done!
ReplyDeleteLiz