You know what we love? Pound cake with little surprises baked inside! Yep - cute little edible finds, like hearts and shamrocks, can hide right inside your pound cake. It is fun and easy to do and the kiddos are always amazed - quite a few adults are impressed too. So, I decided to try my hand a quick Halloween version of the surprise inside pound cake. This time I used bats!
Showing posts with label halloween. Show all posts
Tuesday, October 18, 2016
Labels:
#madewithmichaels,
15 minute wreath,
black,
black and white,
craft,
create,
halloween,
Halloween decor,
holidays,
maker,
Michaels,
projects,
ribbon wreath,
straw wreath,
witch,
wreath
Friday, October 23, 2015
I made these DIY Magical Floating Ghosts for my son's first grade Halloween party. He's 14 now...so yeah, sometimes it take me awhile to get around to sharing my ideas (I did not even know what a blog was back then!). They kids loved these little ghosts. I still have the ghost my son made in first grade and my daughter was playing with it...so it was time to revamp it and share!
Wednesday, October 29, 2014
A few weeks ago, I picked up these paper honeycomb Visionar decorations at the IKEA Paper Shop blogger event. I am the BIGGEST procrastinator when it comes to decorating, and I knew these beauties would be a subtle but fun way to decorate my front porch. And guess what???? It was so quick and easy all you other procrastinators or those who are looking to add a little fun to their Halloween decor have time to do this before Friday!
Wednesday, October 23, 2013
I am always looking for easy crafts that my daughter (and on occasion my son)
and I can do together. After making my bunny garland,
I have a new affection for ripping and cutting up simple cardboard boxes. For this
SUPER SIMPLE Not-So-Spooky GHOST GARLAND,
I added some white paint and strung them on twine...and I love them.
Monday, October 8, 2012
Every year this little town of Pacific Grove, CA is host to the Butterfly Parade.
The parade welcomes the Monarch butterflies to the city, their winter home.
It also gives the elementary school children the opportunity to march in the parade dressed as lady bugs, sea otters, moon jellies, clowns, and patriots,
but the true attraction is the kindergartners all dressed as Monarch Butterflies.
It is a sight that even makes me cynical heart sing.
My boy walked in the parade 6 years ago, but this year it was my girlie's turn. She was so excited and wanted to wear something special. We also happened to be discussing Halloween at the same time...so like any good mother would do, I struck a deal.
With the hubby not working right now, the $100 fairy costumes were a bit extravagant...and I was trying tot talk her out of it...Then she wanted some new boots. The boots were only $20...so I had an idea...
"How about being a Monarch Butterfly Fairy for Halloween?"
Then you can wear the skirt for the parade...
and I already have the supplies to make the skirt...
so then you can get your boots.
Following me? I am not above wheeling and dealing with my kids!
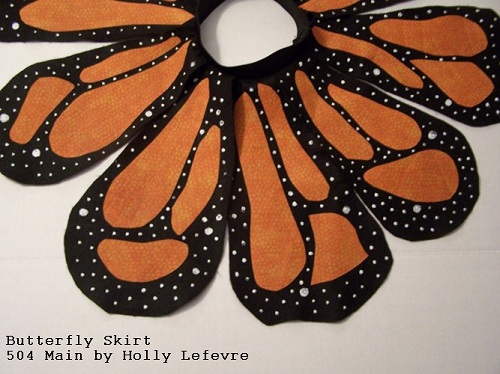
I knew I wanted to make a skirt and then stumbled upon this AMAZINGLY CUTE idea on for a twirly butterfly skirt on The Train To Crazy. I pinned it and waited and then got sewing (sort of).
![]() |
photo from The Train to Crazy |
FIRST: I will direct you to The Train To Crazy for the tutorial. This is where I got the idea for this skirt and the tutorial is great. If you refer to The Train to Crazy and Made (see references below) you will see great photos. My intent here is to tell you what I did differently - this was not my original idea.
I did make a few adjustments (because I always do) and I could do a tutorial for a circle skirt (I did make patterns in the fashion industry for 10 years)...
BUT there is no point in reinventing the wheel.
Here are the supplies I used and the tweaks I made to the process. I had no intention of blogging about this so I took very few tutorial photos.
SUPPLIES
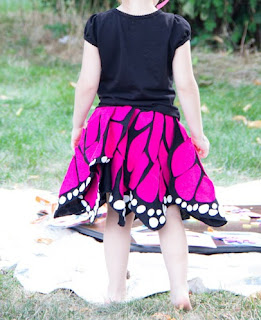
- 1-2 Yards of black felt (about $6.00/yard). You can probably get by with one yard if you position the wings just right. My girl is 5 and has about a 19" waist. We had 9 wings on the final skirt. I could have added 2 more for more fullness...and still might.
- 1 yard orange felt or other fabric. I used some pre-cut yardage from Walmart
- Heat N Bond (Ultra)
- White Puffy Paint
- 1 yard (or less) 2" Elastic
- Black Thread
- You will need a sewing machine (or sew by hand) and an iron/ironing board.
HOW TO:
1. Use the pattern and cut out 9 to 11 (or more as needed) wings from the black felt.
2. Cut manageable size squares of the orange fabric.
3. Follow the directions on the Heat N Bond and adhere it to the back side of the orange fabric.
4. Cut shapes out of orange (I just free-handed the shapes - they look best irregular anyway). I cut a few out, placed the on a few wing at a time and then cut more pieces to fit into the "puzzle."
5. Once happy, peel backing off the Heat N Bond and iron into place.
NOTE: I am not intending this skirt to be machine washed, so I am not concerned about the exposed edges or fraying, but the Heat N Bond adheres the fabrics really well and on other projects I have used this same method and had no issues. Appliqueing the pieces is also possible.
6. I did not make a circle skirt as a base to this skirt. My girlie just wore long bike shorts/leggings under it. This tutorial for a circle skirt from Made is excellent if you want to make a skirt, or for more directions in attaching the elastic, etc.
7. Layout your wings with each one overlapping the other by about 1/2". Run a basting stitch around the top of the wings.
8. Cut elastic 2" larger than the waist - 1" for give and 1" for seam allowance.
9. Sew elastic together, then fold elastic flat (see MADE tutorial) and stitch down each side.
10. Pin wings to the elastic. I pinned at center front and center back and then the sides. Then stretch the elastic and pin at the points in between.
11. Sew elastic to skirt wings - You need to stretch the elastic when sewing. I used a straight stitch and 1/2" seam allowance.
12.Trim threads and lay flat on a surface with the wings spread out. Depending on your wings, you may have to do this in multiple steps...
13. Use the puffy paint to make polka dots on the wings. My dots are not as opaque as I intended but I was in a time crunch (yep, I waited until the last minute). After accenting my wings, I went back and made a few of the dots larger.
14. My dots were dry in about 6 hours and I had a super cute skirt for my girl.
Sorry I do not have a lot of photos but AGAIN, if you refer to The Train to Crazy and Made you will see great photos. My intent here is to tell you what I did differently.
The skirt was a huge hit with her and her friends.
She twirled in it...
She ate cupcakes in it...
She marched and waved to the crowd...
This post is written and created at 504 Main by Holly Lefevre
Wednesday, October 19, 2011
Every year I try to ignore the holidays and they creep up on me. For Halloween I actually had some fun ideas - 2 separate themes - I was going to go all out...but life took over instead. Next year - expect amazing things (my fingers are crossed as as I type this).
I did manage to get ONE project done 3 MONTHS AHEAD
and still barely am getting it posted early.
Anyway...I received a bottle of DecoArt Crystal Gloss Enamels about 3 months ago and inspiration struck for 2 projects - one for Halloween and one because I loved it (that post is coming!).
This is my favorite kind of holiday crafts - one the kids and I can do together! It is SUPER-EASY! Although they wondered why we were painting pumpkins in July!
I have used the Gloss Enamels many times and love them...but I may have found a new love - look at the gorgeous translucent color Crystal Gloss Enamels gives, so I combined the two here.
SUPPLIES
- DecoArt Crystal Gloss Enamels in Bright Orange
- DecoArt Gloss Enamels in Black
- DecoArt Gloss Enamels in Avocado
- Rockler Foam brush
- Small tipped paint brush
- Mason jars or left over jars (I LOVE Using left over jars for projects like this). This is also super cute done with an Ivy bowl (you know those round bowls with the waving lips...I made one and dropped it before I took the photo - it is that kind of week!)
Optional
Canvas Corp Jute Rope
Hot Glue/Hot Glue Gun
NOTE: By the way...there have been about a million tutorials on tinting glass jars on blogs/Internet since I made these. This is the method I used and it worked for me.
Paint and Bake
Decorate and Display!
For display, I added some dried beans to the bottom of the jar to hide the base of my tea lights (on Halloween night I will use battery operated candles outside)
Nestle candles into the beans.
You can also use these as fun vases - the Pink Jars I made had water/flowers in them for 2 weeks and the paint stayed perfect!
So, this is pretty easy craft -
the kids can do it, it can be done with things around the house
Disclosure: Some products received through the DIY Club. See my full disclosure policy in the top navigation bar.
Sunday, October 16, 2011
Some of you may remember this post...
{Yes,this is a repost...because I LOVE them!}
It happens to be one of my ALL TIME favorite projects...
and I have a little something similar but different being created here tomorrow...
so I thought I would post my tattooed pumpkins again.
(I am so getting every penny out of this post!)
I do wish my photos were better...but just wait until the new project!
(fingers crossed!)
I do wish my photos were better...but just wait until the new project!
(fingers crossed!)
Last year I did a giveaway where I received some product...and some of that was tattoo paper/kit. I really wanted to do something different. At the time neither of my kiddos were into stickers or (temporary) tattoos...so I wanted to stretch myself.
(since then Jules has taken to temporary tattoos)
PUMPKINS were my answer!
Tattooed Pumpkin Tutorial
Here's what you need:
- You just need Tattoo Paper/Kit - you can find these online or at Michaels. I think they only come 1-2 sheets per pack (about $10.00)...use a coupon! (The version I am working on uses a new technique)
- Pumpkin or gourd.
- My images are from The Graphics Fairy - See below for direct links:
NOTE: Now, I discovered that the bumpier the object {like all those ridges on a pumpkin} the trickier it is to get it to stick evenly...but it is just a learning curve...after a try or two...I got it!
Fruit works too...pears worked like a charm...and apples would be fab!
DIY IT!
- Seriously, I just followed the package directions.
- Decide on a design.
- Print it out using your computer and printer.
- Apply the adhesive.
- Cut out - with your scissors.
- Position and rub.
- Apply a moist cloth to dampen and loosen the top paper...
- ...and you are DONE!
What a great idea for a wedding!
Or any special Holiday table or occasion!
OK, now off to get some sleep
and finish up the new version!
Wednesday, October 12, 2011
Unlike most bloggers, I seriously am not a fan of decorating for the holidays.
OK, I said it are you going to kick me out of the blogger club now?
However, I still do decorate - the kids love it and love to help....
AND when it comes time for Fall and Halloween...
I LOVE PUMPKINS!
Who knows I may end up being a crazy pumpkin lady in my old age.
My kids and I spent some FUN time at this pumpkin patch yesterday. I have always wanted to stop at this place - as you drive by on the 101 freeway you can see the hillside covered with pumpkins. We scored some great pumpkins - all small or medium...
the car was PACKED to the brim so the big ones had to stay.
We scooted home with the pumpkins and we were greeted by 2 pumpkin projects I have completed for this season. And amazingly these have been done for months. Here is the first - simple (easy-peasy) version of "5 Little Pumpkins" - we sing this song all the time!
SUPPLIES
- Canvas Corp Canvas: 1- 4x4 in canvas, 4 mini (2 canvas, 2 burlap)
- Canvas Corp Jute Rope
- DecoArt So Soft Fabric Paint, Orange*
- DecoArt Americana Acrylics, Light Avocado
- DecoArt Americana Acrylics, Ebony
- Gorilla Glue
- 1 paint stick or piece of board (I had a long paint stick)
- Burlap/Canvas/Felt - whatever you want to use for the leaves green ribbon/twill tape/buttons - just whatever you have around to add a pop of color.
- Hot glue gun and glue sticks
- Paint brush
DIY IT!
Check out the FULL TUTORIAL at The DIY Club!
Glue!
Embellish
What's your favorite way to decorate for Fall or Halloween?
Don't forget....ENTER TO WIN a copy of
THE BIG ASS BOOK OF CRAFTS 2 BY MARK MONTANO!
View my disclosure policy my clicking on "disclosure" in the top navigation bar.
Subscribe to:
Posts (Atom)