Showing posts with label paint. Show all posts
Wednesday, April 27, 2016
Labels:
chalk paint,
craft,
decoart,
DIY,
farmhouse,
farmhouse style,
fixer upper,
home,
home decor,
home sign,
home sign with wreath,
original home sign,
paint,
projects,
rustic decor,
wood,
wood sign,
wreath,
wreath as O
Friday, February 26, 2016
On a whim, a new friend asked me if I could make her a sign on a pallet. "Sure! I can do that." She had a vision but was also willing to let me do my thing. Really, in the end all she specified was the wording "Make Jesus Famous." This was going to be a statement piece for sure.
Labels:
age wood,
artwork,
chalk paint,
DecoArt paint,
distress paint,
DIY,
minwax,
paint,
pine boards,
projects,
Silhouette Cameo,
silhouette cutting machine,
statement piece,
stencil,
wood sign,
wood stain
Friday, September 6, 2013
This Painted Fall Burlap banner was created as a sponsored post for DecoArt
I was holding out to post anything Fall or pumpkin-y until September...I made it!
I do not do a whole lot of seasonal decorating...
but banners, those are easy to swap out and store!
I decided to start off Fall with my latest banner.
Seriously I am turning into the banner lady -
but people keep asking for them and I keep making them..so there ya have it.
Now on to the banner! This banner begins like my "We Love School" Banner but has so much more
to it. To me Fall is about texture, rich colors and a feeling or warmth.
I think through the use of layers of paint and pattern and the texture
of the burlap I have accomplished this feeling in this banner.
Tuesday, August 13, 2013
I am a little banner obsessed.
If I can make a banner for an occasion...I do.
Last week I had a small Back to School party
and made this super cute "We {heart} School" banner for decoration.
It is pretty simple and has a rustic, vintage feel.
And I kind of love it!
Wednesday, September 5, 2012
I have always loved to surround myself with picture and trinkets that inspire me,
make me smile or giggle, or that I just simply like.
I have always had a bulletin board in my room or home.
I consider it to by my ever-evolving mood board.
So, my other 3 bulletin board are full or kid stuff,
household stuff, funny stuff, but I wanted a board just for me!
One full of my favorite things to inspire me and only me!
You can stylize the board any way you want...here is what I did.
Supplies
- Bulletin Board, any size you desire ( got mine for about $6 at Walmart)
- Pretty paper to decorate the frame...from Aaron Brothers. They have an amazing selection of single sheet (oversized) decorative papers...LOVE!
- Paint in your choice of colors. I used DecoArt: Spice Pink, Grey Sky
- Stencils: I used DecoArt alphabet script and polka dot accent
- Decoupage medium such as Mod Podge
Equipment
- Stencil Brush
- Paint Brush (for decoupage)
- Gorilla Glue
- Masking tape or blue painters tape (I used masking tape, but next time I will use the painters tape. The masking tape may stick too much and pull some of the cork off...the painters tape is much more gentle.
- Ruler
- Craft Knife
Accents (optional)
- Lace/small fabric trim
- Large pearls
- Tim Holtz Metal Corners (purchased at Aaron Brothers)
DIY IT!
(You can stencil the bulletin board first or you can do the frame first...there is not advantage or disadvantage to either way...you just need to wait for things to be dry)
FRAME
(You can stencil the bulletin board first or you can do the frame first...there is not advantage or disadvantage to either way...you just need to wait for things to be dry)
Stencil:
- STEP 1: Start in one corner (makes it easy to keep level and line up) with the polka dots and begin stenciling with the Grey Sky and a stencil brush. I made a frame (of sorts) on each side of the bulletin board, just as wide as the stencil.
- Step 2: Find the center of the board, horizontally and vertically and then determine the placement for your letters/words based on the center and how many letters are in your words. Use Painters tape (or eyeball it) to mark when the words are so they will be level.
- Step 3: Line up your stencil and start painting using a stencil brush. I used Spice Pink and Grey Sky for the words I chose.
FRAME
- Step 4: Cut your over sized paper into 2" strips (you may need them to be wider depending on the size of your frame)
- Step 5: Apply decoupage on one portion of the frame at a time and line up strips of paper with inner edge of the frame. Press down and if necessary, use the edge of a craft knife or knife to tuck in the edge between the frame and cork. Wrap the paper around the back side of the frame and trim with craft knife.
- Step 6: Continue to apply the strips of paper until the frame is covered. Depending on the size of the frame, you may need to overlap paper edges. At the corners, fold matching edges into 45 degree angled to miter the corners and match them up.
- Step 7: Once all the paper is place, use the decoupage and coat the entire top of the frame with 2 coats, letting dry between coats.
- Step 8: Add embellishments as you desire. I used some small. 1/4" crochet trim I had, large pearls and the metal corners from Tim Holtz to dress up my board. Just a little Gorilla Glue and we are good to go!
Now add your favorite things and be inspired!
How do you stay inspired?
This post is written and created by 504 Main by Holly Lefevre
disclosure: at various times some of these items were provided to me by the companies. I have fulfilled those posting obligations and now as using them because they are awesome.
Saturday, August 4, 2012
You know it is not good when the weather forecast on your (smart) phone just says "FOG" in big black letters...It has pretty much said that all summer long.
Labels:
art,
chalkboard,
craft,
create,
distress,
DIY,
diy. paint,
paint,
pallet,
pallet sign,
projects,
stencil,
sunshine,
wood pallet
Tuesday, May 15, 2012
OK, no joke, this sign has taken me 5+ months to complete.
You ever have those projects that look perfect in your mind...
but you start them and they are not turning out so perfect in reality...
well, this was one of those.
Finally I think I got it!
It looks NOTHING like the original vision...
N-O-T-H-I-N-G,
but I like it nonetheless.
This sign is for my parents...paying a little
a little homage to their love of the outdoors, the beach
and my Dad's ever popular "It's seventy and sunny" greeting.
It was supposed to be a Christmas present...
so I am either really early or really late.
- 1/4 “ plywood, cut to 24” L x 16” H 1/2” plywood (you need a 24”L x 16”H piece to cut the sun
- NOTE: You can use all 1/4” or all 1/2” plywood to make the sun and base. I used the 1/4” for the sign to make the sign a little lighter. And I liked how much the 1/2” plywood stood out from the base.
- Gorilla Glue Wood Glue
- Jigsaw (DeWalt from Rockler)
- Decoupage, DecoArt
- Americana Acrylic Paints, DecoArt in Bright Yellow, Canyon Orange and Jack-O-Lantern
- Canvas Corp paper, Beach Sampler on Ivory, Blue and Ivory Chevron, and Blue and Ivory Beach Words Reverse
- Foam brush, Rockler
- Paint brush (I used my old Purdy brush designated especially for crafts - by me!)
- 2 – 3” DISChangers
- Stencils Elmer’s Painters Marker, Black
- Dremel Multi-purpose tool
- Distress Ink
Here is a sneak peek...
you can catch the full tutorial over at The DIY Club
Now, just...
Draw it
Cut it
Grab some paper
Paint it!
Decoupage it
Glue it!
Embellish it!
Sand it and mark it up!
Hang it!
See ya at the beach!
Sunday, April 22, 2012
I like to collect things...
big things, small things, things to sit on,
to write on, to put stuff on...
well,it has gotten to be a little much...
because I can never seem to find the time to finish them all.
NOW, I must get my act together and here is where I am starting...
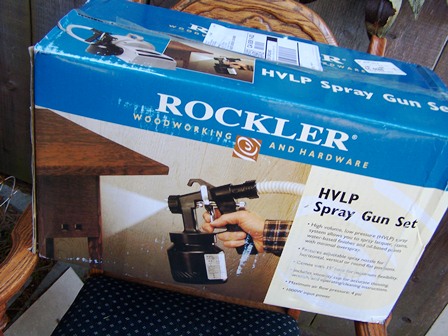
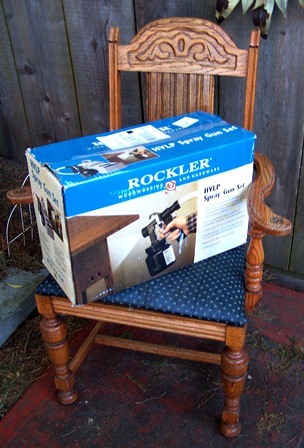
These lovely chairs.
I bought 6 at Goodwill...3 months ago
and I desperately need them in my house.
You see my current dining room chairs are beyond awful.
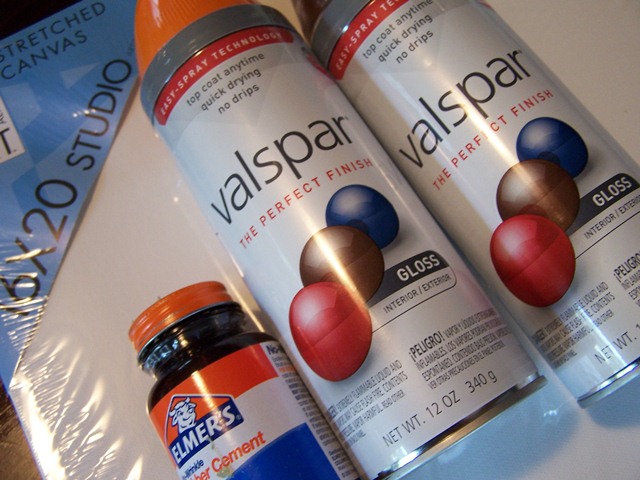
I have a vision (sort of) for these chairs. They look dated and ugly now....but with some creamy white paint, a little distressing and some new seat covers...these are going to be gorgeous!
Go read more about this project and so many others at The DIY Club!
Trust me....or at least play along!
Now off I go to start sanding and prepping!
(I am paying the older kiddo per chair to help and!)
Tuesday, March 6, 2012
I have so many projects that I want to try...
using so many different mediums and supplies.
Oh to find the time!
Well, I finally did find the time to try this project
that was on the cover of Better Homes and Gardens.
(that is a link to their tutorial)
I had just received some Valspar Spray Paint in Island Orange,
had a canvas, and plenty of foliage in the garden...
so I gave it a shot...
and perhaps a certain 4 year old (again)
also really wanted one or two of these canvases for her room.
(we will be making more in other colors)
I was really impressed with the Valspar and the gloss finish was gorgeous (you cannot see the gloss as much on the canvas but you can on the "nest" project I am previewing at the bottom of this post)
Can I tell you how much I LOVE the Easy Spray Technology - a larger finger pad making it easier to spray...and the caps just twists to use - seriously...heaven!!
It also helped that the weather finally cooperated
with me so I could head out side to paint away!
NOW...here's the
GIVEAWAY CLOSED
that was on the cover of Better Homes and Gardens.
(that is a link to their tutorial)
![]() |
source, better homes and gardens |
I had just received some Valspar Spray Paint in Island Orange,
had a canvas, and plenty of foliage in the garden...
so I gave it a shot...
and perhaps a certain 4 year old (again)
also really wanted one or two of these canvases for her room.
(we will be making more in other colors)
I was really impressed with the Valspar and the gloss finish was gorgeous (you cannot see the gloss as much on the canvas but you can on the "nest" project I am previewing at the bottom of this post)
Can I tell you how much I LOVE the Easy Spray Technology - a larger finger pad making it easier to spray...and the caps just twists to use - seriously...heaven!!
It also helped that the weather finally cooperated
with me so I could head out side to paint away!
Supplies
- 1 Can of Valspar, Gloss Finish, Island Orange
- 16 x 20 canvas, Aaron Brothers
- Rubber Cement, CraftBond from Elmers
- Leaf/Foliage
DIY
1 - Use rubber cement to create a frame around the canvas. Just brush it on around the edge of the entire canvas. It won't be perfect and that is OK. I suppose if you want perfect you could tape it off instead. Let dry.
NOTE 1: BHG also used cold press board...canvas worked just fine...I like the look a lot better! And no need to frame it - it is done and finished looking.
NOTE 2: BHG says to use Frisket (and never used it). I did not have any but I always have rubber cement. For me - it worked just fine!
NOTE 1: BHG also used cold press board...canvas worked just fine...I like the look a lot better! And no need to frame it - it is done and finished looking.
NOTE 2: BHG says to use Frisket (and never used it). I did not have any but I always have rubber cement. For me - it worked just fine!
2 - Find a good leaf (BHG suggests silk flowers). I selected some (real) ferns from the garden (FREE!). Plants with texture and open areas works best. I tried a couple of call lily leaves...guess what...they look like big blotches.
3 - Protect work area (drop cloth, cardboard, plastic) and surrounding areas (we are talking about spray paint) and wear proper protective gear (gloves, eye protection).
4 - Place foliage on canvas in desired position.
5 - Prep paint by shaking...twist Valspar's AWESOME cap (yep twist!) and paint. BE CAREFUL - the first "blast of paint" can cause your foliage to move - I sometimes had to gently hold my fern in place (with one finger).
6 - Spray all over canvas.
8 - After dry, rub the edges of the canvas (where you applied the rubber cement) to "remove" paint and create the natural/uneven border. I just used my finger...you can use an eraser. The rubber cement just balls up (with the paint) and rubs off. It will make a bit of a mess in the form of rubber "balls."
![]() |
close up of the canvas corner and finish |
![]() |
I adore this look - so happy with my rubber cement and paint and canvas! |
![]() |
you can make the border as fat of thin as you want |
I used one of my beloved bundt pans and sprayed it in the beautiful Glossy Roasted Coffee, filled it with some moss and little eggs - instant Easter decor!
I will have a full tutorial on this piece in a day or so...but here's a sneak peek!
NOW...here's the
GIVEAWAY CLOSED
Win 2 cans of Valspar spray paint
Open to US residents
Runs from 3/6/2012 through 3/13/2012 at midnight PST
LEAVE A SEPARATE COMMENT FOR EACH ENTRY
MANDATORY ENTRY:
1 - Leave me a comment telling me what you want to spray paint
Optional:
2 - Spread the word: blog or facebook about it! Tag 504Main and Valspar
3 - Tweet the giveaway. Tag @504Main
4 - Follow 504 Main via GFC, RSS or email
![]() |
Pink, purple, and green art pieces are in the works! |
Want to see some more fun projects and have even MORE chances to win spray paint...head over to these other blogs!
The DIY Showoff
(IF Roeshel's site is having technical difficulties, be sure to check back!
You don't want to miss her project!)
(IF Roeshel's site is having technical difficulties, be sure to check back!
You don't want to miss her project!)
GIVEAWAY CLOSED
Subscribe to:
Posts (Atom)