Showing posts with label furniture. Show all posts
Wednesday, January 27, 2016
Tuesday, October 30, 2012
One of the things I have done pretty little of here is
redo/revamp/refashion furniture!
I enjoy doing it...and I do it now and then in my real life,
but do not always blog about it.
I surely do not consider myself an expert in this field...
but I do love a challenge!
redo/revamp/refashion furniture!
I enjoy doing it...and I do it now and then in my real life,
but do not always blog about it.
I surely do not consider myself an expert in this field...
but I do love a challenge!
Recently I was asked to participate in the Wayfair DIY Blogger Challenge.
So, of course, I accepted!
Basically I was allowed to select a piece of furniture from
the Wayfair website and given a gift card
for supplies and asked to see where my imagination would lead me.
So, of course, I accepted!
Basically I was allowed to select a piece of furniture from
the Wayfair website and given a gift card
for supplies and asked to see where my imagination would lead me.
Well, that was the problem...my imagination led me all over the place!
I ended up selecting this coffee table to refashion...
...and had about 100+ ideas for it...
including a kids art desk, an art cart, a rolling game/puzzle table.
I kind of overwhelmed myself.
...and had about 100+ ideas for it...
including a kids art desk, an art cart, a rolling game/puzzle table.
I kind of overwhelmed myself.
I went out and bought wood, casters, spray paint, handles, and other supplies...
and then I changed my mind!
I was making this way too complicated
(I am really good at that)
and...
and then I changed my mind!
I was making this way too complicated
(I am really good at that)
and...
I started to paint the table top and did not like it...
so I scratched that idea.
Do you see why????
so I scratched that idea.
Do you see why????
See...not pretty, right?
The weather had been OK...until it was time to spray paint
and then got cold and wet...so that did not help!
The weather had been OK...until it was time to spray paint
and then got cold and wet...so that did not help!
Then I remembered that I had a great place for this table in the guest room
(which I am continually refashioning too)...and I kind of wanted to create a girly Parisian vignette that included my favorite old books, my French Labeled Eggs, my cameo art and other fabulous goodies!
I pulled out some DecoArt Metallic Finish in Silver and Mod Podge,
and went to creating!
SUPPLIES
Piece of furniture (from Wayfair)
Mod Podge Matte
Paint Brush or foam brush (for Mod Podge)
Foam Brush for Metallic Finish
Paper Towels or a rag
DecoArt Elegant Finishes Metallic Paint, Silver
2 sheets, Decorative paper (I got mine at Aaron Brothers)
Krylon Clear Polyurethane Spray
Upholstery tacks/Upholstery Nails
Small hammer
MAKE IT!
First...assemble you piece of furniture, following all of the directions.
This piece only took me 30 minutes to put together.
It just took a few screws, some dowels and a dusting off
and the table was ready for its transformation.

Since I thought I was spray painting, I had sanded the entire piece.
It does help the paint adhere.
I started by applying the metallic paint only along the edges of the piece
and then realized I like the look of it all over.
(Good thing because I had already sanded my piece!)
I did continue using a heavier coat on the edges, because I liked the effect.
Using a paper towel (rag) and a foam brush, I applied the Elegant Finish all over the piece, working in smaller sections at a time.
I gently wiped off the finish as I went,
often touching up the corners and crevices with the foam brush.
Let the finish dry.
Once dry, spray the entire piece with Krylon Clear Polyurethane and let it dry.
Layout the paper on the table top to ensure placement and coverage.
Apply one liberal coat of Mod Podge on the entire table top.
Place the paper and smooth with your hands
(or sometimes I like to use a 3" plastic putty knife/scraper).
Once smoothed and placed correctly,
apply another 1-2 coats of Mod Podge on the top of the paper.
My paper was not the size of the table top, I tore another piece and placed them overlapping.
apply another 1-2 coats of Mod Podge on the top of the paper.
My paper was not the size of the table top, I tore another piece and placed them overlapping.
Let dry slightly between coats. Continue to smooth as needed.
I did NOT finish my edges in a clean cut I tore the edges
and folded them over to create an old feeling detail.
(see photo below)
Let dry.
I did NOT finish my edges in a clean cut I tore the edges
and folded them over to create an old feeling detail.
(see photo below)
Let dry.
Apply upholstery tacks around the edge of the table using a hammer.
You can also use any other sort of trim you prefer.
I just placed the tacks about every 1.5" and pounded them in...
EASY and inexpensive for a great detail.
So, that is my little transformation!
Now I need to make that art cart!
This post is written and created at 504 Main by Holly Lefevre
disclosure: I was provided a piece of furniture by Wayfair and a gift card by GiftCards.com to participate in this challenge.
Friday, July 20, 2012
I have had the same white "plastic" patio furniture for
a very, very long time...like 13+ years.
Every year I look, and swoon over the pretty furniture
I see in the stores...
and every year, I leave empty-handed.
On the other hand, this furniture is still in good condition.
The original cushions are long gone (think yellow flowers),
and so is the umbrella, but the chairs and table are sturdy
and well made (thank you Sears!)...
so why not spruce up these guys.
Beside, in the house we use stuff until their is nothing left to use!
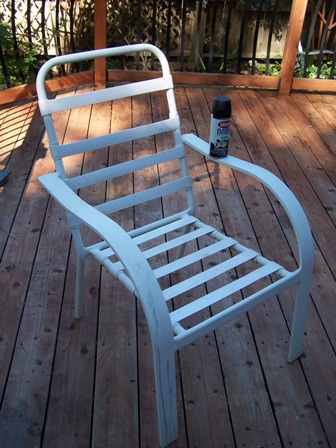
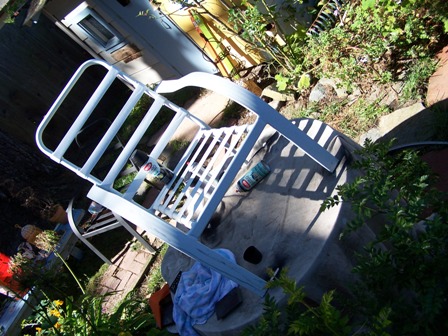
This is where I started...
| The OLD WHITE CHAIR! KRYLON FUSION TO THE RESCUE! |
So, there is nothing earth-shattering about this DIY...
other than it looks 100% better,
and the lesson that just because something is old
does not mean it cannot get a makeover and be pretty again!
SUPPLIES
- Old patio furniture (found in your own backyard, a street corner, dumpster or thrift store)
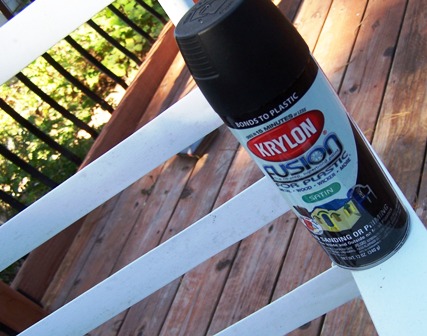
- 8 Cans of Krylon Fusion in Black, Satin finish (it may take more, depending on the style of furniture). I used Fusion because it is the best for bonding with plastic. I will probably need another few cans to finish off the table.
- Good scrub brush and bucket of soapy water.
- Drop cloth/cardboard, lots of newspaper for protecting your surfaces
- Eye, mouth, and hand protection (recommended)
DIY IT!
1. Prep your surface - no sanding or priming needed...I just gave the pieces a good wash with soapy water and a scrub brush.
2. Let dry thoroughly.
3. Grab a chair - place it on the covered/protected surface. I found it easier to elevate mine on top of a table to work on.
4. I laid out one chair at a time - and worked on it over the course of the day.
Begin painting/spraying in smooth even "strokes". Let dry between coats and reapply. I applied about 3 light coats - I was always finding a nook or cranny that I missed.
My chairs were of that textured plastic, so I practiced patience and took my time and the result was amazing.
5. Once dry, flip the chair over and repeat the painting process.
6. Repeat for all the chairs and table.
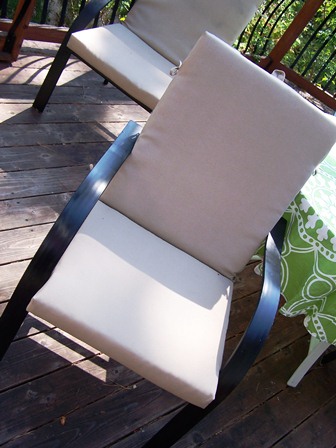
The results....
![]() |
| NEW PRETTY BLACK CHAIR |
As for the table...it is not 100% done...I need (want) to take the glass out before I paint and really clean it good...but I need hubby hereto help with the glass and he has not been home (where we have not been at a party of kiddo function) forever!
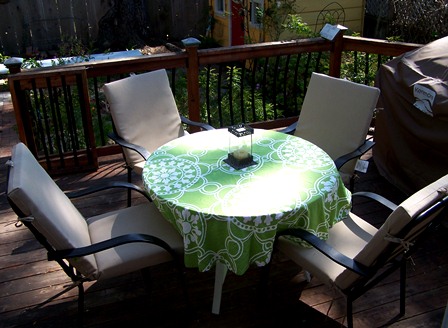
I picked up some new cushion on clearance (about $10 each!!!!),
tied them on the chairs and love the new black chairs!
Now, I love a DIY that saves me money
(and so does my hubby!)
What outdoor projects have you been working on?
Link up to the Bloggy Olympics and show us what you have been doing.
There is also a give away...hop over to Directions Not Included to get in on the giveaway...and it is a good one:
WIN $50 in plants (for fall shipping) from
They sell native wildflowers and ferns nationwide.
Wednesday, May 2, 2012
Many years ago, I used Wallpaper for Windows to create privacy at my home in Los Angeles. Recently I was contacted by Wallpapers for Windows and when I checked out the website, I was stunned and amazed at the fabulous offerings they now have.
I love many of their designs, like…
These decorative accents
and ….
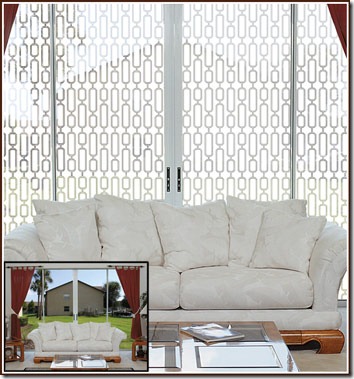
which is semi private and contemporary looking.
I like the unexpectedness of it’s modern look with the florals and vintage goodies in my living room.
I had 2 projects I wanted to use Avalon for…
A window on a side entrance door (seriously I should call it the front door because that is the one everyone uses)
And the glass door on a cabinet that is being transformed to glassware cabinet. I have been procrastinating on this for way too long.
I measure my panes of glass, length and width; sent in the measurements;
and in and in a few days I received trimmed to size pieces.
They were all labeled - perfect for my projects.
This service is a nominal fee…but well worth it.
and in and in a few days I received trimmed to size pieces.
They were all labeled - perfect for my projects.
This service is a nominal fee…but well worth it.
Since I have worked with Wallpaper for Windows before I do know that cutting it by yourself is really easy too…so you can easily do it at home if you prefer!
This Trim to Size Service just saves you a bit of time!
The first project I tackled was my door.
A couple years ago I sprayed it with glass frosting and painted a stencil on it…and loved it…but since I am a DIYer and always changing things up…
it was time for the door to get its makeover.
A couple years ago I sprayed it with glass frosting and painted a stencil on it…and loved it…but since I am a DIYer and always changing things up…
it was time for the door to get its makeover.
Door Before
I removed the treatment by using a spray: Painters Pal from Goo Gone and a sharp putty knife.
I prepped the surface my cleaning it thoroughly
and waiting for it to dry.
To apply Wallpaper for Windows, the process is super simple. In fact my friend was hanging out with me as I did the cabinet door and she was amazed at the transformation and how quickly I whipped that together.
Spray the glass with a soapy water solution (enter ratio); peel backing off of the wallpaper (do not get the backing wet); Place on glass.
Spray generously on top of the film; Use the squeegee to remove bubbles..work from the inside out.
Ta-Da!
My second project
I have had this cabinet that has been in my garage for, well, let’s just say way too long (years). First I was going to paint it red…then white…then, well, I brought it inside…
and ultimately I decided to leave it alone.
(I happen to love real wood)
As nothing was speaking to me.
and ultimately I decided to leave it alone.
(I happen to love real wood)
As nothing was speaking to me.
Cabinet Before and After
I cleaned up the pieces and changed out the hardware
and that already made a huge difference, but I am not one to display her glassware or china, so I wanted something light that would dress up the cabinet and "hide" the pieces that were going inside.
I will be adding shelves to the cabinet and painting the inside for sure…
and I have a suspicion I will be painting the cabinet in time too….
but for now, I cleaned it up, changed the knobs,
and added the Avalon Wallpaper for Windows.
and I have a suspicion I will be painting the cabinet in time too….
but for now, I cleaned it up, changed the knobs,
and added the Avalon Wallpaper for Windows.
Be sure to visit
Now, how about taking your chance at
winning $75 towards a purchase at
GIVEAWAY DETAILS
-Open from 5/2/2012 through 5/9/2012 at midnight PST
-Open to US resident with a US Mailing address.
-Email must be linked to profile or left in the comment.
-Winner has 48 hours to respond after being contacted.
-Leave one comment for each entry…without the mandatory entry, no other entries count.
MANDATORY ENTRY:
Visit Wallpaper for Windows and select you favorite design and come back and tell me what you would use your $75 for.
OPTIONAL #1:
Tweet the giveaway (This is just an example- you can tweet whatever you what) “You’ll love Wallpaper for Windows. Win $75 towards your purchase from @504main and @windowfilmguy www.504main.com"
OPTIONAL #2:
Share the giveaway via a blog post or facebook post (leave the url in the comment)
Good luck!
Subscribe to:
Posts (Atom)