504 Main by Holly Lefevre: Disney Princess party
twitter facebook instagram bloglovin google plus pinterest youtube
Showing posts with label Disney Princess party. Show all posts

Monday, September 16, 2013

The Little Mermaid is my favorite Disney Princess and I was thrilled to throw a party and write this sponsored post for Collective Bias®  Social Fabric® Community to celebrate The Little Mermaid.

I was a teenager when The Little Mermaid was released.
But I went and saw it in the theaters. I loved it!
Then I purchased the VHS tape...
then I purchased the cassette soundtrack...
and then my friend gave me a Sebastian watch for Christmas.
Yes, The Little Mermaid - Ariel - is my favorite Disney Princess EVER!
My daughter loves Ariel too!

The Little Mermaid Viewing Party #DisneyPrincessPlay #shop

 photo arrow.pngCONTINUE READING


Sunday, November 4, 2012

When I plan a party, I like to serve really good food (don't we all)
I don't get overly overcomplicated or fancy-schmancy,
but amazing tastes with great variety is important.
 Where I do veer from this rule is the dessert...
I like to do something quirky, fantastical, or just plain fun!

edible tea cup

For the Princess Tea Party, I whipped up a simple little dessert
and served it in an Edible Tea Cups and it was a hit!
I promise I whipped these up in no time at all
(really I made 15 in less than 20 minutes!) 
And, I will be totally honest with you..this is not my area of expertise...
I am sure someone could make them super fancy or elaborate,
but this worked for the girls, it worked for me...
and this method is really EASY!

edible tea cup

My friend Randi at Dukes and Duchesses shared a photo of some adorable miniature tea cups on Facebook a few months ago and I hunted down the full tutorial from She Knows.

I made a few using that tutorial (the tutorial is really easy to follow),
but I need to change things up. Here is why:
1 - I wanted something bigger
2 - Having Miniature Reese's Peanut Butter Cups in my house is dangerous!
(the original tutorial uses them)
3 - I was not getting the results I wanted....as I cut (or tried to cut) those sugar cones, well, lets just say there was a lot of breakage.

So, I thought that has to be am easier way for people like me who are impatient and do not have mad knife wielding skills. So I created my version!

edible tea cup at Princess party

INGREDIENTS AND SUPPLIES
  • 1 sandwich or quart size zipper bag 
  • Wilton Candy Melts. I used white you can use whatever flavor/color you want.
  • Keebler waffle cups/bowls (this was the only brand at my local stores)
  • Biscuit cookies. The BEST deal I found was at World Market...99 cents for a package! You can use an assortment of other cookies found at the local grocery store, you can even use sandwich cookies and scrap the inside cream out. My second choice was Marie Lu Biscuit
  • Large Pretzel Twists
  • Optional: Wilton Pearl Sprinkles 
  • Optional: Chocolate Mousse Recipe
  • Optional: Whipped Cream
edible tea cup ingredients

MAKE IT!

I PROMISE THIS PROCESS GOES QUICKLY...Really, I have no patience, and I did it! (again I made 15 min about 20 minutes)

Here is a "dry fit" photo for you to see how they go together!


  • Layout the supplies for a few tea cups at a time.
  • When it comes to the pretzels (handles) I gently cut them in half to form the handle...I ALSO just used some of the already broken pieces to make handles  (because I am so resourceful). I kept the extra swirls and such...I thought it was cute and I am all about using what I have.

  • Place about 1/2 cup of candy melts in a microwave safe container and heat slowly on low in the microwave, stirring often, until melted (REFER TO THE PACKAGE DIRECTIONS). I work in small batches when melting the chocolate so that is stays hot and fluid.
  • Place a good amount of the melted chocolate into the zipper bag. Close the zipper side and snip off a very small corner. You are going to be using this like a pastry bag - you don't have to, you can dip or spoon it on...but I found it to be easier to use the bag.
edible tea cup
  • Place a nickel size ball of chocolate onto the cookie/biscuit
  • Set waffle cone atop and put down gently
  • Give these a minute or two to harden up and set.
edible tea cup
  • Run a line of chocolate up one side of the tea cup (you can also do drop/balls at the bottom and top)...attache pretzel/handle to the cup using this chocolate.
  • Let dry/harden.
edible tea cup

OPTIONAL: Now, I am NOT a choclatier type lady, but for fun, I tried to pipe am initial and a heart on the tea cup (I wish I would have thought of this before the Tea party!). It was super easy to do...and then I just added a Wilton pearl sprinkle as an accent. I won't be winning cupcake wars or a Food Network Challenge...but I like it.
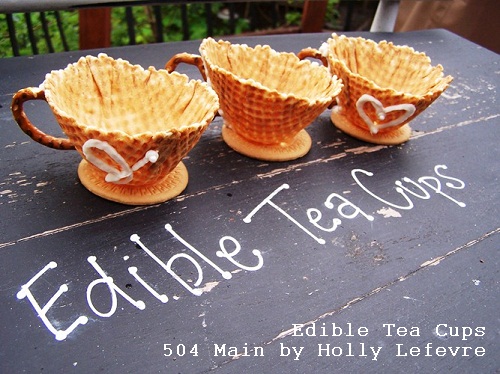

edible tea cup

And there they are!
I love these little guys!

edible tea cup
Add caption

Here is how yummy it looked with that chocolate mousse!

edible tea cup


Who wants to come over for a tea party????
 Signature
This post is written and created at 504 Main by Holly Lefevre

Trick or Treat Tuesday at Inside BruCrew Life
Create and InspireToday's Creative Bloghomemade crafts
 photo arrow.pngCONTINUE READING


Sunday, October 28, 2012

I L-O-V-E to plan parties and weddings.
Seriously, just about any reason, any occasion will do!
I love the magic and happiness that can be created
through some well thought out plans, a few perfect decorations...
and of course great guests!


 photo arrow.pngCONTINUE READING


Thursday, October 25, 2012

We had the most amazing Princess-y Party yesterday.
Eight girls dressed in the princess best come over for a Halloween Tea party!
I am still giddy about it. They were enchanting.


 I included a number of elements, but one of my favorites (and the girls got to take them home) were the placecards pumpkins. (the entire party will be posted by Monday but you can see the preplanning now!)

First I adore pumpkins of all sizes shapes, and colors,
but these mini white ones are magical to me!

I have tattooed pumpkins before and love this technique.
I feel that since TEMPORARY TATTOOS are made for human skin,
they curve and stick to the skin of a pumpkin really well...
so that is why I continue to use them.

I also LOVE tattoo paper because I can print detailed images
from amazing sources like The Graphics Fairy.
(see my original tattoo pumpkin post for those pumpkins)


Tattooed Pumpkin Tutorial
This tutorial is from my original Tattooed Pumpkin Post
BUT it has been UPDATED!
Here's what you need:
  • Pumpkins
  • You just need Temporary Inkjet Tattoo Paper/Kit - You can buy TEMPORARY INKJET TATTOO PAPER many places. Usually you get1-2 sheets per pack (You need one sheet of printable paper and one sheet of adhesive for each project).
  • I purchased this last batch from Robins Eggcetera on ebay - at the time, the best price for the most paper. Here is a link for Amazon:
  •  
    NOTE: I used 2 sheets of paper/adhesive to print 11 names and a Happy Halloween phrase too

MAKE IT!

  • Seriously, I just followed the package directions.Each product will have its own directions...just read them (yes, I actually did read the directions this time)
  • Decide on a design. For this project I simply used French Script from my regular old fonts and enlarged it to my desired size. But is you can (legally) download it, you can print it!
  • Print it out using your computer and printer. FOLLOW THE DIRECTIONS AND PRINT ON THE SHINY SIDE AND BE CAREFUL AS YOU HANDLE IT....IT NEEDS TO DRY THOROUGHLY. 
    • NOTE: If you are printing names or for most images - be sure to use the MIRROR Image option so the final product is exactly as you imagined it would be.
  • After the print has dried thoroughly, apply the adhesive. Remove the solid side of the adhesive backing and line up the edges of the printed sheet and adhesive. Smooth adhesive onto printed sheet. I used a credit card to firmly push out the air bubbles and get good adhesion.
  • Cut out the design - with your scissors.
  • Remove the clear backing from the adhesive when yo are ready to apply. It will be sticky once you do this.
  • Position the tattoo and rub/push into place.
  • Apply a moist cloth to dampen the tattoo and get the tattoo to stick (just like those temporary tattoos the kids get at parties). After about 20-30 seconds the top paper (the actually backing of the printed sheet) will loosed. If it is not loose, reapply the moist cloth/paper.
  • If some parts are sticking up, loose, not completely adhered, I was able to use my finger lightly to smooth things out.


Be sure to come back Monday for all the party details
 
Whatcha think? 
 Fun for Halloween...or heck all Fall long!
Signature 

This post is written and created at 504 Main by Holly Lefevre
Create and InspireToday's Creative Blog
 photo arrow.pngCONTINUE READING


blogger template