504 Main by Holly Lefevre
twitter facebook instagram bloglovin google plus pinterest youtube

Friday, October 19, 2012

I remember growing up and going to Disneyland.
There were only 3 princess at that time:
Cinderella (my favorite), Snow White, and Sleeping Beauty.
Now my daughter has a host of new princesses to love, adore, and be enchanted by.

Last year, our Halloween was all about Rapunzel.
Jules was just in love with her (and still is).
I would say this is when our princess magic began in this house.

For Thanksgiving we headed to Disneyland and attended the Princess Lunch at Ariel's Grotto. I am one cynical lady, but my heart melted seeing the excitement
and wonder in all of the girls faces at this lunch.
Disney knows how to make some magic for sure.
This year, my daughter and I are creating some magic at our home.
We have the extreme pleasure of hosting a Disney Princess Halloween Party for some of her friends. Jules has been so excited about this party from the moment we found out we would be hosting.

She really got in the spirit of all things princess by playing with the Royal Ball Augmented Reality app 2.0 (you can get this app too by searching "Disney Princess Royal Ball" in the iTunes App Store or Google Play store).

The whole family got in on the action with this app...
we eventually ended up with it downloaded on all three of our phones.
Of course Jules loved that.
 She was able to visit the Princess Boutique,
where she got to dress up like a princess.
and head to the Royal Ball in a carriage. 

Then we all went shopping at Walmart.
While shopping, we used the Royal Ball app, to unlock more activities and outfits. 
I do not think my kids have ever  had so much fun shopping.
It was like a treasure hunt to find the items they needed to scan.

We purchased party supplies, a princess costume,
and the recently released "from the vault" copy of Cinderella on Blu-Ray.
You can see all the goodies we found at Walmart by visiting my Google+ album and checking out my path to purchase.

Since this is Jules's party, I asked her for input on what she would like to see.
In no particular order, here were her requests:

"A fancy dessert. Just like the one we had at the Princess lunch!"
A Cinderella costume and high heels (glass slippers).
A Tea Party.
Dolls and treats for all of her friends.
Pink and sparkles.
Crowns.


PLANNING THE PRINCESS TEA PARTY
With Jules's requests in mind,  ultimately we decided to host a Disney Princess Halloween Tea Party, full of magical princess colors and sweet princess-like details.
Each girl has been invited to wear her favorite princess costume...
or select one when she arrives. 

When I host a party for my kids I try to keep it enchanting (or magical) but not go overboard. Now the overboard part is relative, I was a wedding planner after all! I like simple, inexpensive decorations that have drama, like tissue lanterns with ribbons hanging from the ceiling - inexpensive and easy to pull off but really take the party to another level visually...and my kids appreciate it.

I also like to use real plates, utensils, and tea cups, along with cloth napkins. I did purchase some Princess plates at the request of Jules for this party though.
 
I also try to stick to food with quality and high likability factors.
I keep the menu pared down, but with enough variety that the kids will like what is being offered.

I try to do one thing that is really special.
For our tea party, we are making edible tea cups.
(which are inspired by this pin)
I just love these (we have been practicing!)

Originally I wanted to make each place setting reflect a different princess...
but all of the girls wanted the same princess,
so I choose to use a Disney fabric that highlights all of the princesses
to make napkins and accessories, as well as to incorporate all
of the princess dress colors using different ribbons.
 
Of course there will be one craft...royal banners with the girls names.
And each girl will receive a crown to wear.
Shouldn't we all have a crown?

Jules is so excited...she has started a countdown calendar, and has proclaimed
"This is better than Christmas!"
I guess I have to agree - how much more fun can a 5 year old have
than shopping for princess costumes
and fantastical toys and surprises for her friends.

Be sure to experience the magic and wonder of #DisneyPrincessWMT
Disney on Twitter
Cinderella Facebook
Disney Princess on Facebook 

You can also join in on the princess fun by joining a
Disney Princess Party on Pinterest (now through 10/31)
or joining us for a Disney Princess Twitter Party (10/25/12 from 1-2EST).

Be sure to stop back by next week to see the party in all of its enchanted glory (I am so excited...I love planning parties!).
But for now....tell me...

Who is your favorite princess?

 Signature
This post is written and created at 504 Main by Holly Lefevre 

I am a member of the Collective Bias™ Social Fabric® Community. This shop has been compensated as part of a social shopper insights study for Collective Bias™ and Disney Consumer Products, Inc. #CBias #SocialFabric
 photo arrow.pngCONTINUE READING


Thursday, October 18, 2012

Please excuse the blurry images in the linky.
I have no idea what is happening!
Working on seeing what the problem is (darn it!)

Welcome to Tickled Pink!
Hi all!
Last week I forgot to post Tickled Pink...
I actually tried to stay off the computer all weekend
(I did an "OK" job at that).

Before I go on...

I have a cool giveaway happening!

 Now for my ramblings....
I have honestly felt burned out big time over just managing life.
I am trying to recapture what made me want to start this crazy blog and why I love it so much. One of the things I do love is seeing what amazing projects and recipes and stories everyone has to share...that is why I started Tickled Pink...
but alas I have been a pretty stinky hostess.

I have not made a firm decision yet, but this may be the last Tickled Pink...
or the last one for a few weeks.
I am reluctant to say that because I LOVE visiting the links.
I discover so many cool things that otherwise I might miss.

That's it...just had to say it!
And sorry...no features.
_____________________________________________________________________

NOW FOR TICKLED PINK!

A craft...a recipe...a tip...a party...a short story...a  poem...a  fashion find...a  favorite product...your favorite  post...whatever makes  your blog  fabulous!
That is what Tickled Pink is all about!
{and it does NOT have to be PINK}


Grab a button HERE!
or here!
PRACTICE PINK KINDNESS
504 Main

Will everyone do me a FAVOR????
Please visit the person linked before you...
Pretty Please!


1. Link  up...whatever makes  your blog  fabulous. Family Friendly please. Guess what? Your post does not have to be PINK!!  I reserve the right to remove posts that are offensive or do not  adhere  to the rules, without any discussion, at my discretion.
2. PLEASE LINK TO A POST URL, ****NOT YOUR MAIN URL****
3. Pretty please...add the Tickled Pink button or TEXT link back to the post* {people need  to know what the heck they are doing!}. 
4. Please visit a couple other links!


TICKLED PINK DOES NOT HAVE Categories anymore!
I won't banish you if you mess up, but try to link appropriately, pretty please!
By linking up...you grant me permission to use a photo if you are featured. Proper credit will be given.

Link Up what ever made you or your blog FAB this week!
This post is written and created at 504 Main by Holly Lefevre
 photo arrow.pngCONTINUE READING

Tuesday, October 16, 2012

Welcome to the third installment of
This is where I share some of my FAVORITE gadgets, tools, and small appliances. I may have received some of the items as part of a promotion at one point or another and some I have purchased...but I am only sharing the things I LOVE here!
(and sometimes there are giveaways - and this is one of those times)


This week we are talkiing coffee and about
The Scoop Single Cup Coffee Maker by Hamilton Beach 

Have I ever made it a secret that I L-O-V-E my coffee?
Well, in case you missed it...
I I L-O-V-E my coffee...all day long!
I thrive on it...and just love the ways its tastes.
photo: Hamilton Beach

Last Christmas, hubby and I had a "What were you thinking?" moment.
I had been wanting a single cup coffee maker (but resisted because of the waste of those little cups)...and he was watching morning TV and saw The Scoop from Hamilton Beach . I had no idea such a cool product existed and it was being offered for an amazing price (like seriously amazing) price. And, guess what he did...he did NOT buy it...
and it sold out in like no time at all!

Well, patience paid off, and after April's NYC trip, I finally got The Scoop thanks to Hamilton Beach (you can read all about me and The Scoop here!).

It has been months and I still love The Scoop. It makes great single serve cups of coffee. And...I get to use whatever brand or type of coffee I want and there is no waste - no special cups! Yeah...just amazing coffee!

Hamilton Beach also has a new coffee pot The Scoop Two Way Brewer - you get the best of both worlds - a single cup and a full pot. My regular coffee pot (which I keep for when company comes over) is about to go and this will be my next purchase!
photo: Hamilton Beach

The Scoop proudly sits on my counter and I use it multiple times a day...
and now you can WIN The Scoop Single Cup Coffee Maker for yourself! 


GIVEAWAY:
Open to shipping addresses in the continental U.S.
Opens 10/16/12 and runs through 10/24/12.
One winner will be selected randomly using rafflecopter's winner function

NOTE: I am using Rafflecopter right now for my giveaways. 
You can enter by logging in with Facebook OR by using your email.
The only mandatory entry is to leave a comment.
All others are optional.


   Signature
This post is written and created at 504 Main by Holly Lefevre

Disclosure: Hamilton Beach is providing The Scoop as a giveaway. BUT I LOVE The Scoop and this series is independent of any sponsors.
 photo arrow.pngCONTINUE READING


Monday, October 15, 2012

I pretty much never turn down the opportunity to entertain
(much to the chagrin of my husband).
Fall is my favorite season to do just that- our skies here are bright and sunny, the air is crisp and there are so many reasons for having guests over.


When guests arrive for a party of event I like to "be ready."
I have found that having beverages ready and waiting eases that initial party rush.
I use my party cart A LOT for this purpose.

I just hosted a DIY Vanilla Extract Party and in the coming weeks have some ladies coming over to  DIY everything from signs to jewelry. Not to mention the Halloween chili night! 
But, I will be prepared! With a little forethought you too can create a
Pick Your Poison Warm Beverage "Bar."


PREPARE YOUR BEVERAGES
Heat water and mix or brew a selection of beverages such as:
hot cocoa, warm apple cider or a pumpkin spice latte.

Add some whipped cream, pumpkin pie spice, cinnamon sprinkles,
or mini marshmallows for the guests to personalize their drinks.

But of course you must have great cups too!
Lifestyle Crafts to the rescue!
Using the drink sleeve, you cannot only dress up your cups but label them as well,
so that everyone knows what they are drinking!


I was inspired to create this "bar" by this super cute drink sleeve 
I received from Lifestyle Crafts.  
 (I think I love my Epic 6 machine (die cutter/letterpress) more than anything.)
DRESS UP THE CUPS:
  • Epic 6 or Compatible Die Cutter
  • Lifestyle Crafts Drink Sleeve Die
  • Paper/Cardstock - I used Canvas Corp. papers and black cardstock
  • Adhesive: glue stick, glue dots, double stick tape.
  • White ink pen or chalk ink or chalk
  • 12-16 oz cups

1. The whole process was simple. I ran my die through the die cutter . I choose to do one type of paper per type of beverage. Then I ran the black paper through the die cutter to make the ovals for labeling. Go visit Lifestyle Crafts for a great tutorial on how to die cut!

2. The die has a tab on the back for easy assembly and placement.
(HINT: if your cup is a bit smaller, just use some adhesive to make the drink sleeve smaller)

3. Write out the beverage choices on the ovals and affix to the drink sleeve.

NOTE: You can use the drink sleeve on many reusable coffee cups too. I happen to be using a recyclable cup because there are so many people coming over and some of the events are not at my home.

Isn't this FUN and EASY...and let me tell you, a set up like this is a huge time saver when you are prepping for the guests.

You can grab your own drink sleeve die at Lifestyle Crafts. It is a part of the new Wintertide collection and a great addition to the Fall and Winter holiday paperie!

Be sure to use the code 504main to get 20% off your order at Lifestyle Crafts!

What's your favorite warm beverage for Fall?

Signature 
This post is written and created at 504 Main by Holly Lefevre

This post contains affiliate links for Lifestyle Crafts. I was provided with product for review.
 photo arrow.pngCONTINUE READING


Wednesday, October 10, 2012

We are pasta lovers in this house.
Parmesan cheese...marinara...sauteed with veggies...
and of course my kiddos love meatballs.
These are our standards,
but I am always trying to find way to incorporate
new flavors and tastes into the pasta menu. 
After making my Easy Lentil Dip,
I have been feeling inspired to make a pasta dish with lentils.

 photo arrow.pngCONTINUE READING


Monday, October 8, 2012

Every year this little town of Pacific Grove, CA is host to the Butterfly Parade.
The parade welcomes the Monarch butterflies to the city, their winter home.
It also gives the elementary school children the opportunity to march in the parade dressed as lady bugs, sea otters, moon jellies, clowns, and patriots,
but the true attraction is the kindergartners all dressed as Monarch Butterflies.
It is a sight that even makes me cynical heart sing.


My boy walked in the parade 6 years ago, but this year it was my girlie's turn. She was so excited and wanted to wear something special. We also happened to be discussing Halloween at the same time...so like any good mother would do, I struck a deal.


With the hubby not working right now, the $100 fairy costumes were a bit extravagant...and I was trying tot talk her out of it...Then she wanted some new boots. The boots were only $20...so I had an idea...
"How about being a Monarch Butterfly Fairy for Halloween?"
Then you can wear the skirt for the parade...
and I already have the supplies to make the skirt...
so then you can get your boots.

Following me? I am not above wheeling and dealing with my kids!

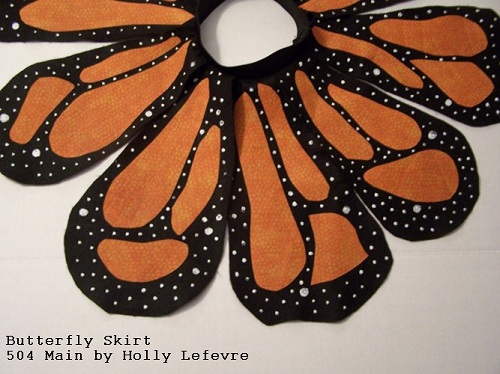
I knew I wanted to make a skirt and then stumbled upon this AMAZINGLY CUTE idea on for a twirly butterfly skirt on The Train To Crazy. I pinned it and waited and then got sewing (sort of).
photo from The Train to Crazy
FIRST: I will direct you to The Train To Crazy for the tutorial. This is where I got the idea for this skirt and the tutorial is great. If you refer to The Train to Crazy and Made (see references below) you will see great photos. My intent here is to tell you what I did differently - this was not my original idea. 

I did make a few adjustments (because I always do) and I could do a tutorial for a circle skirt (I did make patterns in the fashion industry for 10 years)... 
BUT there is no point in reinventing the wheel.

Here are the supplies I used and the tweaks I made to the process. I had no intention of blogging about this so I took very few tutorial photos.

SUPPLIES
  • 1-2 Yards of black felt  (about $6.00/yard). You can probably get by with one yard if you position the wings just right. My girl is 5 and has about a 19" waist. We had 9 wings on the final skirt. I could have added 2 more for more fullness...and still might.
  • 1 yard orange felt or other fabric. I used some pre-cut yardage from Walmart
  •  Heat N Bond (Ultra)
  • White Puffy Paint
  • 1 yard (or less) 2" Elastic
  • Black Thread
  • You will need a sewing machine (or sew by hand) and an iron/ironing board.


HOW TO:
1. Use the pattern and cut out 9 to 11 (or more as needed) wings from the black felt.

2. Cut manageable size squares of the orange fabric.

3. Follow the directions on the Heat N Bond and adhere it to the back side of the orange fabric.
 
4. Cut shapes out of orange (I just free-handed the shapes - they look best irregular anyway). I cut a few out, placed the on a few wing at a time and then cut more pieces to fit into the "puzzle."

5. Once happy, peel backing off the Heat N Bond and iron into place.
NOTE: I am not intending this skirt to be machine washed, so I am not concerned about the exposed edges or fraying, but the Heat N Bond adheres the fabrics really well and on other projects I have used this same method and had no issues. Appliqueing the pieces is also possible.

6. I did not make a circle skirt as a base to this skirt. My girlie just wore long bike shorts/leggings under it. This tutorial for a circle skirt from Made is excellent if you want to make a skirt, or for more directions in attaching the elastic, etc.

7. Layout your wings with each one overlapping the other by about 1/2". Run a basting stitch around the top of the wings.

8. Cut elastic 2" larger than the waist - 1" for give and 1" for seam allowance.

9. Sew elastic together, then fold elastic flat (see MADE tutorial) and stitch down each side.

10. Pin wings to the elastic. I pinned at center front and center back and then the sides. Then stretch the elastic and pin at the points in between.

11. Sew elastic to skirt wings - You need to stretch the elastic when sewing. I used a straight stitch and 1/2" seam allowance.

12.Trim threads and lay flat on a surface with the wings spread out. Depending on your wings, you may have to do this in multiple steps...

13. Use the puffy paint to make polka dots on the wings. My dots are not as opaque as I intended but I was in a time crunch (yep, I waited until the last minute). After accenting my wings, I went back and made a few of the dots larger. 

14. My dots were dry in about 6 hours and I had a super cute skirt for my girl.

Sorry I do not have a lot of photos but AGAIN, if you refer to The Train to Crazy and Made you will see great photos. My intent here is to tell you what I did differently.

The skirt was a huge hit with her and her friends. 

She twirled in it...


She ate cupcakes in it...

She marched and waved to the crowd...

 Signature 
 This post is written and created at 504 Main by Holly Lefevre
 photo arrow.pngCONTINUE READING


Thursday, October 4, 2012


Welcome to Tickled Pink!
I ENJOYED my real life a lot this week!
**We had three glorious days of hot weather and sun**
**I took my baby to the beach, 3 days in a row**
**I took a long walk with my hubby**
**I spent 3 hours having coffee with the ladies**
**We drank hot chocolate with colored marshmallows
(after spending way to long at the beach) with friends**
**I made a monarch butterfly skirt for the Butterfly Parade this weekend**
(for Jules, not for me!) 

I also made Pumpkin Pie Spice 

and Pumpkin Spice Lattes


What did you do?
_________________________________________________________________
The winner of the Sandra by Sandra Lee Indoor/Outdoor Electric grill  I shared in
FAVORITE THINGS KITCHEN EDITION 
is
Lisa from akawest

Early next week I have another edition of Favorite Things...and you will love it too!
_________________________________________________________________
Be sure to enter my current giveaway.
You will love it and so will your hair!
Clairol Professional Care and Styling Line ($100)

_____________________________________________________________________

THANK YOU for continuing to visit!
Sorry, I am behind on the features!

Sunny days were meant for playing outside!
_____________________________________________________________________

Here is a hint....going forward, those lovely bloggers with a link back or button for Tickled Pink/504 Main in the linked up post...
have a better chance of being featured!
**************************

NOW FOR TICKLED PINK!

A craft...a recipe...a tip...a party...a short story...a  poem...a  fashion find...a  favorite product...your favorite  post...whatever makes  your blog  fabulous!
That is what Tickled Pink is all about!
{and it does NOT have to be PINK}


Grab a button HERE!
or here!
PRACTICE PINK KINDNESS
504 Main

Will everyone do me a FAVOR????
Please visit the person linked before you...
Pretty Please!


1. Link  up...whatever makes  your blog  fabulous. Family Friendly please. Guess what? Your post does not have to be PINK!!  I reserve the right to remove posts that are offensive or do not  adhere  to the rules, without any discussion, at my discretion.
2. PLEASE LINK TO A POST URL, ****NOT YOUR MAIN URL****
3. Pretty please...add the Tickled Pink button or TEXT link back to the post* {people need  to know what the heck they are doing!}. 
4. Please visit a couple other links!


TICKLED PINK DOES NOT HAVE Categories anymore!
I won't banish you if you mess up, but try to link appropriately, pretty please!
By linking up...you grant me permission to use a photo if you are featured. Proper credit will be given.

Link Up what ever made you or your blog FAB this week!

This post is written and created at 504 Main by Holly Lefevre
 photo arrow.pngCONTINUE READING


blogger template