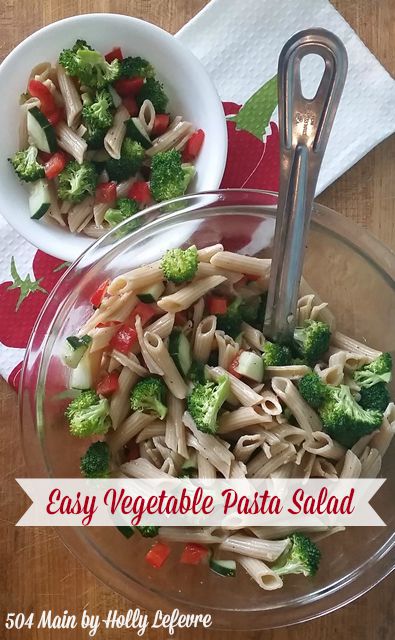
This family of mine LOVES pasta. I LOVE veggies (and they sort of do...sometimes..depending on the veggie). So what better way to give them the pasta they love and make mom happy than with a Perfectly Delicious Vegetable Pasta Salad. Not only is this salad packed of of nutritious veggies, but it has the heartiness of ultragrain quinoa pasta, tossed with your favorite dressing and kissed with some freshly grated Parmesan. This pasta salad is so versatile - it is great for lunchboxes, dinner on a warm evening, and a crowd-pleaser at picnics and barbecues (Labor Day is fast approaching!)
Showing posts with label summer. Show all posts
Friday, August 28, 2015
Labels:
broccoli,
cold lunch,
cucumber,
easy lunch,
hodgson mill,
italian dressin,
Newmans Own,
pasta,
pasta salad,
penne pasta,
potluck,
quinoa pasta,
recipe,
recipes,
red bell pepper,
summer,
Summer Party
Wednesday, August 7, 2013
We are a pasta family.
We love pasta...in all shapes and forms.
My kids favorite...bow tie!
My hubby's favorite...spaghetti!
My favorite...any!
What is a constant is that we use whole wheat pasta rich in whole grain
Good quality, tasty whole wheat pasta like Hodgson Mill Whole Wheat Pasta
can truly bring out the best in your pasta dish. I was excited to receive a selection of Hodgson Mill Whole Wheat Pastas to create a new recipe for their Summer Pastabilities contest. (Um, yeah...I just might have won the Have a Grain Holiday Contest!)
Monday, June 10, 2013
This is a crazy easy and super fun project that (almost) anyone can do...and it is pretty cheap (and I have shared this before here...but it is too good not to share again!). I first did this project with my son when we moved into our house 8 years ago. I had quite a few of (single) fence
pickets left over from our "keep the doggie from jumping the fence project," and we knew no one in the neighborhood yet so my imagination was the source of entertainment for my son.
We loved being outside in our garden, so we grabbed our fence pickets, paint, and all sorts of other objects and goodies and made garden angels.
This is a more recent recreation of that project!
(I was not a crazy blogger back then)
We loved being outside in our garden, so we grabbed our fence pickets, paint, and all sorts of other objects and goodies and made garden angels.
This is a more recent recreation of that project!
(I was not a crazy blogger back then)
Labels:
craft,
create,
DIY,
family,
garden,
guest post,
kids,
outdoor paint,
outdoors,
projects,
summer
Monday, May 20, 2013
I am exhausted and taking care of some personal business...
and trying to help out with end of the school year activities for my kids.
My kids only have 6 days of school left so I am REALLY thinking about SUMMER!
(I need to get on it. A.S.A.P.!)
Here is one of the activities we did last year
and it has continued to be a popular choice for my kids year round.
(This is a repost)
Eight years ago today we moved into this house.
and trying to help out with end of the school year activities for my kids.
My kids only have 6 days of school left so I am REALLY thinking about SUMMER!
(I need to get on it. A.S.A.P.!)
Here is one of the activities we did last year
and it has continued to be a popular choice for my kids year round.
(This is a repost)
![]() |
| Image credit: bortn66 / 123RF Stock Photo |
Eight years ago today we moved into this house.
My son and I knew no one and were bored...very bored.
I used our moving boxes to make houses, dump trucks, and rocket ships.
The rocket ship actually survived for 3 years!
I had forgotten all about this...
Until my memory was jogged when I was at the Maker Faire with Delta Faucet. We came across the Berkeley Institute of Design's Crowd-Powered Bridge Design and Research Project. I was reminded of the rockets ship and thought this would make a fun summer activity for my kids and their friends.
![]() |
| The exhibit at the Maker Faire |
Fast forward to today...we had some friends over to celebrate my son's birthday
and I had tons of cardboard...
and thought, let's give this a shot!
We had 2 groups of kids:
older kids ranging from 9-11 years old and
younger kids ranging from 5 to 8 year old.
At first they seemed hesitant, but ready to give it a go.
I showed them the photo I took at the Maker Faire
and the older kids went with it-
taping, ripping, and building with cardboard for a couple of hours.
The younger kids needed a bit of help, but also got in on the action...
first they drew some picture to decorate it -
that was more important to the little ones.
Here is how to do it and what you need
to make your own bridge/ramp/contraption!
SUPPLIES
Cardboard: boxes, shoe boxes, poster board, craft paper - whatever you have around! I picked up a few rolls of kraft/shipping paper at the dollar store just in case.
Tape: No need to get high quality tape...I bought the $1 tape and clear packing tape from the dollar store too. I figured the cheaper tape was fine, since I do not plan on keeping these forever. (just FYI - it has a strong scent so use in a ventilated area)
Scissors (optional)
MAKE IT!
- Gather the kids.
- Suggested they collaborate first and draw a picture so each kid could visualize the end goal. I think this helps the kids combine forces more easily.
- Explain to them they are to work together to create a bridge or tower or whatever you want using only the cardboard and tape. At the Maker Faire the goal was to get a small toy car to roll over the bridge and for it to be high enough for a toy cardboard boat to go under the bridge. Our goal was that Jules could ride her trike under it.
- Give them each a roll of tape.
- Then turn them loose....it took a bit for them to start clicking...but then they did and worked together to build this bridge (or ramp).
Well, my visions of a grand bridge did not quite materialize.
The kids bridge looked like a ramp.
They proceeded to launch the empty rolls of tape and Hot Wheels cars and Zoobles off of it. The Trike did fit under it...but most importantly, they had fun in the sun for hours and worked together to get a finished project.
The little kids also created a smaller version of a "bridge"
(or something!) and enjoyed it too.
Moral of the story...
everyday recyclables and things laying around the house and provide hours of fun and teach the kiddos a little something this summer!
The kids actually asked when they can do this again...
now, that is a winner idea in my book!
Do you have any simple, cheap, and easy idea for summer?
Tuesday, June 26, 2012
Seven years ago today we moved into this house.
My son and I knew no one and were bored...very bored.
I used our moving boxes to make houses, dump trucks, and rocket ships.
The rocket ship actually survived for 3 years!
![]() |
| Image credit: bortn66 / 123RF Stock Photo |
I had forgotten all about this...
Until my memory was jogged when I was at the Maker Faire with Delta Faucet. We came across the Berkeley Institute of Design's Crowd-Powered Bridge Design and Research Project. I was reminded of the rockets ship and thought this would make a fun summer activity for my kids and their friends.
![]() |
| The exhibit at the Maker Faire |
Fast forward to today...we had some friends over to celebrate my son's birthday
and I had tons of cardboard...
and thought, let's give this a shot!
We had 2 groups of kids:
older kids ranging from 9-11 years old and
younger kids ranging from 5 to 8 year old.
At first they seemed hesitant, but ready to give it a go.
I showed them the photo I took at the Maker Faire
and the older kids went with it-
taping, ripping, and building with cardboard for a couple of hours.
The younger kids needed a bit of help, but also got in on the action...
first they drew some picture to decorate it -
that was more important to the little ones.
Here is how to do it and what you need
to make your own bridge/ramp/contraption!
SUPPLIES
Cardboard: boxes, shoe boxes, poster board, craft paper - whatever you have around! I picked up a few rolls of kraft/shipping paper at the dollar store just in case.
Tape: No need to get high quality tape...I bought the $1 tape and clear packing tape from the dollar store too. I figured the cheaper tape was fine, since I do not plan on keeping these forever. (just FYI - it has a strong scent so use in a ventilated area)
Scissors (optional)
MAKE IT!
- Gather the kids.
- Suggested they collaborate first and draw a picture so each kid could visualize the end goal. I think this helps the kids combine forces more easily.
- Explain to them they are to work together to create a bridge or tower or whatever you want using only the cardboard and tape. At the Maker Faire the goal was to get a small toy car to roll over the bridge and for it to be high enough for a toy cardboard boat to go under the bridge. Our goal was that Jules could ride her trike under it.
- Give them each a roll of tape.
- Then turn them loose....it took a bit for them to start clicking...but then they did and worked together to build this bridge (or ramp).
Well, my visions of a grand bridge did not quite materialize.
The kids bridge looked like a ramp.
They proceeded to launch the empty rolls of tape and Hot Wheels cars and Zoobles off of it. The Trike did fit under it...but most importantly, they had fun in the sun for hours and worked together to get a finished project.
The little kids also created a smaller version of a "bridge"
(or something!) and enjoyed it too.
Moral of the story...
everyday recyclables and things laying around the house and provide hours of fun and teach the kiddos a little something this summer!
The kids actually asked when they can do this again...
now, that is a winner idea in my book!
Do you have any simple, cheap, and easy idea for summer?
Tuesday, June 5, 2012
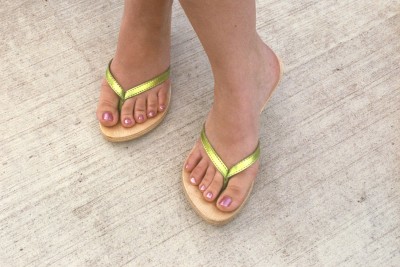
Sandal Season is HERE!
And if you are like me,
you are realizing that your feet may need a little love
before they make their Summer debut.
Image credit: devilpup / 123RF Stock Photo
I remember the days when I had time to get a mani and pedi every week.
Yes, every week.
That was my indulgence...
and I needed it.
I like to be barefoot,
which is not so good for maintaining pretty feet.
But for my own health,
I have learned it is not just about having pretty looking feet,
but I need healthy feet too.
I never really thought about the importance of the health of my feet before.
"Skin is the largest organ in your body and its your first line of defense against infection."
So dry cracked feet is not only "not pretty" but also not healthy.
O'Keeffe's for Healthy Feet is formulated with to provide better absorption of moisture through thick skin like on the feet and the heels.
You can read more about O'Keeffe's 3 Step Process
for promoting the healing of dry, damaged skin here.
I have been using O'Keeffe's for a few weeks now and have noticed a remarkable difference in my feet. The cracked heels are gone, my feet feel smooth and they even look good! (I will spare you a photo of my feet!).
With O'Keeffe's for Healthy Feet I feel like I do a little good for my feet every day!
AND
Now, you can try O'Keeffe's for Healthy Feet
and get ready for Sandal Season!
GIVEAWAY CLOSED
GIVEAWAY with 5 WINNERS
Each winner gets 5 jars of O'Keeffe's for Healthy Feet
Open to U.S. Residents
Runs from 6/5/12 through 6/10/12 at midnight PST
Enter- MANDATORY
Sign up for the O'Keeffe's newsletter...come back and leave me a comment letting me know you did
Optional, but highly recommended....Be sure to Like Okeefe's on facebook so you can keep with the latest tips and ideas for keeping your feet and hands healthy!
Optional : Share the giveaway on Twitter/Facebook or your blog (leave the url here)
Sample tweet: Sandal Season is here! Get healthy feet with @O'Keefes Company. Great giveaway @504main! www.504main.com"
Optional: Tell me hat is your favorite nail/toe polish color!
GIVEAWAY CLOSED
Monday, May 7, 2012
One time in elementary school,
my class was asked to draw a picture of a family tradition…
and I drew a picture of my family grilling.
At the time I felt embarrassed that this was my tradition…
but overtime, I grew to realize it was about so much more than grilling.
The fact that we grilled virtually year round and
our home was always open to friends and family brought
us together and gave us a lot of fond memories.
my class was asked to draw a picture of a family tradition…
and I drew a picture of my family grilling.
At the time I felt embarrassed that this was my tradition…
but overtime, I grew to realize it was about so much more than grilling.
The fact that we grilled virtually year round and
our home was always open to friends and family brought
us together and gave us a lot of fond memories.
I grew up in Southern California, where it is seemingly always 70 and sunny,
so it makes perfect sense to grill year round!
Grilling was not reserved for the weekend or a camp out or a holiday…
so it makes perfect sense to grill year round!
Grilling was not reserved for the weekend or a camp out or a holiday…
it was a mealtime staple.
I want my kids to have the same fun memories -
setting the table, helping pull the meal together,
selecting a special treat to grill after the meal.
It is one more way to bring us all together as a family and
capture that bit of happiness that lies in every day.
setting the table, helping pull the meal together,
selecting a special treat to grill after the meal.
It is one more way to bring us all together as a family and
capture that bit of happiness that lies in every day.
Wednesday, August 10, 2011
When it comes time to plan a family vacation - no matter how long or short, how exotic or not, how near or far, there is a lot of discussion at our house - everyone has an opinion...even the four year old! I am basically a traveling chicken - I do it and I always end up loving it (yes, my hubby drug me to Europe and I complained and now I cannot wait to take the kids).
My son, however, has the traveling bug in his genes (his meimaw does too). Forget camping, he dreams of active vacations and adventures like a European Bike tour. Seriously, when he reads a book about a locale or activity he wants to experience it.
Tuesday, June 21, 2011
I have crashed and burned.
Whenever I finish a MAJOR project,
I always crash and burn for about one week.
It is almost like all the things that I could not concentrate
on before are all swirling in my head - AT ONE TIME!
I have a gained some much needed perspective in the last couple of months,
but I still have a bajillion projects to finish,
some super FAB giveaways to get to,
and
an A-M-A-Z-I-N-G (beyond belief) trip to
Delta Faucets to tell you about.
Seriously I had no idea how much fun faucets and plumbing could be! Of course all the people at Delta, the company who brought us bloggers there, and the bloggers who were on the trip were also A-M-A-Z-I-N-G!
In the meantime, a friend of mine (like a real life one who I have know since I was 7 or so) made the s'mores bark I posted about during the holidays for a teacher gift...
and it was a DUH moment for me.
She is brilliant!
I think I got stuck in the fact that it had bark in the title and bark is for Christmas, right?
So, here is my s'mores bark recipe (again)...
perfect for taking on a picnic or to a party when you cannot make the real thing!
If you have read my blog before, you know I am a sucker for anything s'mores related.
Whenever I finish a MAJOR project,
I always crash and burn for about one week.
It is almost like all the things that I could not concentrate
on before are all swirling in my head - AT ONE TIME!
I have a gained some much needed perspective in the last couple of months,
but I still have a bajillion projects to finish,
some super FAB giveaways to get to,
and
an A-M-A-Z-I-N-G (beyond belief) trip to
Delta Faucets to tell you about.
Seriously I had no idea how much fun faucets and plumbing could be! Of course all the people at Delta, the company who brought us bloggers there, and the bloggers who were on the trip were also A-M-A-Z-I-N-G!
In the meantime, a friend of mine (like a real life one who I have know since I was 7 or so) made the s'mores bark I posted about during the holidays for a teacher gift...
and it was a DUH moment for me.
She is brilliant!
I think I got stuck in the fact that it had bark in the title and bark is for Christmas, right?
So, here is my s'mores bark recipe (again)...
perfect for taking on a picnic or to a party when you cannot make the real thing!
If you have read my blog before, you know I am a sucker for anything s'mores related.
If you have never read my blog before, well, now you know too!
{and I am not the only one in the family with this issue.}
I love this idea for the holidays, but seriously how perfect is this for summer.
S'mores and summer go together right?
So, when you cannot have the real thing,
make up some s'mores bark to take along.
YUM!
S'mores and summer go together right?
So, when you cannot have the real thing,
make up some s'mores bark to take along.
YUM!
(please excuse the photo - quite possibly my worst food photos ever!)
INGREDIENTS/SUPPLIES
(adapted from a recipe found at about.com)
- 16-17 full graham crackers (about 1 and 1/2 sleeves)
- 1/2 cup butter
- 1 cup packed brown sugar
- 2 cups chocolate chips
- 1 1/2 cups mini marshmallows
- Rimmed baking sheet
- OPTIONAL: nuts, bacon, candies
DIRECTIONS
- Preheat oven to 350F.
- Cover baking sheet with aluminum foil.
- Spray foil with non-stick cooking spray.
- Arrange graham crackers in a single layer on the cookie sheet. Place them right up next to one another. You may have to cut or break apart some of the graham crackers.
- Melt/Stir butter and brown sugar together in a saucepan over a medium flame.
- Bring the mixture to a rolling boil, being sure to stir constantly to avoid separating or scorching.
- Once at a constant boil, pour the mixture over the graham crackers. Use a spatula to spread it over the crackers in an even layer.
- Place toffee in the oven for 5 minutes. It should be bubbling all over.
- Remover from the oven and cool for one minute.
- Sprinkle the chocolate chips on top of the hot toffee and let rest for about 1 minute, then spread with a spatula or knife.
- Once evenly spread, sprinkle mini marshmallows on top (I press them down just a little).
- FOR FUN! I put the entire cookie sheet in the broiler for 2 minutes to toast the marshmallows and then popped them in the refrigerator to firm up. The toasty taste is the best!
ADDITIONAL TOPPINGS:
You can also add other favorite items like toasted pecans...or what about joining the bacon craze and crumbling some crispy bacon on top for bacon s'mores bark!
Subscribe to:
Posts (Atom)