When I plan a party, I like to serve really good food (don't we all)
I don't get overly overcomplicated or fancy-schmancy,
but amazing tastes with great variety is important.
Where I do veer from this rule is the dessert...
I like to do something quirky, fantastical, or just plain fun!
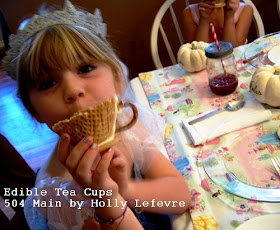
For the Princess Tea Party, I whipped up a simple little dessert
and served it in an Edible Tea Cups and it was a hit!
I promise I whipped these up in no time at all
(really I made 15 in less than 20 minutes!)
(really I made 15 in less than 20 minutes!)
And, I will be totally honest with you..this is not my area of expertise...
I am sure someone could make them super fancy or elaborate,
but this worked for the girls, it worked for me...
and this method is really EASY!
I am sure someone could make them super fancy or elaborate,
but this worked for the girls, it worked for me...
and this method is really EASY!
My friend Randi at Dukes and Duchesses shared a photo of some adorable miniature tea cups on Facebook a few months ago and I hunted down the full tutorial from She Knows.
I made a few using that tutorial (the tutorial is really easy to follow),
but I need to change things up. Here is why:
1 - I wanted something bigger
2 - Having Miniature Reese's Peanut Butter Cups in my house is dangerous!
(the original tutorial uses them)
3 - I was not getting the results I wanted....as I cut (or tried to cut) those sugar cones, well, lets just say there was a lot of breakage.
So, I thought that has to be am easier way for people like me who are impatient and do not have mad knife wielding skills. So I created my version!
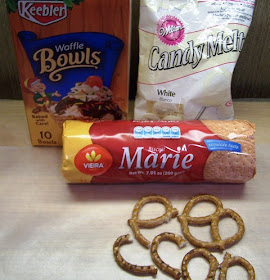
INGREDIENTS AND SUPPLIES
- 1 sandwich or quart size zipper bag
- Wilton Candy Melts. I used white you can use whatever flavor/color you want.
- Keebler waffle cups/bowls (this was the only brand at my local stores)
- Biscuit cookies. The BEST deal I found was at World Market...99 cents for a package! You can use an assortment of other cookies found at the local grocery store, you can even use sandwich cookies and scrap the inside cream out. My second choice was Marie Lu Biscuit
- Large Pretzel Twists
- Optional: Wilton Pearl Sprinkles
- Optional: Chocolate Mousse Recipe
- Optional: Whipped Cream
MAKE IT!
I PROMISE THIS PROCESS GOES QUICKLY...Really, I have no patience, and I did it! (again I made 15 min about 20 minutes)
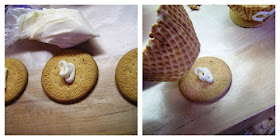
Here is a "dry fit" photo for you to see how they go together!
- Layout the supplies for a few tea cups at a time.
- When it comes to the pretzels (handles) I gently cut them in half to form the handle...I ALSO just used some of the already broken pieces to make handles (because I am so resourceful). I kept the extra swirls and such...I thought it was cute and I am all about using what I have.
- Place about 1/2 cup of candy melts in a microwave safe container and heat slowly on low in the microwave, stirring often, until melted (REFER TO THE PACKAGE DIRECTIONS). I work in small batches when melting the chocolate so that is stays hot and fluid.
- Place a good amount of the melted chocolate into the zipper bag. Close the zipper side and snip off a very small corner. You are going to be using this like a pastry bag - you don't have to, you can dip or spoon it on...but I found it to be easier to use the bag.
- Place a nickel size ball of chocolate onto the cookie/biscuit
- Set waffle cone atop and put down gently
- Give these a minute or two to harden up and set.
- Run a line of chocolate up one side of the tea cup (you can also do drop/balls at the bottom and top)...attache pretzel/handle to the cup using this chocolate.
- Let dry/harden.
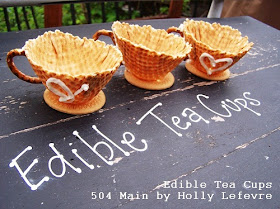
OPTIONAL: Now, I am NOT a choclatier type lady, but for fun, I tried to pipe am initial and a heart on the tea cup (I wish I would have thought of this before the Tea party!). It was super easy to do...and then I just added a Wilton pearl sprinkle as an accent. I won't be winning cupcake wars or a Food Network Challenge...but I like it.
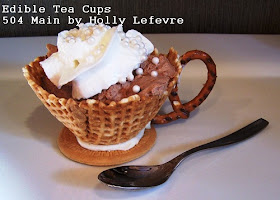
And there they are!
I love these little guys!
 |
| Add caption |
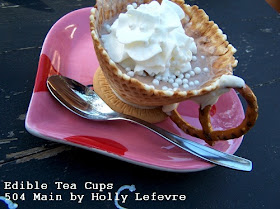
Here is how yummy it looked with that chocolate mousse!
Who wants to come over for a tea party????
This post is written and created at 504 Main by Holly Lefevre
Trick or Treat Tuesday at Inside BruCrew Life
Trick or Treat Tuesday at Inside BruCrew Life





I love these SO much, Holly! My girls would love to have these on their tea table. I'm pinning! {P.S. thanks for the link!}
ReplyDeleteYou did a brilliant and creative job making these. Lovely and I am sure they are tasty too.
ReplyDeleteThese are adorable. I would love these at my upcoming 40th birthday party! :)
ReplyDeletePinning in hopes of making them someday myself.
I would love to come to a tea party at your home! :) The cups are so adorable!
ReplyDeletetotally cute love it!
ReplyDeleteI feel like these would be SO CUTE for even a wedding or baby shower too. Love it!
ReplyDeleteThose are adorable! Very creative! {HUGS!} Clydia {THREE MANGO SEEDS}
ReplyDeleteThese are brilliant and adorable. What a fun idea and looks like they were very much enjoyed!
ReplyDeleteI do! I'll have dark chocolate, please.
ReplyDeleteThese are so cute...I have to share with my nieces!
I'll come....pick me, pick me, pick me! (that seems a little too anxious, doesn't it?)...what adorable teacups, Holly!
ReplyDeleteHolly those are so adorable! My girls would LOVE those at a party. Thinking I'm going to have to try it out at their next b-days.
ReplyDeleteThese are TOO cute, Holly!!
ReplyDeleteOh my goodness they are too cute. What a great idea. :) Megan
ReplyDeleteThat is the most adorable thing!! And so clever! Awesome :)
ReplyDeleteThese are just too cute! What a fun dessert!
ReplyDeleteI love these, too cute!! And they actually look like something I could make. :) Pinning so I don't forget!
ReplyDeleteOh my word so cute!!! Sharing :)
ReplyDeleteThese are so so cute Holly!! I love them! What a fun addition to your princess party!
ReplyDeleteAbsolutely love this Holly. How special and these could work nicely for so many parties.
ReplyDeleteThose are so adorable!!! I definitely want to come over for a tea party with those cups:-) And I love the initial with a pearl...so cute!!!!
ReplyDeleteOh my goodness! My girls would LOVE to make these! Such a cute idea. :)
ReplyDeleteAre you kidding me?? These are SO CUTE!!!! I did not see these when you posted them. I am fixing that now and subscribing! Mom OnTimeOut just posted on FB and I flipped out! (especially when I thought you had just made them AFTER that amazing bakeware and I thought you might be "ROBO HOLLY"). LOL
ReplyDeleteI seriously think these are the best things ever. I can't get enough of cute tea cups...but edible?? YES! Great job, Holly!!
ReplyDeleteHow incredibly perfect this will be for my daughter's Alice in Wonderland party :D
ReplyDeleteHow absolutely perfect these will be for my daughters Alice in Wonderland party!!!
ReplyDeleteOh Holly these are the days I hate that I only have boys! These are adorable
ReplyDelete