


I am perpetually at a loss for storage in my house...for everything.
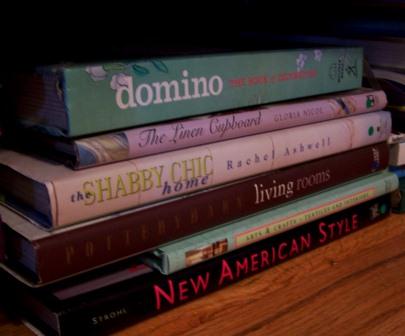
Some things I can hide...somethings I choose to hide, and some things I just need to tidy up. Well, my books (lots and lots of books) are some of those things that I want out and want access to, but just needed to be tidied up a bit.
Some things I can hide...somethings I choose to hide, and some things I just need to tidy up. Well, my books (lots and lots of books) are some of those things that I want out and want access to, but just needed to be tidied up a bit.

The look of the cart is very much inspired by my new "old" crate I made last year.
My daughter loves this and asked me to make her one for her room. I am kind of lovin' the functionality and the faux-vintage look...I see many many more in my future!

So, let's get to it! Trust me - it is not hard to do!
Supplies
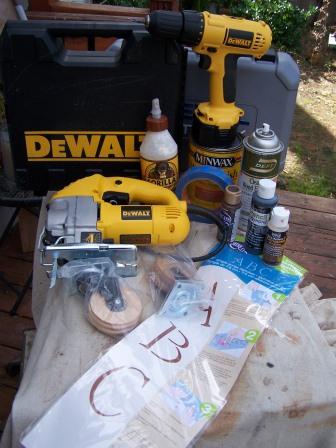
- DeWalt Cordless Drill from Rockler
- DeWalt Heavy Duty Compact Jigsaw Kit from Rockler
- 4 Designer Wooden Casters, Maple (and screws included) from Rockler
- Deft Wood Finishing Spray, Rockler
- Gorilla Glue, Wood Glue
- 5: 1" x 6" x 6' pine boards
- 2: 1" x 8" x 6' pine boards
- 1 box 2" interior wood screws
- DecoArt Stencils, Simple Script 3"
- DecoArt Stencil Paint (or Acrylic Paint) in Black
- DecoArt Staining and Antiquing Medium
- DecoArt American Acrylic in Burnt Umber
- Dremel Multi-Max or other sander or sand paper (a sander works quickly and well)
- Wood stain (I used Minwax Colonial Maple)
- Old paint brush (for staining) or staining pad
- Rags
- Stencil Brush
- Painters tape
- Screwdriver
- L-Square
- Ruler
- Pencil
- Tape measure
DIY IT!
I am not super-duper DIY Lady...but this was relatively easy to do. In fact I built it all in 1.5 hours, and that included some redesigning. You can download a simple sketch and wood list RIGHT HERE!
CUT:


STENCIL


SAND


STAIN


ANTIQUE


NOTE: Most important thing - MEASURE TWICE, cut once, or rather build once. I had a little mishap...my cart ended up being too tall to fit under my buffet (I still have not figured out how that happened!)...so what to do...well, I unscrewed the box from the base, measures up 1" from the original screw holes/baseline and then screwed it back in. This dropped the front of my box lower to the ground, which did not really bother me. I then had some screw holes that were showing. I did not want to fill them in with wood putty...so I decided to place "extra" wood screws into the holes. They do nothing for the support/function, but in the end I actually think the double screws give an interesting detail.

I am not super-duper DIY Lady...but this was relatively easy to do. In fact I built it all in 1.5 hours, and that included some redesigning. You can download a simple sketch and wood list RIGHT HERE!
CUT:
- Cut 3 of the 1" x 6" board down to 64" long.
- Cut 5 lengths or the 1" x 6" board into 16.5" pieces
- Cut the 1" x 8" boards down to 66"
- On one of the 8" boards, find the center, mark over 2.5 inches on each side of the center; draw a curve between those 2 points. This will become an opening/pull. Cut with the jigsaw. Sand well.
- Layout the 3- 64" boards, lining them up.
- Place three of the 16.5" lengths perpendicular on the longer boards. One board is centered on the longer boards and the other 2 boards are placed on either side, 12" in from the edges.
- Once happy with placement, mark and then use the Gorilla Glue Wood Glue and run a line of glue between the boards and onto the shorter boards before screwing in (is this 100% necessary, maybe not, but I really wanted a strong secure base, and the glue combined with the screws will do that)
- Screw the shorter lengths into the longer lengths (this becomes the bottom of the cart)
- Flip it over and dry place the front/back and sides (just to be sure you have cut correctly).
- Screw in the sides, along the bottom to the base of the cart.
- Flip over, propping the base of the cart on the sides and the bottom of the cart is facing up - the front and backs are designed to hang down farther hang the sides
- Place the front and back in position, lining up the tops of the boards to the tops of the sides and screw into the base and then into the sides.
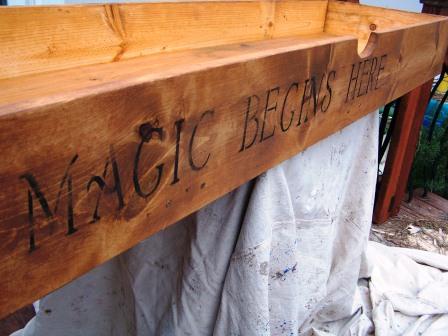
- Stencil the letters. I chose "Magic Begins Here..." because we all love to read and I believe magic lies in books.

- I justified my wording to the left and mad a light pencil line 2" down from the top of the cart to line up the top of my letters.
- Place the stencil on the front board, spelling out your quote/wording and continue until you are down. Keep some rags/towel handy for wiping the stencil.
- NOTE: I chose to stencil before sanding and staining because I wanted it to appear as though it was an old cart and the age was on top of the wording.

SAND
- Sand away! Sand the entire cart. I hit the top edges and corners really "hard" and rounded them out a bit. I also sanded the cut out/pull really, really well.
- When I sanded the lettering it appears to have smeared, but it came right off and was perfect!
- Once finished sanding, wipe clean with a cloth before staining.
- Prepare your stain...I just used a basic color and painted it on with a paint brush. Let sit for a minute or so and then wipe off with a rag.
- Repeat this all over the cart. Let dry.
ANTIQUE
- Now on to antiquing...Mix a 1:1 ratio of DecoArt Staining and Antiquing Medium with Americana Acrylic in Burnt Umber. Mix very well.
- Use a rag or a paint brush and brush onto the cart (do a piece at a time). Let sit for a minute and wipe off. Do this all over the cart.
- I then went back and painted it on heavier on the corners and other areas for "wear."
- Spray all over with Deft Wood Finishing Spray
 |
| This is with stain and antique medium |
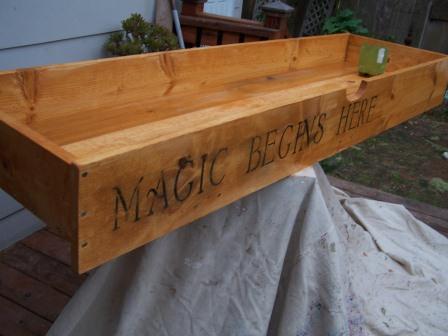 |
| Just to compare with the antiqued look, this is stain only. |
CASTERS
- Once dry flip over and place the casters. I placed the casters just inside (toward the center) or the outside support boards.
- Be sure when you place them they have room to swivel and move - I almost screwed mine in right next to the boards...guess what no swivel then!
NOTE: Most important thing - MEASURE TWICE, cut once, or rather build once. I had a little mishap...my cart ended up being too tall to fit under my buffet (I still have not figured out how that happened!)...so what to do...well, I unscrewed the box from the base, measures up 1" from the original screw holes/baseline and then screwed it back in. This dropped the front of my box lower to the ground, which did not really bother me. I then had some screw holes that were showing. I did not want to fill them in with wood putty...so I decided to place "extra" wood screws into the holes. They do nothing for the support/function, but in the end I actually think the double screws give an interesting detail.
 |
| Here is a sample of how I had to re-position my screws..oops! |
Why am I telling on myself?
To show you that you can fix a big ole mess up and make it look pretty!
Now, here's a recap:
Now, here's a recap:
BEFORE: stacks of books
AFTER: tidy rolling cart
NOW...
Flip it over,
fill it with magical books
and all done!
fill it with magical books
and all done!


Go check out The DIY Club


I love ANYTHING with wheels! This is just genious! Great job!
ReplyDeleteI love it! This looks beautiful and adds so much. Great job.
ReplyDeleteNot only is this a great idea, it looks awesome!
ReplyDeleteAwesome!! I have so many, many books that are here....and there....and over there too. This would is perfect! Nice job!
ReplyDeleteHoly cow you are awesome!! That takes some real skill
ReplyDeleteI love it! What a great way to gain storage!
ReplyDeleteOh you clever girl! That is so cool!
ReplyDeleteAnd if you want to share, come join the party!
ReplyDeleteHolly this looks GREAT!
ReplyDeleteAnd I love that it's so easy.
Holly!!! That is just the coolest!! I love the book box - the lettering is so cute. And the fact that it's on wheels is so great!!
ReplyDeleteLove, love, love. This is awesome!
ReplyDelete-Kendall
{Songbirdsandbuttons.blogspot.com}
Super cute and a great way to use the space!
ReplyDeleteThis is so awesome! Now if I only had the perfect piece of furniture to do this with... :)
ReplyDeleteSo gorgeous Holly!!! I love the words especially, such a fun detail!
ReplyDeleteThis is coolness, Holly! Love it!
ReplyDeleteStroke of genius.
ReplyDeletePinned it and spotlighted you on my Facebook page today, Holly.
ReplyDeleteSo when will you be delivering my cart?
I love how clever and cute this is. A great idea for some extra storage! Great job Holly!
ReplyDeleteFantastic solution. What a great way to use up every inch of space, but still look tidy doing it =)
ReplyDeleteI am taking a few minutes tonplay catch up with some posts. I am so glad to have seen this. It's awesome. Inlove the idea.
ReplyDeleteRuth
What a great look; I love that you took it all the way to the bottom drawer too!
ReplyDeleteMackenzie :)
This is such a great idea! And I love the quote you chose for the front. I feel that way about reading too!
ReplyDeleteI love this idea - we have completely run out of book space again, and think this is the way forward!
ReplyDeleteWould love for you to link up at Empty Your Archive. We have a special focus this week on decluttering and organisation, Alice @ Mums Make Lists x