


Birdies chirping in the warming air make me think of Spring and the promise and hope of a glorious season, so I decided to make myself a Little Birdie Banner, complete with a couple of Chicks (I made these last year, but just updated the DIY, so check it out.) and little birdie houses, and some of my favorite fabrics!

When I was at the Craft and Hobby Association show in Los Angeles about one month ago, one of my absolute FAVORITE finds was Canvas Corp. They have everything - burlap, canvas, fabric shapes, paper, pillow and rug blanks...I really could go on and on. You can visit them on facebook or their blog! I was lucky enough to get some of their product and then had the honor of being asked to be a judge in the Canvas Corp Banner Contest.
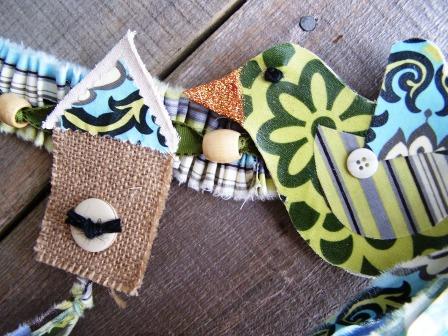
Well, Of course I had to make a banner...and here is my creation. I made this a virtually no sew banner (lots of Liquid Stitch and Fabric Mod Podge, but you could easily sew some this too). I also embellished with a worn-ish look. There are so many ways to personalize a banner like this and Canvas Corp has so many options for shapes and even different sizes for you to make your own banner.

Supplies
- (Canvas Corp) 2 sets of mini burlap shapes, tags (burlap) - the mini rectangles or mini squares would work too.
- (Canvas Corp) 1 set of mini canvas shapes, diamonds, cut in half
- Jute cord (Canvas Corp)
- Buttons (or your choice of embellishment)
- Wood beads (or your choice of embellishment)
- Fabric Mod Podge
- Liquid Stitch
- Chick on a Stick Template - COMING SOON - TECHNICAL DIFFICULTIES WITH PDF's. SEE NOTE AT TOP OF BLOG POSTING SECTION AND EMAIL ME AT holly504main@yahoo.com. I WILL SEND YOU THE FILE.
- Fabric (I used fat quarters of Amy Butler fabric. Scrap book paper)
- Fabric strips (approx 8 for the banner), 1.5 " wide x 20" long
- Fabric Strips of ribbon lengths (20-30) for adorning/embellishing
- Scissors
- Pinking shears (optional)
- Needle with large eye (heavy duty)
- Glitter is orange
- Ribbon
- Plastic hoops (from notions department) - optional
DIY IT!
- Start with your Chicks so that they can dry while you work with the rest.
- Cut out 2 of each shape from the template. I like to use 3 coordinating patterns. I also cut one shape of the bird and wing out of heavy art paper (poster board, etc. would work) to adhere the fabric to.


- Using Fabric Mod Podge, coat the paper then lay down the full chick silhouette on top; Give it a top coat of Fabric Mod Podge
- Then lay down the center portion of the chick; secured with Fabric Mod Podge; Give it a top coat of Fabric Mod Podge.

- Then the wing; Give it a top coat of Fabric Mod Podge

- Let dry.
- Add Fabric Mod Podge (or glue) to the beak area and cover with glitter.

- For the eye you can use puffy paint, acrylic paint or I used the black cord to make an eye by simply knotting it a few times.
BIRDHOUSES- DIY

- Cut mini diamond shapes in half for the top of the bird house - I used pinking shears here.

- At this point, I made a template for a small triangle for the small fabric triangle that attaches to the top of the bird house - I used pinking shears all around this shape (this step is optional...I wanted some color). The roof of the birdhouse will be canvas if not.

- Position/layout the bird houses without glue - roof (half diamonds) on top of house (min tags/rectangles). Once happy with shape, get gluing!
- Apply a line of Liquid Stitch along the bottom of the diamond shape and adhere to the rectangle; let dry.

- Use the black cord and go trough the button holes 2-3 times, leaving ends on the top of the button. tie off in a knot and trim edges.

- Use Liquid Stitch to adhere buttons to the burlap.

- Cut a length of ribbon about 2 yards (I would rather have extra than not enough!).
- Begin about 18"-20" from an end, make a knot and slip on a wood bead...continue this about every 4-4.5 inches until.... you have created a space for all of your birdhouses.

- When the birdhouses are all dry, run a line of Liquid Stitch on the back of each house at approximately the same place the edge of the roof hits on the front.

- Attach to the ribbon (in between the wooden beads); let dry.

- I decided the ribbon was not enough...I took some coordinating striped fabric and ripped 1.5 inch strips (if you snip/cut parallel to the selvage you can easily rip the length of the fabric w/o cutting - I like this "rough" edge). Of course you can simply cut or use pinking shears if you want a "cleaner" effect.

- I thread some of the black jute onto my heavy duty needle and loosely stitched down the middle of each strip and then pulled to get a ruffle/pleat effect. I did them all on the same strand of jute cording, but it you need to add it is super easy to tie a piece on.


- Lay down the ruffle ribbon right above the birdhouses to see if you need to loose or tighten the ruffles. You should have some ruffley fabric and ribbon (that is attached to the birdhouses) that extend past the actual part where the bird houses are (sorry this is hard to explain); lay it flat/straight and Liquid Stitch those two together, with the ribbon being in the center of the ruffley fabric - this is where the Chick goes.

- When the birdhouses are "dry" positioned, add Liquid Stitch and adhere to the ribbon/ruffle.
- You are going to lay the birdhouses on top of the ruffley fabric. You want one wooden bead to be at each end. When happy with how the ruffles look and placement, flip the houses over and run a line of liquid stitch on the ribbon (that is on the bird house). Carefully flip over the birdhouses and place them on the ruffley fabric.
The back of the banner

- Once in position, run Liquid Stitch over he remaining ribbon (approx. secure 6") and secure that to the ruffley fabric. There may still be ribbon hanging..leave it for now.
- There should be I put magazines on the finished project while they dry so that I am sure they adhere. Let dry completely.

- Small plastic hoops sewn to the back of the banner (sorry about this photo)would be for hanging. You can also use ribbon, fishing line - whatever you have.

- Hang banner up and then decide if you want to embellish it more. I am using some more fabric strips (cut an 1/2") to hang from the banner. I tied 3-5 strips together and Liquid Stitched them to the back.
- As "extra" embellishment, add a phrase "Welcome" or "Spring" or even your last name would be really fun.

So, Ta-Da! That is my Little Birdie Banner...I have not made a lot of banners, so I am sure there may be an easier way to accomplish the same goal, but I was also sort of creating as I went, and needed to leave my options open.

How do you like it!?
What reminds you of Spring?


So adorably perfect for spring! I love it!
ReplyDeleteThat is so cute! It's just whimsical and fun ... I love it.
ReplyDeleteVisiting from The CSI Project.
That is adorable. I have been thinking of making Spring Banner. May just have to try that. I love it on your door.
ReplyDeleteSweet! I'd love to feature it in a future post!
ReplyDeleteOh, Holly, this is soooo cute! I love the mix of burlap, brights colors, and ruffles. So fun! Perfect for spring!
ReplyDeleteGreat "chicks on line", in addition to the chicke on sticks! You are a patient crafter for sure. I would have wadded those birds up in a ball & sent them flying off on their own.
ReplyDeleteI love how it turned out! So sweet and soooo Springy! Thanks for sharing how to make it:)
ReplyDeleteHolly, I love it! Great patterns, colors, and embellishments!
ReplyDeleteHolly - your banner is adorable! It so reminds me of spring and is a welcoming addition to your front door.
ReplyDeletereally cute holly...i would love to string this across my garden...we have a frame for the sugar snap peas that would be perfect. i need to get working on it..heading over to canvascorp's site now!
ReplyDeleteOh Holly! This is BEAUTIFUL! Seriously. I LOVE it! WOW!
ReplyDeleteThanks for linking up to Making It With Allie! I can't wait to see what you have for next week!
AllieMakes.Blogspot.com
I love this this is so cute Holly! And the material you made it with fits so perfectly! Super gorgeous.
ReplyDeleteHolly, so funny I stopped by.. when your doing more adorable birds.. last easter your handmade adorable birds were on my table as a centerpiece... I love the material you used this time.. so creative.. I love your header.. did you do it?? If you did and you have time.. I would love some help LOL I love banners... I will be trying to visit more.
ReplyDeletemiss you
This is so sweet and cheerful! I love that you added ribbons of torn strips to hang from each little house!
ReplyDelete~Amanda
Holly, you did it again! Lovin' it.
ReplyDeletei have been in the car so long today and am tired and lazy, so you get one comment for 3 posts... love this banner and the other one! they are so happy, bright, springy! and the poem is adorable!
ReplyDeleteOH my goodness, that banner turned out so, SO SOOO cute!!!!!
ReplyDeleteAwesome idea!
This is absolutely fabulous! I love it!!!
ReplyDeletetotally tweet-riffic! seriously, you created something original and lovely xoxo
ReplyDeletemalia
Wow Holly that's just darling!!! I LOVE the ribbon you used and the little burlap houses! So seriously springy and cute!!
ReplyDeleteHolly, that is beyond words! So precious and perfect for spring! :)
ReplyDeleteholly--too cute! I love how this turned out. I missed it the first time around!
ReplyDeletegail
Lovely! So many ways this can be customized! Thanks for sharing!
ReplyDeleteSaved this in my feed for a while & shared it today on my blog. Love the colors & the burlap!
ReplyDeleteI would love for you to stop by!
Amanda
frillsandfrolic.blogspot.com
So cute Holly! I love the little birdies! What a fun banner to bring spring in!
ReplyDeletexoxo,
Amy
p.s. thanks for linking up to the Point of View link party! :)
So sweet! I love it!
ReplyDeleteI adore this banner! I love burlap, and all the little details you added really make it special. Thanks so much for linking up to the Point of View spring link party. I featured your banner on my blog today:
ReplyDeletehttp://www.gwennypenny.com/2011/04/point-of-view-features-and-theme-for.html